SP310
User Manual
Rev.1.0
15
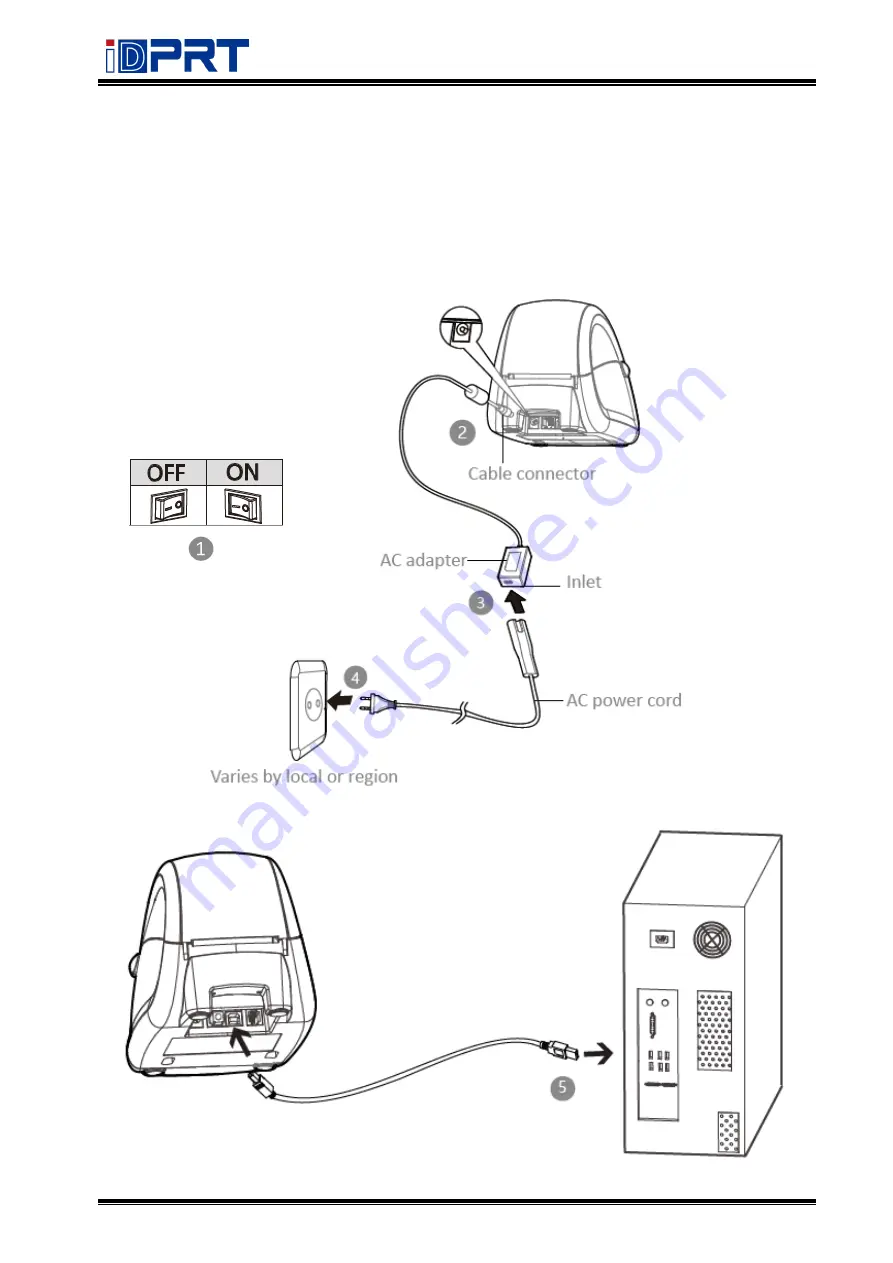
3.2 Power/USB Connection
1. Make sure the printer is in the
“Off”.
2. Connect the AC adapter to the cable connector.
3. Connect the AC power cord to the outlet.
4. Connect the other end of the AC power cord into the socket outlet.
5. Connect the USB cable to the printer and PC.
Summary of Contents for SP310
Page 9: ...SP310 User Manual Rev 1 0 9 1 2 Appearances and Components...
Page 10: ...SP310 User Manual Rev 1 0 10 1 3 Dimension...
Page 19: ...SP310 User Manual Rev 1 0 19 4 3 Serial Interface PIN No Signal name 1 RTS 2 RXD 3 GND 4 TXD...
Page 34: ...SP310 User Manual Rev 1 0 34 3 Speed 4 Test...
Page 35: ...SP310 User Manual Rev 1 0 35 5 Media Handling 6 Media Type...
Page 36: ...SP310 User Manual Rev 1 0 36 3 Click Watermark it recommends to use BMP format...
Page 37: ...SP310 User Manual Rev 1 0 37 4 Click Halftone Click Brightness to adjust the brightness...
Page 40: ...SP310 User Manual Rev 1 0 40 3 Click Ports then select the port according to your needs...
Page 41: ...SP310 User Manual Rev 1 0 41 4 Click Advanced to set the available time for the printer...
Page 46: ...SP310 User Manual Rev 1 0 46 4 Type in the password of your computer...
Page 48: ...SP310 User Manual Rev 1 0 48 8 Under Printer Scanner printer SP310 is available...
Page 56: ...SP310 User Manual Rev 1 0 56 Access Control Select the item for detailed setting...
Page 59: ...SP310 User Manual Rev 1 0 59 Ink Toner Levels...
Page 64: ...SP310 User Manual Rev 1 0 64 8 Click Finish...
Page 74: ...SP310 User Manual Rev 1 0 74 4 Click Next 5 Click Install...
Page 77: ...SP310 User Manual Rev 1 0 77 3 Set up the page according to your needs then click Next...


