


Part 1 – Introduction
17
eSATA Connection
Connect external hard drives to these ports.
Do not connect or disconnect an eSATA device while
the NVR is powered on. To connect an eSATA device,
first turn off the NVR and unplug the power cable.
Connect the eSATA device and then power the eSATA
device first and then NVR back on. To disconnect an
eSATA device, first turn off the NVR and unplug the
power cable. Turn off the eSATA device and then
disconnect the eSATA connection cable.
USB Port
Support Super-speed USB 3.0 (5Gbps), High-Speed USB
2.0 (480Mbps) and Full Speed USB 1.0 (12Mbps) for
transfer.
Audio Connection
Connect the audio device to the
AUDIO IN
port and
speakers with a built-in amplifier to the
AUDIO OUT
port. Use the
AUDIO OUT
port to listen to audio from
network cameras.
Use the
AUDIO IN
port to establish two-way
communication with cameras.
•
This NVR does not feature a built-in audio amplifier
unit and therefore requires the user to purchase a
speaker system with a built-in amplifier separately.
It's possible to connect an amplified audio source to
the NVR, but microphones that do not have a built-
in amplifier will not function properly if connected
to the NVR directly. If this is the case, connect the
microphone to the NVR via a pre-amp.
•
Check your local laws and regulations on making
audio recordings.
Monitor Connection
Connect to the
VGA OUT
or
HDMI
port.
•
Use a certified cable marked with an HDMI logo
when using HDMI. The screen may not display or
a connection error may occur if you do not use a
certified HDMI cable.
•
It is recommended that you use the following HDMI
cable type.
–
High-speed HDMI Cable
–
High-speed HDMI Cable with Ethernet
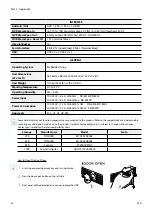
Alarm Connection
Connect alarm connectors to these ports.
Press down on the button and insert the cable into
the opening. Release the button and then pull on the
cable slightly to ensure it is held securely in place. To
disconnect the cable, press down on the button again
and pull the cable out.


