


Part 1 – Introduction
11
4
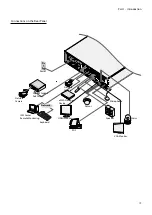
USB Ports
●
Storage Device Connection
Connect an external USB hard drive or a USB flash
memory device to one of the USB ports for use with
the Clip Copy feature. The external storage device
should be placed as close to the NVR as possible.
It is recommended that you use a connection
cable that is no longer than 180cm in length. Use
the connection cable included with your external
storage device to connect the device to one of NVR's
USB ports. For more information on Clip Copy, refer
to the
Clip Copy in the operation manual
.
●
Peripheral Device Connection
Use the USB ports to connect peripherals such as a
USB mouse to the NVR. You can also use a USB-to-
serial converter and connect multiple text-in devices
to the NVR at the same time.
For USB flash memory devices, the NVR supports
the FAT32 file format only.
5
Power LED
Lights up while the main unit is in operation.
6
Front Door Lock
By using enclosed door-lock key, front panel
can be detachable to replace the HDD. For more
information on how to replace the HDD, refer to the
7
Rack Mount Ears
The ears can be used for rack mount.
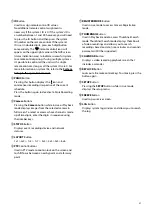
Port Number of HDD Drive
Refer to the following port number of HDD drive.
Group
1
Group
2
HDD Installation Precautions
To reuse the HDD which was used as a RAID, low-level
format the drive. Otherwise, it is recognized as a RAID
error and the data of all the connected HDDs may be
deleted.
Make sure to turn off the power before you add, remove
or replace the HDD.
RAID Configuration Precautions
It is possible to configure a raid represented by odd
number on consecutive disk drives.
Various combinations of RAID can be configured
according to the following conditions.
●
RAID 1
: Two consecutive hard drives (RAID
configurations represented by disk drives 1, 3, 5 and 7).
●
RAID 5, RAID 10
: Four consecutive hard drives (RAID
configurations represented by disk drives 1 and 5).
●
RAID 6
: All hard drives (RAID configuration
represented by disk drive 1).
•
When configuring RAID, you must use HDDs with
the same capacity and of the same model.
•
While RAID is rebuilding due to degradation, do
not remove a HDD to configure the RAID. If you
remove it, the data of all the connected HDDs may
be deleted.
1
5
7
2
4
6
8
3
Group1
Group2


