background image

8

Classic LX, RS - 

Installation

GENERAL

IMPORTANT.

 It is absolutely ESSENTIAL to ensure, in practice,

that products of combustion discharging from the terminal
cannot re-enter the building or any other adjacent building
through ventilators, windows, doors, other sources of natural air
infiltration or forced ventilation/air conditioning.

If this should occur, the appliance MUST  be turned OFF,
labelled 'unsafe' and corrective action taken.

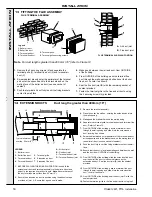
TERMINAL

The terminal assembly can be adapted to accommodate various
wall thicknesses.  Refer to Frame 4 - Unpacking.

AIR SUPPLY

Detailed recommendations for air supply are given in
BS.5440:2. The following notes are for general guidance:

1.

It is NOT necessary to have a purpose provided air vent in
the room or internal space in which the boiler is installed.

2.

If the boiler is to be installed in a cupboard or compartment,
permanent air vents are required (for cooling purposes) in
the cupboard/compartment, at both high and low levels. The
air vents must either communicate with room/internal space,
or be direct to outside air. The minimum effective areas of
the permanent air vents, required in the cupboard/
compartment, are specified as follows and are related to
maximum rated heat input.

3.

Both air vents MUST communicate with the same room or
internal space or MUST be on the same wall to outside air.

4.

In siting the air vents care must be taken to avoid the
freezing of pipework.

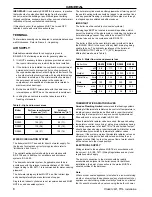
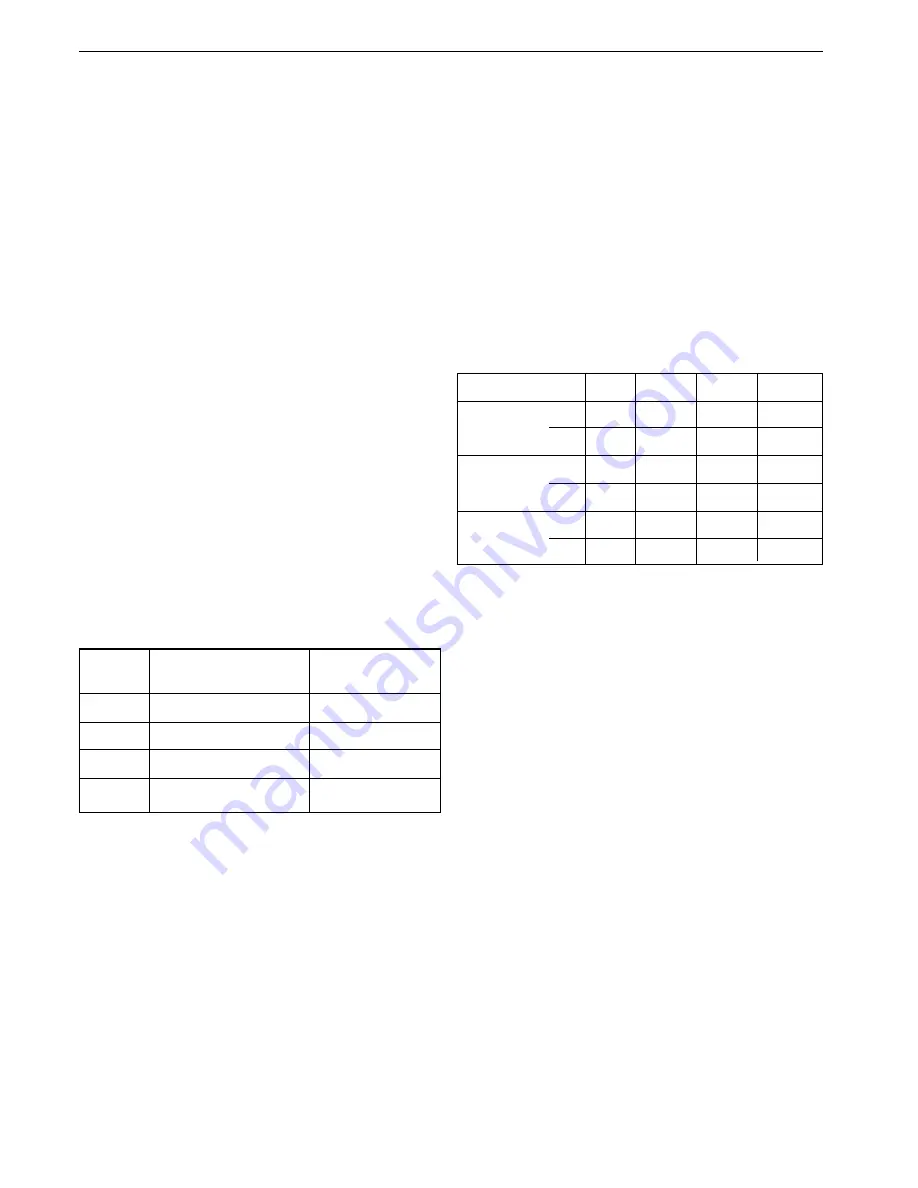
Table 4 - High and low vent areas

WATER CIRCULATION SYSTEM

The boiler must NOT be used for direct hot water supply. For
the types of system and correct piping procedure refer to
'Introduction' and Frame 1.

The central heating system should be in accordance with
BS. 6798 and, in addition, for  smallbore and microbore
systems, BS. 5449.

The domestic hot water system, if applicable, should be in
accordance with the relevant recommendations of BS. 5546.
Copper tubing to BS. 2871:1 is recommended for water carrying
pipework.

The hot water storage cylinder MUST  be of the indirect type
and should preferably be manufactured of copper.

Single feed, indirect cylinders are not recommended and MUST
NOT be used on sealed systems.

THERMOSTATIC RADIATOR VALVES

Caradon Plumbing Limited

 recommend that heating systems

utilising full thermostatic radiator valve control of temperature in
individual rooms should also be fitted with a room thermostat
controlling the temperature in a space served by radiators not
fitted with such a valve, as stated in BS. 5449.

When thermostatic radiator valves are used, the space heating
temperature control over a living / dining area or hallway having
a heating requirement of at least 10% of the boiler heat output
should be achieved using a room thermostat, whilst other rooms
are individually controlled by thermostatic radiator valves.
However, if the system employs thermostatic radiator  valves on
all radiators, or two port valves without end switches then a
bypass must be fitted in order to ensure a flow of water should
all the valves be in the closed position.

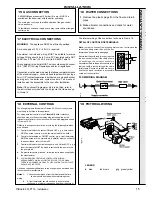
ELECTRICAL SUPPLY

Wiring external to the appliance MUST be in accordance with
the current I.E.E. (BS. 7671) Wiring Regulations and any local
regulations which apply.

The point of connection to the mains should be readily
accessible and adjacent to the boiler, except for bathroom
installations; the point of connection to the mains MUST be
situated outside of the bathroom.

Note.

Where a room sealed appliance is installed in a room containing
a bath or shower then the appliance and any electrical switch or
appliance control utilising mains electricity should be so situated
that it cannot be touched by a person using the bath or shower.

The hot water cylinder and ancillary pipework not forming part of
the useful heating surface should be lagged to prevent heat loss
and any possible freezing - particularly where pipes run through
roof spaces and ventilated underfloor spaces.

IMPORTANT.

The boiler must be vented 

(not on sealed systems.)

Draining taps MUST be located in accessible positions, which
permit the draining of the whole system - including the boiler and
hot water storage vessel. They should be at least 1/2" BSP
nominal size and be in accordance with BS. 2879.

The boiler is fitted with a special drain plug (provided) to drain
the BOILER ONLY, in the event of the system drain plug being
unable to do so. The hydraulic resistance of the boilers, at
MAXIMUM OUTPUT with an 11

0

C (20

 0

F) temperature

differential, are shown in Table 5.

Table 5 - Water flow rate and pressure loss

Boiler Size

RS230

RS240

RS250

RS260

Boiler

kW

8.8

11.7

14.7

17.6

Output

Btu/h 30 000

40 000

50 000

60 000

Water flow

l/min

11.4

15.2

19.0

22.8

Rate

gal/h

150

200

250

300

Pressure

mbar

24.0

22.0

34.0

45.0

Loss

in wg

9.6

9.0

13.6

18.0

Boiler

Air from room/internal

Air direct

Space cm

2

 (in.

2

)

Outside cm

2

 (in.

2

)

RS230

102 (16)

51 (8)

RS240

135 (21)

68 (11)

RS250

170 (26)

83 (13)

RS260

198 (31)

102 (16)

Summary of Contents for Classic LXRS 230

Page 1: ......

Page 2: ...Classic LX RS Installation CAUTION To avoid the possibility of injury during the installation servicing or cleaning of this appliance care should be taken when handling edges of sheet steel component...

Page 3: ...INIMUM mbar in w g 4 0 1 6 8 7 3 5 9 7 3 9 12 0 4 8 pressure HOT MID mbar in w g 8 5 3 4 12 0 4 8 12 1 4 9 14 0 5 6 MAXIMUM mbar in w g 14 5 5 8 15 0 6 0 15 0 6 0 16 5 6 6 Seasonal Efficiency SEDBUK 7...

Page 4: ...ymbols IE Ireland GB United Kingdom Countries of destination PMS Maximum operating pressure of water C12 A room sealed appliance designed for connection via ducts to a horizontal terminal which admits...

Page 5: ...ated input not exceeding 60 kW BS 5449 Forced circulation hot water systems BS 5546 Installation of gas hot water supplies for domestic purposes 2nd Family Gases BS 5440 Part 1 Flues for gas appliance...

Page 6: ...nds of the gravity flow and return pipes and fit a 22 mm to 28 mm copper connection at the boiler gravity flow and return connections in order to run the gravity circuits in 28 mm pipe Front clearance...

Page 7: ...GAS SUPPLY The local gas supplier should be consulted at the installation planning stage in order to establish the availability of an adequate supply of gas An existing service pipe must NOT be used...

Page 8: ...m thermostat controlling the temperature in a space served by radiators not fitted with such a valve as stated in BS 5449 When thermostatic radiator valves are used the space heating temperature contr...

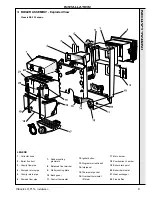
Page 9: ...ermostat 12 Igniter button 13 Programmer optional 14 Interpanel 15 Thermostat pocket 16 Overheat thermostat if fitted 17 Main burner 18 Combustion chamber 19 Boiler drain point 20 Boiler thermostat 21...

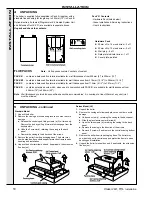
Page 10: ...e painted 5 UNPACKING continued Standard Model 1 Unpack the boiler 2 Remove the casing as follows and place to one side to avoid damage a Release the controls pod fixing screws a 3 full turns only Rem...

Page 11: ...ements to avoid cavitation Should these conditions not apply either lower the pump position or raise the cistern above the minimum requirement specified by Caradon Plumbing Limited Note A cold water f...

Page 12: ...cover plate screw holes 7mm 9 32 and insert the plastic plugs 4 Remove the template from the wall IMPORTANT The wall must be of suitable load bearing capacity 1 Cut the appropriate hole in the wall fo...

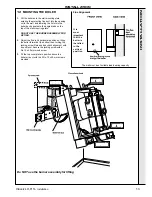
Page 13: ...boiler back panel onto the angled tabs on the top of the wall mounting plate DO NOT USE THE BURNER ASSEMBLY FOR LIFTING 2 Adjust the flue to its horizontal position by tilting the boiler forward at t...

Page 14: ...emaining sachet of sealant provided 7 Fasten the terminal grille to the flue and air ducts using the 2 securing screws 6 provided 5 Terminal grille 6 Terminal grille securing screws Legend 1 Boiler ai...

Page 15: ...separation in both poles or a plug and socket serving only the boiler and system controls The means of isolation must be accessible to the user after installation Note If the optional Programmer Kit i...

Page 16: ...torage heater and can normally be left at least 24 hrs without frost damage However if parts of the pipework run outside the house or if the boiler will be left off for more than a day or so then a fr...

Page 17: ...point E and connect a gas pressure gauge via a flexible tube 4 Turn the gas control knob clockwise until resistance is felt and then release WAIT FOR 3 MINUTES 5 Push in and retain fully depressed the...

Page 18: ...ing bottom panel Standard Model Draw attention to the lighting instruction label affixed to the controls pod door 3 Explain and demonstrate the lighting and shutting down procedures 4 The operation of...

Page 19: ...placement of components the boiler casing must be removed Frame 30 Deluxe model LX Standard model 31 BURNER AND AIR BOX REMOVAL 1 Remove the screw retaining the burner support bracket to the combustio...

Page 20: ...ush the sliding catch in and lower the glass fascia to the closed position Standard Model Close the controls pod door 34 RE ASSEMBLY 33 CLEANING THE BURNER AND PILOT ASSEMBLY Refer to Frame 31 for ill...

Page 21: ...e piezo unit Refit the new unit and re assemble in reverse order 6 Refit the control box assembly 7 Replace the boiler casing 8 Check the operation of the new piezo unit SERVICING When replacing any c...

Page 22: ...on of the control thermostat 41 CONTROL THERMOSTAT REPLACEMENT 1 Refer to Frame 36 2 Unclip the thermostat capillary from the clips situated on the back panel 3 Remove the thermostat phial from the po...

Page 23: ...hield is refitted 7 Replace the boiler casing 8 Check the operation of the thermocouple SERVICING 42 OVERHEAT THERMOSTAT REPLACEMENT 1 Refer to Frame 36 2 Slacken the screw at the thermostat pocket an...

Page 24: ...e the keyhole fixings Pull the assembly downwards to clear the water pipes from the back panel 11 Remove the 4 rubber grommets from the top of the back panel to facilitate the fitting of the new heat...

Page 25: ...er casing 7 Set the programmer to the desired programme and check the operation of the boiler 1 Refer to Frame 36 2 Remove the old seal from the casing surround 3 Thoroughly clean the casing surfaces...

Page 26: ...require resetting Does the pilot now stay alight YES NO Clean the contacts and reconnect securely Replace the overheat thermostat NO NO Replace the gas valve NO Have you confirmed that the system con...

Page 27: ...lary 1 113 193 27 308 012 Thermostat knob1 013 909 30 308 523 Boiler casing assembly white stove enamel with sightglass and foil insulation Standard model only 1 079 932 31 308 524 Controls casing doo...

Page 28: ...END Numbers up to 44 relate to the B G spares list 28 Thermostat pocket 32 Wall mounting plate 33 Back panel 35 Balanced flue terminal 37 Programmer optional 39 Overheat thermostat if fitted 100 Boile...

Page 29: ...29 Classic LX RS Installation SHORT LIST OF PARTS 57 BOILER CASING ASSEMBLY 56 SHORT PARTS Standard Model Deluxe Model...

Page 30: ...01482 492 251 Fax 01482 448 858 Registration No London 322 137 Registered Office National Avenue Kingston upon Hull HU5 4JN A subsidiary of Caradon p l c Technical Training The Caradon Plumbing Limit...

Page 31: ...be giving away a free boiler for the five best ideas every year to be selected by our Technical Director Please complete this form using extra sheets if required and post it or fax it to us on 01482...

Page 32: ...ease arrange for me to join an Ideal factory tour Range guides required The Ideal Guide a specifier s and installer s introduction to the Ideal domestic boiler range The Ideal Householders Guide to as...

Reviews: