


26
Harrier GTS -
Installation & Servicing
INSTALLATION
har9089
3
1
2
3
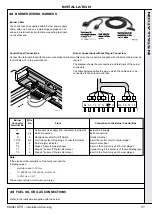
36 INSTALLING THE MAINS AND CONTROL WIRING
1.
Route the mains supply in at the
rear, along one of the cable trays
and up through the opening in the
top front panel.
2.
Route any remote sensor cables
similarly in the other cable tray.
3.
Secure the cables with the cable
ties provided.
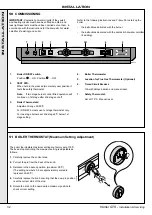
37 INSTALLING THE CONTROL PANEL
1.
Route the sensors through the left hand opening in the top
front panel.
2.
Route the burner leads through the same opening in the top
front panel.
3.
Lower the control panel onto the location buttons nearer the
front and slide the control panel forwards.
har7019
4
5
5
4.
Remove the three screws from the rear of the
control panel and remove the top/rear cover.
5.
Secure the control panel to the casing top
front panel with two self tapping screws and
shakeproof washers provided.
6.
Pull the mains cable and any other sensors into
the control panel through the appropriate opening
ready to make the connections.
har9088
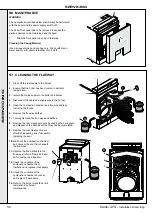
230V / 50Hz
1
2
3
INST
ALLA
TION


