background image


22


Installation and Servicing

SECTION 2 - INSTALLATION

A** - See Diagram in

Section 1.16

Extended centre line

155

(200)

IMPORTANT.


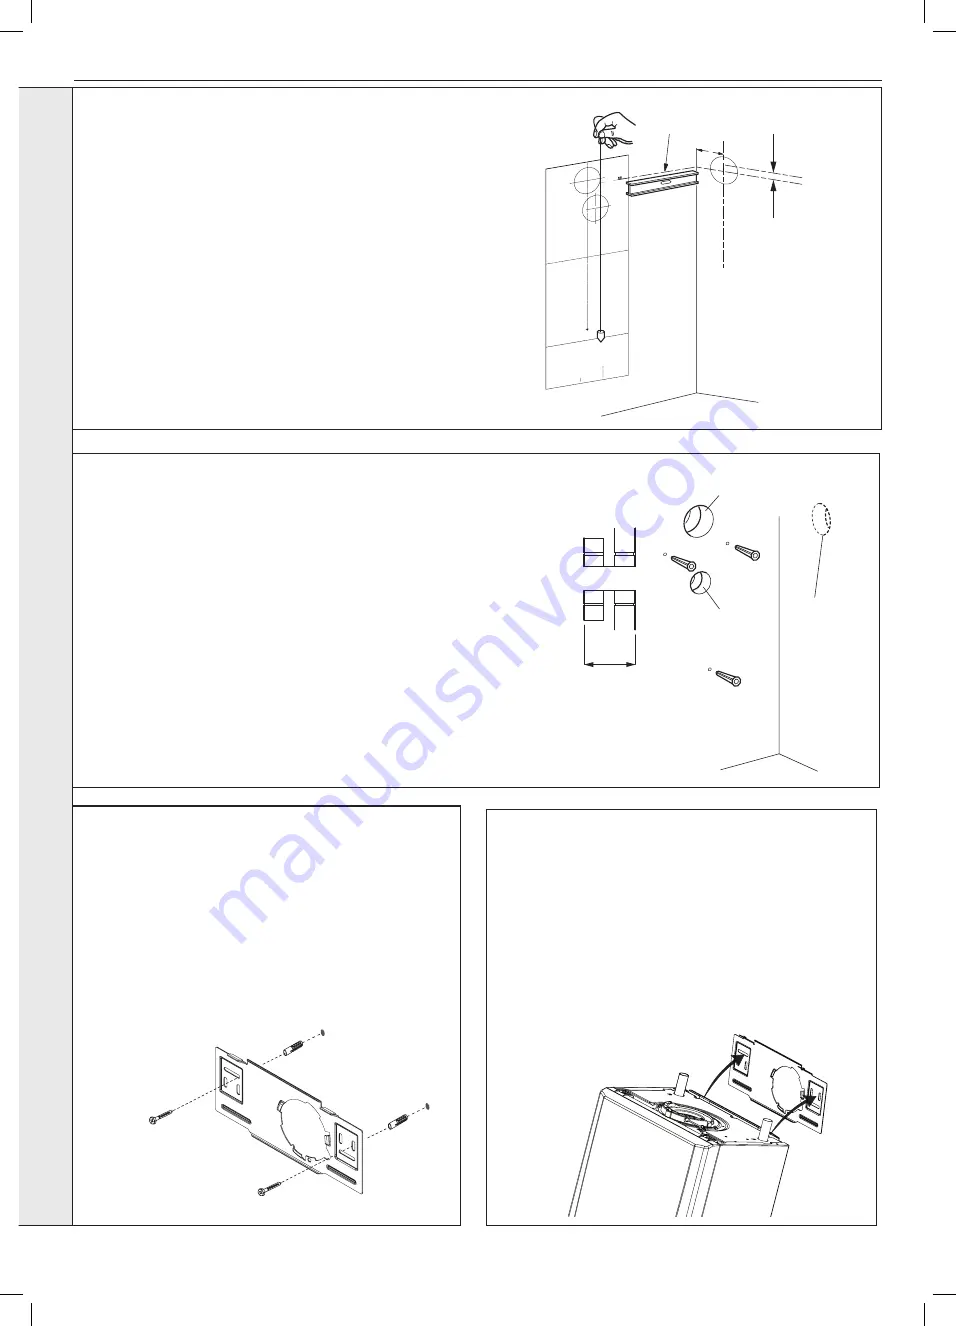
Ensure that, during the cutting operation, masonry falling outside of the 

building does not cause damage or personal injury.

1.

  Cut the rear flue hole (preferably with a 5” core boring tool), ensuring 

that the hole is square to the wall.  

Both wall faces immediately around the cut hole should be flat.

2.

  Drill 3 holes with a 7.5mm / 8mm masonry drill and insert the plastic 

plugs, provided, for the wall mounting plate and the boiler bottom 

retaining bracket.

3.

  Locate 2 No.14 x 50mm screws in the wall mounting plate (one at each 

side, in any of the 3 holes provided at each side) and screw home.

205862-10070

X

Section

through wall

Note. 

Check all of the hole

positions before drilling.

Alternative

Side flue only

5" diameter hole

Turret Rear

Flue - 5” dia

Alternative

Rear Flue

5” dia

The wall mounting template is located on the internal protective 

packaging.  The template shows the position of the fixing and rear 

flue centre holes for a standard installation

Care MUST be taken to ensure the correct holes are drilled.

1.

  Tape template into the required position, ensuring its squareness 

by hanging a plumbline as shown. 

2. 

If fitting a side flue, extend the flue centreline onto the side by 

155mm

 on a standard wall fix or 

200mm

 if using a stand-off 

bracket.

3.

  Mark the following on to the wall:

 a

  The selected group of wall mounting screw holes.


b.

 The centre position of the flue duct.  Marking both the centre 

and the circumference of the flue duct.

4.

  Remove the template plate from the wall.

2.4  WALL MOUNTING TEMPLATE

2.5  PREPARING THE WALL

2.7  MOUNTING THE BOILER


(TURRET OPTION)

2.6  FITTING THE WALL MOUNTING 


PLATE (TURRET OPTION)

Screw the wall mounting plate to the wall using 2 wall plugs 

(previously fitted) with the 2 screws provided.

Choose one of the 2 sets of slots in left and right bank.  

Ensuring that at least one of the screws is fitted into a top slot 

and the mounting bracket is level.

205862-10084

Example of fixing

1.  Remove the top flue plastic blanking disc and retain the 

plastic horseshoe fixing and screw.


Caution: water may discharge from open pipes

2.  Lift the boiler onto the wall mounting plate (refer to the 

Introduction section for safe handling advice), locating it 

over the two tabs.

3.  Screw the boiler bottom retaining bracket to the wall with 

the screw provided.

INST

ALLA

TION

Summary of Contents for LOGIC MAX HEAT H 12

Page 1: ...ire Do not use reconditioned or copy parts that have not been clearly authorised by Ideal Boilers For the very latest copy of literature for specification and maintenance practices visit our website idealboilers com where you can download the relevant information in PDF format February 2019 UIN 219010 A04 INSTALLATION SERVICING LOGIC MAX HEAT H 12 15 18 24 30 ...

Page 2: ... 12 1 15 1 18 0 24 3 30 3 Part Load P1 kW 3 9 4 9 5 9 8 0 9 9 Auxiliary Electricity Consumption Full Load elmax kW 0 020 0 021 0 026 0 042 0 048 Part Load elmin kW 0 012 0 012 0 013 0 013 0 013 Standby PSB kW 0 005 0 005 0 005 0 005 0 005 Seasonal Space Heating Energy Efficiency Full Load ƞ4 90 0 90 0 89 7 90 0 89 8 Part Load ƞ1 97 9 97 8 98 5 98 7 98 2 Standby Loss Pstby kW 0 055 0 055 0 055 0 05...

Page 3: ... VI Class VII Class VIII 1 2 1 5 2 3 4 3 5 5 PRODUCT FICHE The energy efficiency of the package of products provided for in this document may not correspond to its actual energy efficiency once installed in a building as the efficiency is influenced by further factors such as heat loss in the products in relation to the building size and its characteristics Collector Size in m2 Tank Volume in m3 C...

Page 4: ...4 Installation and Servicing ...

Page 5: ...RT PROCEDURE To restart the boiler press the RESTART button The boiler will repeat the ignition sequence if a heat demand is present NOTES FOR THE INSTALLER Relevant Installation changes implemented in this book from Mod Level A03 Aug 18 to A04 Feb 19 ERP Data Page 2 Updated Nox Emissions figures Section 2 19 Condensate Drain Updated information and figures Section 3 1 Page 66 Maximum and Minimum ...

Page 6: ...6 Installation and Servicing ...

Page 7: ...The Roof Flue Kit 32 2 19 Condensate Drain 33 2 20 Connections 35 2 21 Electrical Connections 35 2 22 Installer Wiring 36 2 23 Installer Wiring Plan Diagrams 37 2 24 Wiring Diagram 38 2 25 Commissioning Testing 39 2 26 Initial Lighting 40 2 27 General Checks 41 2 28 Restart Procedure 41 2 29 Accessing The Installer Mode 42 2 30 Handing Over 42 3 SERVICING 43 3 1 Servicing Schedule 43 3 2 Boiler Fr...

Page 8: ... by 26 8 c For ft3 h divide the gross heat input Btu h by the gross C V of the gas Btu ft3 d For m3 h multiply l s by 3 6 Key to symbols GB United Kingdom IE Ireland Countries of destination PMS Maximum operating pressure of water C13 C33 C53 A room sealed appliance designed for connection via ducts to a horizontal or vertical terminal which admits fresh air to the burner and discharges the produc...

Page 9: ...ers only Scale reducer 18 Hot water mode Heat input to be calculated Max operating burner pressure n a Max operating water pressure measure record Cold water inlet temp measure record Hot water outlet temp measure record Water flow rate at max setting measure record For condensing boilers only Condensate drain 33 For all boilers complete sign hand over to customer For GB to comply with Building Re...

Page 10: ...ithin the system filter box Be sure to follow Ideal system filter installation and maintenance guide for correct method of installation Failure to install the system filter correctly will affect boiler warranty Data Plate The boiler model and serial number can be located on the bottom of the boiler casing shown in Section 1 16 Condensate Gas Connection Diagram 1 2 OPERATION When there is a demand ...

Page 11: ...evice not approved by Ideal Boilers could invalidate the certification and the normal appliance warranty It could also infringe the Gas Safety Regulations and the above regulations 1 6 SAFE HANDLING OF SUBSTANCES No asbestos mercury or CFCs are included in any part of the boiler or its manufacture 1 7 LOCATION OF BOILER The boiler must be installed on a flat and vertical internal wall capable of a...

Page 12: ...imes 3 Minimum acceptable spacing from the terminal to obstructions and ventilation openings are specified in Table 3 Only one reduction down to 25mm is allowable per installation otherwise BS5440 1 2008 dimensions must be followed Flue Terminal Positions Min Spacing 1 Directly below above or alongside an opening window air vent or other ventilation opening 300mm 2 Below guttering drain pipes or s...

Page 13: ...H 1 15 CONDENSATE DRAIN Refer to Section 2 19 A condensate drain is provided on the boiler This drain must be connected to a drainage point on site All pipework and fittings in the condensate drainage system MUST be made of plastic no other materials may be used IMPORTANT Any external runs must be in accordance with BS 6798 The drain outlet on the boiler is sized for standard 21 5mm overflow pipe ...

Page 14: ... building where wall thicknesses do not exceed 600mm Where the space into which the boiler is going to be installed is less than the length of flue required the flue must be fitted from the outside Installation from inside ONLY b If a core boring tool is to be used inside the building the space in which the boiler is to be installed must be at least wide enough to accommodate the tool extensions F...

Page 15: ...boiler is not exceeded 4 Adjust room and cylinder thermostats and programmer to NORMAL settings The system should be vented directly off the boiler flow pipe as close to the boiler as possible The cold feed entry should be inverted and MUST be positioned between the pump and the vent and not more than 150mm away from the vent connection Note Combined feed and vent pipes may also be fitted There sh...

Page 16: ...should be positioned so that the discharge of water or steam cannot create a hazard to the occupants of the premises or cause damage to electrical components and wiring 3 Pressure Gauge A pressure gauge covering at least the range 0 4 bar must be fitted to the system The gauge should be easily seen from the filling point and should preferably be connected at the same point as the expansion vessel ...

Page 17: ...ust be adequate to accept the expansion of the system water when heated to 110o C c The charge pressure must not be less than the static water head above the vessel The pressure attained in the system when heated to 110o C should be at least 0 35 bar less than the lift pressure of the safety valve For guidance on vessel sizing refer to the table in this section For further details refer to BS 5449...

Page 18: ...PORTANT The application of any other treatment to this product may render the guarantee of Ideal Boilers Invalid The Ideal System Filter will aid against the build up of iron oxide debris however the below water treatment is also recommended by Ideal Boilers Ideal Boilers recommend Water Treatment in accordance with the Benchmark Guidance Notes on Water Treatment in Central Heating Systems If wate...

Page 19: ...ER 223 FLUE MANIFOLD 2 1 BOILER ASSEMBLY Exploded View 224 FLUE MANIFOLD TOP 225 FLUE MANIFOLD TOP SEALING CAP 226 FLUE MANIFOLD REAR SEALING CAP 227 CLAMP RETAINING FLUE TURRET 228 HOSE CONDENSATE INTERNAL 229 SIPHON TRAP 231 CONDENSATE OUTLET CONNECTION 233 FLUE SENSING NIPPLE 301 CONTROLS BOX HINGES HARNESS CLIPS 302 PCB 304 CONTROL THERMISTOR RETURN 305 POTENTIOMETER BLANK KNOBS 306 ELECTRODE ...

Page 20: ...and check the contents Pack A Contents A Boiler B Hardware Pack C Wall Mounting Plate D These Installation Users Instructions E Wall Mounting Template located on internal protective packaging F Boiler Guarantee Registration Pack G Ideal System Filter C A D B E F Boiler Guarantee G HARDWARE PACK CONTENTS Gas Valve Pack 1 Washer Gas blue 2 Gas Cock Accessory Pack 1 Screw x3 2 Wallplug x3 Gas Valve P...

Page 21: ...l D 2 x Self Tapping Screws E Sealing Tape F Cutting Aid B A F C D E Note This flue system incorporates a removable flue outlet nose that utilises a push fit location system This enables the installation of deflector high level or balcony outlet flue kits without the removal of the whole B pack terminal The appliance must not be operated without the desired outlet nose correctly fitted in place No...

Page 22: ...e correct holes are drilled 1 Tape template into the required position ensuring its squareness by hanging a plumbline as shown 2 If fitting a side flue extend the flue centreline onto the side by 155mm on a standard wall fix or 200mm if using a stand off bracket 3 Mark the following on to the wall a The selected group of wall mounting screw holes b The centre position of the flue duct Marking both...

Page 23: ... the mounting face allowing the correct sealing of the components It is IMPORTANT that all attachments are fitted in accordance to the installation instructions provided with them The TURRET supplied in the B Pack has an upper combustion sample point with a screw cap seal and a lower air sample point with an air stopper seal Ensure all caps seals are in place Additional Termination Kits available ...

Page 24: ...ffFrame A WALL Edge of turret to outside face of wall plus 44mm flue length SIDE Fit towall A WALL Minimum clearance 5mm DETERMINING THE FLUE LENGTH AND FLUE PACKS REQUIRED CONT D Shows the flue required when measured from outside edge of turret to the outside face of the wall to obtain cut length add 44mm Minimum Maximum finished flue lengths obtainable dimension A 44mm Horizontal Flue Terminal 6...

Page 25: ...he outlet terminal is upper most 4 Drill a 3 5mm hole through one of the 2 outer side holes in the outer flue section into the inserted outer flue as shown Take care not to pierce the inner plastic flue Fit screw provided 5 Seal the joint on the outer air duct with the tape provided 6 Fit internal and external wall seals see installing flue CUTTING HORIZONTAL FLUE TERMINAL 600MM LONG B PACK 1 Meas...

Page 26: ...ll need to be refitted 9 When 1st mark is in line with the wall whilst holding the flue firmly push the white wall sealing flange to the wall until the 2nd of the two marks is just visible If the last location mark is clearly past the white inner wall seal then the outer wall seal will have been dislodged from its mounting and will need to be re fitted 10 Ensure the seam and the outlet terminal ar...

Page 27: ...is IMPORTANT that the rubber terminal wall seal is pressed against the outside wall to create an adequate seal between the flue and wall as shown in Figure 2 2 13 SETTING THE REAR FLUE LENGTH WALL THICKNESS OF 115MM TO 442 MM 1 Measure and note wall thickness X Refer to Section 1 16 2 Add 8mm to dimension X and measuring from the ring cut the outer tube only 3 To ensure the tube is cut square mark...

Page 28: ...etween the plastic connector and the terminal air duct with the tape provided 6 Push the terminal assembly through the prepared hole in the wall until the rubber seal clears the outside wall Rest the assembly in the hole while fitting the wall mounting plate 7 Screw the wall monting plate to the wall using 2 wall plugs previously fitted with the 2 screws provided Choose one of the 2 sets of slots ...

Page 29: ...n to the wall as this movement engages the rear flue air and flue seal 3 Screw the boiler bottom retaining bracket to the wall with the screw provided 4 Remove the top flue blanking disk Fill the condensate trap within the boiler by pouring a cupful of water into the flue outlet Take care to ensure that the water is only poured into the flue outlet and does not spill into the boiler casing 5 Repla...

Page 30: ... made using a separately supplied vertical connector WEATHER PROOFING Where the flue passes through the roof line an adequate seal must be made This is achieved by using either Flat roof weather collar or Universal weather collar ACCESSORIES Flue Duct Extension Kits are available for flue lengths extending beyond 1m These packs contain 500mm 1000mm and 2000mm extension ducts and may be cut to the ...

Page 31: ...penetrate the shaded area of the roof Note The equivalent flue length resistance of the elbow kits are 90o elbow kit 1m 45o elbow kit 0 6m If chimney penetrates dotted area such that A is less than 300mm B shall not be less than 300mm Where two or more vertical fanned draught chimney configurations terminate in close proximity at the same height they shall be separated by at least 300mm Where any ...

Page 32: ...ctor kit 3 Secure the vertical connector by applying downward pressure on the connector 4 Position the clamp on the top face of the flue manifold and push it horizontally backwards Locate both clamp lugs into the flue manifold and secure to the flue manifold with the M5 retaining screw 5 Push extension duct if required supplied separately into vertical connector Note Ensure turret sample points ar...

Page 33: ...arge point such as an internal soil and vent stack or internal kitchen or bathroom waste pipe etc fig 3 External Drain Connections The use of an externally run condensate drainage pipe should only be considered after exhausting all internal termination options as described previously An external system must terminate at a suitable foul water discharge point or purpose designed soak away If an exte...

Page 34: ...rnal pipe Water Weather proof insulation Max 3m external pipework Limestone chippings 500 300 25 75 2 rows of three Ø12mm holes 25mm centres 50mm from the bottom of the tube facing away from the house Minimum connection height up to 3 storeys Soil vent stack 450 Boiler with 75mm sealed condensate trap Min Ø 19mm Internal pipe Min Ø 30mm Internal pipe Water weather proof insulation Figure 3 Connect...

Page 35: ...e position of the gas connection For additional gas supply information refer to Gas Supply on page 12 2 21 ELECTRICAL CONNECTIONS Wiring should be 3 core PVC insulated cable not less than 0 75mm2 24 x 0 2mm and to BS 6500 Table 16 For IE reference should be made to the current ETCI rules for electrical installations The mains supply to the boiler and system wiring centre shall be through one commo...

Page 36: ...e cable is retained into the strain relief as shown 7 Swing the control box back up into the operating position and re fit the front panel ensuring a good seal is made NOTE When making the mains electrical connections to the boiler it is important that the wires are prepared in such a way that the earth conductor is longer than the current carrying conductors such that if the cord anchorage should...

Page 37: ...SPUR TIMER CH ON L N HW ON HW OFF Y PLAN VALVE LOGIC MAX HEAT H BOILER WITH Y PLAN SYSTEM br br o g y b b g y g g L N E L N E CH ON R S ON HW ON HW OFF C S ON FUSED SPUR TIMER CH ON L N HW ON HW S PLAN VALVE CH S PLAN VALVE R S C S o PUMP SL 2 BOILER L N MAINS IN SL 1 IN L IN LOGIC MAX HEAT H BOILER WITH S PLAN SYSTEM 2 23 INSTALLER WIRING PLAN DIAGRAMS INSTALLATION ...

Page 38: ...E 5V CH LIVE IGNITION LIVE PE X2 DHW LIVE X3 PUMP GND X9 X8 OWC OWC OPENTHERM OPENTHERM OPENTHERM 5V CHIP COM BUS TX CHIP COM BUS 24V CHIP COM BUS GND CHIP COM BUS 5V CHIP COM BUS RX MAINS LIVE MAINS NEUTRAL AUXILIARY LIVE IONISATION 2 2 FLOW DHW DHW X7 1 3 2 1 1 2 WPS SIGNAL WPS GND FLUE FLUE RETURN RETURN 1 black grey red green blue brown green yellow orange pink violet yellow bk gy r g b br g y...

Page 39: ... has been checked adjusted and preset at the factory for operation on the gas type defined on the appliance data plate DO NOT adjust the air gas ratio valve Having checked That the boiler has been installed in accordance with these instructions The integrity of the flue system and the flue seals as described in the Flue Installation section Proceed to put the boiler into operation as follows CHECK...

Page 40: ...iler mode knob B is OFF 5 Check that the gas service cock J is OPEN 6 Slacken the screw in the inlet pressure test point H and connect a gas pressure gauge via a flexible tube 7 Switch the electricity supply ON and check all external controls are calling for heat CENTRAL HEATING 8 Set the CH temp knob A to max and turn the mode knob B to BOILER ON The boiler control should now go through its ignit...

Page 41: ...initial pressure to the design requirement 6 Balance the system Refer to Section 1 21 7 Check the condensate drain for leaks and check that it is discharging correctly 8 Finally set the controls to the User s requirements 2 28 RESTART PROCEDURE To restart boiler press the RESTART Button F Legend A Central Heating Temperature Knob B Mode Knob C Boiler Status D Burner on Indicator E Central Heating ...

Page 42: ...d to the householder to ensure the greatest possible fuel economy consistent with the household requirements of both heating and hot water consumption Advise the User of the precautions necessary to prevent damage to the system and to the building in the event of the system remaining inoperative during frosty conditions 4 Explain the function and the use of the boiler heating controls 5 Explain th...

Page 43: ...ordance with BS7967 Parts 1 to 4 Flue Sampling Point Air Sample Point Ensure all caps and seals are re fitted after use SERVICING Note In order to carry out either servicing or replacement of components the boiler front panel must be removed Refer to Section 3 2 PRELIMINARY INSPECTION 1 Light the boiler and carry out a pre service check noting any operational faults refer to appropriate fault find...

Page 44: ...embly 6 Inspect the injector for blockage or damage 7 Inspect fan outlet sealing gasket and replace if necessary 1 2 3 5 Injector SERVICING 3 2 BOILER FRONT PANEL REMOVAL REPLACEMENT REMOVAL 1 Loosen the two screws retaining the front panel 2 Pull the two clips down to disengage and pull panel forward and upward and remove REPLACEMENT 3 Hook the panel onto the top retaining clips 4 Push the panel ...

Page 45: ...IMPORTANT The burner head is a ceramic plaque construction Care must be taken to ensure that the burner is not placed down upon its face as this may cause damage to the ceramic 6 Brush off any deposits that may be on the ceramic with a SOFT brush 7 Inspect the sealing gasket around the burner for any signs of damage Replace as necessary 1 Pull off the rubber pipe noting the position and flush out ...

Page 46: ...on gaps are correct Refer to Sections 3 13 3 14 1 Ignition Electrode Flame Detection Reassemble the boiler in the following order 1 Ensure that the condensate trap siphon is full of water 2 Refit the burner ensuring the sealing gasket is correctly positioned and free from damage tighten the 4 fixing screws in the sequence shown below A B C D 3 Refit the fan venturi assembly ensuring the retaining ...

Page 47: ...to drain the boiler See Section 3 20 item no 2 THE BOILER MUST NOT BE OPERATED WITHOUT THE FRONT PANEL FITTED 3 9 FAN REPLACEMENT 1 Refer to Section 3 8 2 Disconnect the electrical leads from the fan 3 Remove the clip from the gas control valve outlet 4 Remove the extended nut retaining the fan mounting bracket 5 Lift and remove the fan and venturi assembly 6 Remove the screw and twist venturi ant...

Page 48: ...g that the new gas seal supplied is located correctly in the injector housing 10 Check operation of the boiler Refer to Sections 2 26 2 27 3 11 BURNER REPLACEMENT 5 5 6 1 See Section 3 4 2 Refer to Section 3 8 3 Undo the two screws and remove the sump cover 4 Lift the manifold to clear the bottom sealing gasket and remove manifold 5 Remove the 2 front fixing screws and loosen the 2 rear extended n...

Page 49: ...Check the operation of the boiler Refer to Section 2 26 2 27 3 12 CONTROL RETURN THERMISTOR REPLACEMENT 1 Refer to Section 3 8 2 Disconnect the electrical leads from the thermistors 3 Unclip the flow thermistor from the flow pipe and withdraw it from the boiler 4 Unclip the return thermistor from the return pipe and withdraw it from the boiler 5 Reconnect the electrical lead to the new thermistors...

Page 50: ...and re assemble in reverse order ensuring that the the earth lead is replaced 6 Check operation of the boiler Refer to Sections 2 26 2 27 Flame Detection Electrode 12 5mm Straight edge 1 Refer to Section 3 8 2 Remove the burner Refer to Section 3 11 3 Unplug the flame detection lead from the electrode 4 Remove the 2 screws retaining the detection electrode 5 Remove the electrode 6 Fit the new flam...

Page 51: ...on 4 3 16 GAS CONTROL VALVE REPLACEMENT 1 Refer to Section 3 8 2 Unplug the electrical lead connection from the gas control valve 3 Remove the outlet gas valve clip and slide the pipe upwards 4 Undo the gas inlet pipe union at the inlet to the gas valve 5 Undo the single screw fixing the gas valve to the mounting bracket and withdraw the valve forwards 6 Fit the new gas control valve ensuring that...

Page 52: ...Heat then press RESTART button f Using central heating knob rotate clockwise or anticlockwise to show n for Natural Gas then press the RESTART button g Using central heating knob rotate clockwise or anticlockwise to show boiler size select correct 12 15 18 24 or 30 then press RESTART button h Display shows H n Boiler size internal number j Press restart New PCB is now programmed 11 Check operation...

Page 53: ...lbow 12 Remove the screw retaining the flow pipe bracket and remove the bracket from its rear retention slot 13 Pull the flow pipe to the right to disengage from the heat exchanger 14 Remove the condensate rubber pipe Refer to Section 3 17 15 Remove the LH heat exchanger fixing screw 16 Pull the heat exchanger to the left to disengage the rear retention pegs and remove the heat exchanger 17 If rep...

Page 54: ...the drain valve 4 Remove the magnet Slowly open the inlet valve to control the flow Flush out the filter until the water runs clear 5 Close the inlet valve Close the drain valve 6 Reinsert the magnet Replace the drain valve cap 7 Open inlet outlet valves 8 Restart the boiler Ensure that the magent sheath remains clean and dry Note Remember to re pressurise system after cleaning the filter as loss ...

Page 55: ...FAN FAULT GO TO SECTION 4 9 CONTROL NO FLOW THERMISTOR FAULT GO TO SECTION 4 10 RETURN THERMISTOR FAULT GO TO SECTION 4 11 OUTSIDE SENSOR FAULT LOW MAINS VOLTAGE CONTACT ELECTRICITY PROVIDER NO CH NO HW GO TO SECTION 4 12 GO TO SECTION 4 14 LC 5 RESTARTS WITHIN 15 MINS TURN POWER OFF AND ON RESTART PROCEDURE To restart boiler press the RESTART button FU DIFF GREATER THAN 50ºC CHECK ISOLATION VALVE...

Page 56: ...or continuity visual condition and position Refer to Section 3 14 Check if the condensate pipe is blocked Check flue is installed correctly Replace as necessary NO Check gas supply and rectify fault NO YES Is 24Vdc supply available at the Gas Valve YES Check spark generator and associated harness for continuity and visual condition Refer to Section 3 15 Are these functioning correctly YES Check ig...

Page 57: ...ilable at the Boiler Inlet 18 mbar Check the detection electrode and associated harness for continuity visual condition and position Refer to Section 3 14 Check if condensate pipe is blocked Check if flue is blocked Replace as necessary NO Check gas supply and rectify fault NO YES Is 24Vdc supply available at the Gas Valve while the flame is on YES Check spark generator and associated harness for ...

Page 58: ...eter connected across the thermistor s terminal pins At 25 o C expect 9 700 10 300 Ohms At 60 o C expect 2 400 2 600 Ohms At 85 o C expect 1 000 1 100 Ohms Is the Thermistor value correct YES YES NO NO Replace PCB Replace PCB Fit a new Thermistor Fit a new Thermistor Is there continuity between the PCB and Thermistor Is there continuity between the PCB and Thermistor NO NO YES YES Check and replac...

Page 59: ...he Timer Room Stat This is not boiler fault Ensure Voltage is supplied to boiler by rectifying external wiring 4 13 NO DISPLAY Is there 230Vac to the boiler at L and N see Section 4 12 NO Supply power to the boiler Is the wiring from the terminal block to the Main PCB connected securely NO Connect the wiring from the terminal block to the Main PCB securely Replace the PCB YES YES 4 14 NO DHW Is th...

Page 60: ...ils of approved Ideal Parts Distributors are available on www idealparts com Our Parts team are also available to help with your Ideal Spare Parts enquiries on 01482 498665 When calling and to ensure we can provide you with the most accurate parts information please ensure you have the following to hand Boiler Model Appliance GC Number Boiler Serial Number IMPORTANT NOTE Propane Boilers After inst...

Page 61: ...61 NOTES Installation and Servicing ...

Page 62: ...62 Installation and Servicing SECTION 5 SPARE PARTS ...

Page 63: ... fields on the commissioning checklist completed in full To instigate the boiler guarantee the boiler needs to be registered with the manufacturer within one month of the installation To maintain the boiler guarantee it is essential that the boiler is serviced annually by a Gas Safe registered engineer who has been trained on the boiler installed The service details should be recorded on the Bench...

Page 64: ...opriate Building Regulations and then handed to the customer to keep for future reference GAS BOILER SYSTEM COMMISSIONING CHECKLIST CONTROLS Programmable room thermostat Optimum start control Combination Boiler Fitted Fitted Fitted Automatic bypass to system Fitted Boiler interlock ALL SYSTEMS Yes Yes CENTRAL HEATING MODE OR mbar OR mbar Central heating return temperature COMBINATION BOILERS ONLY ...

Page 65: ...ularly and that the appropriate Service Interval Record is completed Service Provider SERVICE RECORD SERVICE 01 AND Where Possible AND Signature SERVICE 02 AND Where Possible AND Signature SERVICE 03 AND Where Possible AND Signature SERVICE 04 AND Where Possible AND Signature SERVICE 05 AND Where Possible AND Signature SERVICE 06 AND Where Possible AND Signature SERVICE 07 AND Where Possible AND S...

Page 66: ...ulletin TB 008 where chimney flues are in voids The ECGA should be of the correct type as specified by BS 7967 Prior to its use the ECGA should have been maintained and calibrated as specified by the manufacturer The installer must have the relevant competence for use of the analyser Check and zero the analyser IN FRESH AIR in accordance with the analyser manufacturer s instructions KEY CO carbon ...

Page 67: ...mbled fixed and supported as per instructions Check that flue and flue terminal are not obstructed Check that no seals e g Those on flue extensions have been displaced during installation Rectify if necessary Turn off appliance and call Ideal Technical Helpline for advice The appliance must not be commissioned until problems are identified and resolved If commissioning cannot be fully completed th...

Page 68: ...68 NOTES Installation and Servicing ...

Page 69: ...69 NOTES Installation and Servicing ...

Page 70: ...The code of practice for the installation commissioning servicing of central heating systems Ideal Boilers Ltd PO Box 103 National Avenue Kingston Upon Hull HU5 4JN Tel 01482 492251 Fax 01482 448858 Registration No London 322 137 Ideal Technical Helpline 01482 498663 Ideal Consumer Helpline 01482 498660 www idealboilers com FM 59915 Ideal Boilers Ltd pursues a policy of continuing improvement in t...

Reviews: