background image

32

 Classic FF - 

Propane Installation

SERVICING

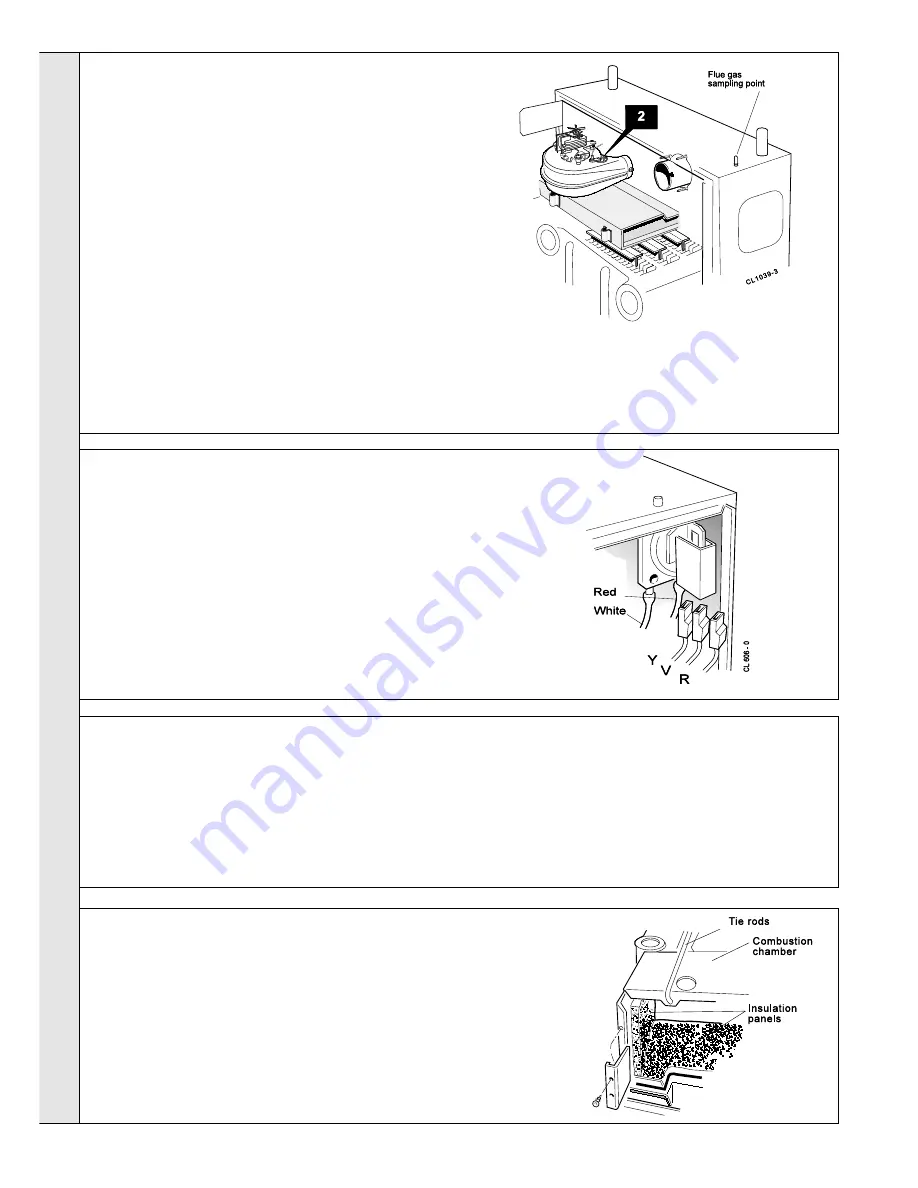
67 COMBUSTION CHAMBER INSULATION REPLACEMENT

66 PRINTED CIRCUIT BOARD (PCB) REPLACEMENT

65 AIR PRESSURE SWITCH (APS) REPLACEMENT

64 FAN REPLACEMENT

1.

Refer to Frame 56.

2.

Remove the burner and air box assembly.
Refer to Frame 51.

3.

Remove the 4 tie rods.

4.

Remove the combustion chamber.

5.

Remove the 2 side panel retaining brackets.

6.

Remove the side insulation panels.

7.

Remove the front and rear
insulation panels.

8.

Fit the new front and rear
insulation panels.

9.

Fit the new side panels and
retain with the brackets and
screws previously removed.

10.

Re-assemble in reverse order.

1.

Refer to Frame 56.

2.

Remove the 2 silicon rubber tubes from the fan sensing points.

3.

Disconnect the fan leads.

4a.  Rear flue.  

Slacken the M4 screw securing the flue connector to the

fan. Disconnect the connector from the fan and slide into the flue.

4b. Side or top flue. 

 Slacken off two M4 screws securing the flue elbow

and flue connector. Disconnect the flue connector from the elbow and
slide into the flue. Remove the flue elbow.

5.

Disconnect the silicon rubber tube from the rear of the collector hood.

6.

Slacken the two M5 nuts on the front tie rods, releasing the tie rods
from the combustion chamber.

7.

Remove the M5 central fixing screw at the rear of the collector hood
and remove collector hood / fan assembly.

8.

Remove the three M4 screws retaining the fan to the collector hood.

9.

Fit the new fan and re-assemble in reverse order, ensuring the fan
leads, and 3 sensing tubes are reconnected.

10.

Check the operation of the boiler.

5.

Disengage the PCB from the mounting posts and withdraw
from the control box.

6.

Fit the new PCB and re-assemble in reverse order.

7.

Check the operation of the boiler.

Fuse.

To change the fuse, prise it out of  the holder and disengage
the fuse. Refer to Frame 72 for fuse location.

Note.

Refer to Frame 72 of 'Exploded Views' for

illustration of the procedure detailed below.

1.

Refer to Frame 56.

2.

Remove the fixing screws and swing the control box down
into the servicing position.

3.

Disconnect the detection lead from the PCB.

4.

Unplug all the Molex connectors from the PCB.

1.

Refer to Frame 56.

2.

Remove the APS fixing screw.

3.

Remove both sensing tubes from the APS.

4.

Remove the 3 electrical connections from the  APS.

5.

Fit the new APS and reassemble in reverse order.

6.

Check the operation of the boiler.

SER

VICING

Summary of Contents for Classic FF 250 P

Page 1: ...Classic FF Propane Installation 1 INSTALLATION M A N U A L classic the wall hung boiler Wall hung fanned flue gas fired boiler Installers guide to central heating boilers SERVICING Classic FF 250P 275P ...

Page 2: ...lb 37 4 82 5 43 1 95 0 Boiler size Height mm in 700 27 5 Width mm in 380 15 0 Depth mm in 300 11 8 Flue duct diameter mm in 100 4 0 Boiler Size FF 250 P FF 260 P FF 275 P Boiler input kW 18 3 20 9 26 7 Btu h 62 500 71 250 91 250 Gas consumption l s ft3 h 0 20 25 0 0 22 28 5 0 29 36 5 Boiler output kW 14 7 16 7 21 4 Btu h 50 000 57 000 73 000 Burner Setting mbar 35 3 35 0 35 0 pressure HOT in w g 1...

Page 3: ...lectrical Connections 22 Electrical Regulations 7 Extension Ducts Fitting 21 External Control 22 Fault Finding 34 Flue Installation 6 Rear installation 14 Side installation 17 Gas Safety 4 Gas Supply 6 Health Safety Document 4 Initial lighting 25 Installation 11 Mandatory Requirements 4 Pump 8 Servicing 27 Short List of Parts 36 Spares Replacement 29 System Diagrams 23 Terminal Guards 6 Water and ...

Page 4: ...ers etc are directly connected to these appliances unless covered by these Installation and Servicing instructions or otherwise recommended by Caradon Plumbing Limited in writing If in doubt please enquire Any direct reconnection of a control device not approved by Caradon Plumbing Limited could invalidate the BSI Certification and the normal appliance warranty It could also infringe the Gas Safet...

Page 5: ...ust be at least wide enough to accommodate the tool c If using the Complete Sealed System Unit then refer to the instructions packed with the unit for the necessary clearances Pelmet restrictions If the ability to fit or remove the casing during installation and subsequent servicing is impaired by pelmets etc this operation can be made easier by first removing the controls pod casing in line with ...

Page 6: ... guidance on this aspect Compartment Installations A compartment used to enclose the boiler should be designed and constructed specially for this purpose An existing cupboard or compartment may be used provided it is modified for the purpose In both cases details of essential features of cupboards compartment design including airing cupboard installation are to conform to the following z BS 6798 z...

Page 7: ...lst other rooms are individually controlled by thermostatic radiator valves However if the system employs thermostatic radiator valves on all radiators or two port valves without end switches then a bypass must be fitted to ensure a flow of water should all valves be in the closed position ELECTRICAL SUPPLY WARNING The appliance MUST be efficiently earthed Wiring external to the appliance MUST be ...

Page 8: ... feed must not be in a vertical leg Minimum Requirements 3 OPEN VENT SYSTEM REQUIREMENTS FULLY PUMPED System return Connections to boiler Inverted cold feed entry System flow to pump 150 6 Max 15mm Cold feed 450 18 Mimimum 450 18 Mimimum 22mm Open vent Feed expansion cistern Water level cold Surge arrester 75 3 Min 450 18 Min 200 8 Min Highest point of flow or return 150 6 Max Max practical length...

Page 9: ...ecting pipe being not less than 15mm 1 2 nominal size and not incorporating valves of any sort b The vessel capacity must be adequate to accept the expansion of the system water when heated to 110 o C 230 o F c The charge pressure must not be less than the static water head above the vessel The pressure attained in the system when heated to 110 o C 230 o F should be at least 0 35 bar 5lb in2 less ...

Page 10: ...ith an automatic air vent connected between them the stop valve being located between the system and the automatic air vent The stop valve may remain open during normal operation of the system if automatic water make up is required b Through a self contained unit comprising a cistern pressure booster pump if required and if necessary an automatic pressure reducing valve and flow restrictor The cis...

Page 11: ...sic FF 30 shown LEGEND 1A Heat exchanger 2 Flue baffles 3 Tie rods 4A Pumped flow pipe 5A Pumped return pipe 6 Collector hood assembly 7 Combustion chamber 12 Main burner 19 Control box 24 Pressure switch 30 Fan 40 Wall mounting plate 44B Programmer optional 52 Back panel INSTALLATION ...

Page 12: ...e 1 off z Terminal grille assy 1 off z Polyurethane foam seal 400 lg 1 off z No 8 x 8 lg Pozi pan hd screws 3 off 8 UNPACKING Pack A Contents z The complete boiler z Installation Servicing Instructions z User s Instructions z Hardware Pack listed below z Wall mounting template z Wall mounting plate z Side outlet terminal mounting plate z Flue extension tube 1 off z Boiler sealing ring 1 off Wall m...
Page 13: ...s pod casing 1 Unpack the boiler 2 Remove the casing as follows and place to one side to avoid damage a Undo the 2 casing retaining screws a retaining the casing to the back panel b Swing the bottom of the boiler casing up until the controls pod casing has cleared the controls then unhook the top from the back panel 3 Remove the boiler from its packaging base The boiler may now be stood upright on...

Page 14: ...hole positions BEFORE drilling 11 FLUE ASSEMBLY Exploded View 2 When cutting the ducts always use the cardboard support rings provided 1 An optional flue duct extension kit is required for wall thicknesses greater than 600mm 23 1 2 Refer to Frame 10 LEGEND 1 Terminal 2 Weather seal 3 Flue assembly 4 Boiler sealing ring 5 Flue extension tube 13 PREPARING THE WALL IMPORTANT Ensure that during the cu...

Page 15: ...ling ring Do NOT drill the inner flue duct 3 Insert the self tapping screws provided in order to fix the boiler sealing ring in position 4 Stick the self adhesive foam strip provided in the hardware pack onto the flue immediately behind the boiler sealing ring 1 Insert the flue extension tube into the flue assembly 2 Insert the flue assembly through the hole sufficiently far enough to allow the ru...

Page 16: ...cate the 3 studs in the holes in the back panel 2 Secure the flue to the boiler using the three M5 wing nuts provided 3 Pull the flue extension tube and engage onto fan locate and secure with the M4 screw attached to the fan Note The sealing ring studs will locate in the back panel one way only This will ensure that the terminal grille is correctly aligned This plate allows neat concealment and fu...

Page 17: ...terminal is to be sited within 25 40mm of a corner or vertical pipe refer to Table 3 then the hole MUST be accurately cut and the rubber weather seal trimmed around the groove provided The terminal wall plate need not be fitted 23 PREPARING THE WALL IMPORTANT Ensure that during the cutting operation masonry falling outside of the building does not cause damage or personal injury 1 Cut the flue hol...

Page 18: ... flue duct and boiler sealing ring Do not drill the inner flue duct 3 Insert the self tapping screws provided in order to fix the boiler sealing ring in position 25 FITTING THE FOAM SEAL 1 To determine the position for the foam seal measure the wall thickness and mark it onto the flue measuring from the groove near the terminal 2 Wrap the self adhesive foam strip round the flue ensuring that the f...

Page 19: ...to retain the boiler Note Before fully tightening the M8 screw check the boiler alignment using a spirit level and adjust as necessary with the jacking screw 29 WALL MOUNTING PLATE 1 Fix the mounting plate to the wall with the No 14 x 50mm wood screws 2 If the downward routing of pipes is required then the downward routing pipe brackets and M8 spacer supplied in the Downward Piping Kit should be f...

Page 20: ...erminal is less than 2m 6 6 above ground level an approved terminal guard should be fitted Refer to the Contents List on Page 3 1 Pull the flue through the side outlet plate and locate the 3 studs in the hole in the side of the boiler 2 Secure the flue to the boiler using the three M5 nuts provided 3 Insert the flue extension tube into the flue 4 Fit the 90 flue elbow supplied with the boiler onto...

Page 21: ...ndard flue Terminal grille Extension tube Boiler Flue length Accessories Product No Up to 600 B Pack 1 off see Frame 8 600 to 1550 B Pack 1 off D Pack 1 off see Frame 8 1550 to 2500 B Pack 1 off D Pack 2 off see Frame 8 2500 to 3000 B Pack 1 off D Pack 3 off see Frame 8 1 Remove the cardboard support aid from the flue and place safely to one side 2 Fit the inner flue extension duct onto the inner ...

Page 22: ... the live pump lead 4 If a proprietary system is used follow the instructions supplied by the manufacturer 5 System designs featuring controls or wiring arrangements which allow the boiler to fire when there is no pump circulation taking place should not be fitted Advice on required modifications to the wiring may be obtained from the component manufacturers Notes 1 Connection between a frost ther...

Page 23: ...s fully controlled system set the boiler thermostat to maximum 4 Switchmaster Midi is similar in operation but the wiring differs slightly see manufacturer s literature 41 MID POSITION VALVE Pumped only LEGEND b blue bk black br brown r red w white y g yellow green or orange gy grey 40 PICTORIAL WIRING LEGEND gy grey b blue bk black br brown r red y yellow w white y g yellow green or orange v viol...

Page 24: ...eft off for more than a day or so then a frost thermostat should be wired into the system This is usually done at the programmer in which case the programme selector switches are set to OFF and all other controls MUST be left in the running position The frost thermostat should be sited in a cold place but where it can sense heat from the system Wiring should be as shown with minimal disturbance to...

Page 25: ...nt fixing screws 3 turns only Remove the pod by pulling it forward to disengage from the keyhole slots b Remove the control box securing screws and swing it down into the servicing position See diag B Frame 46 5 Slacken the screw in the burner pressure test point F and connect a gas pressure gauge via a flexible tube 6 Swing the control box back into its working position 7 Press the overheat therm...

Page 26: ...er consumption Advise the User of the precautions necessary to prevent damage to the system and to the building in the event of the system remaining inoperative during frosty conditions After completing the installation and commissioning of the system the installer should hand over to the householder by the following actions 48 HANDING OVER c Refill and vent the system clear all air locks and agai...

Page 27: ...t be carried out by CORGI registered installer As the installer you may wish to undertake the service contract yourself or alternatively offer to the customer the benefits of the Caradon Ideal Services details of which are outlined in the household pack supplied with this boiler a Light the boiler and carry out a pre service check noting any operational faults Operate the boiler for at least 20 mi...

Page 28: ...removal details b The pilot burner is clean and unobstructed c The ignition detection electrode is clean and undamaged d The ignition detection lead is in good condition e The spark gap is correct Frame 60 Clean or renew as necessary Note The pilot shield is located around the pilot assembly bracket and is located by the electrode retaining nut 54 REASSEMBLY Reassemble the boiler in the following ...

Page 29: ...ding the control box printed circuit board is fitted with 2 indicator lights which represent the following boiler conditions Neon I3 Mains electricity ON Neon SG1 Flashes to indicate spark operation stops after detection The boiler MUST NOT be operated if the casing is not fitted 57 SIGHTGLASS REPLACEMENT 1 Refer to Frame 56 2 Unfasten the two nuts and washers holding the sightglass assembly to th...

Page 30: ... to maximum and no further adjustment is possible Ensure that there is an inlet pressure of 20 mbar available Also check burner ignition and cross lighting Refer also to Frame 56 A Remove the fixing screws B Swing the control box down into the servicing position Thermostat control 1 Pull the knob off the shaft 2 Remove the backnut securing the thermostat control to the control box 3 Pull off the M...

Page 31: ...al lead 6 Refit the new electrode and lead in reverse order Ensure that the pilot shield is replaced 7 Check the spark gap Refer to Frame 60 8 Reassemble in reverse order 9 Check the operation of the boiler 63 GAS CONTROL VALVE REPLACEMENT Note Refer also to Frame 71 of Exploded Views for illustration of the procedure detailed below 1 Refer to Frame 56 2 Remove the burner and air box assembly Refe...

Page 32: ...ber tube from the rear of the collector hood 6 Slacken the two M5 nuts on the front tie rods releasing the tie rods from the combustion chamber 7 Remove the M5 central fixing screw at the rear of the collector hood and remove collector hood fan assembly 8 Remove the three M4 screws retaining the fan to the collector hood 9 Fit the new fan and re assemble in reverse order ensuring the fan leads and...

Page 33: ...e fixings Pull the assembly downward to clear the water pipes from the back panel 10 Remove the 2 rubber sealing grommets from the top of the back panel to facilitate fitting the new assembly 11 Fit the new heat exchanger assembly complete with water pipes and hang it on the key hole slots and screws Retighten the screws 12 Replace the 2 rubber sealing grommets 13 Reassembly in reverse order 14 Re...

Page 34: ...s the pilot injector blocked YES Replace gas valve NO Is there a supply on terminals of main gas valve YES NO YES NO NO Is there a supply on the fan connector at PCB Molex marked FAN YES YES NO YES Check the polarity of the mains supply Check the continuity of the ignition lead from connector to electrode Does the spark now cease when gas is lit Ensure pilot and main gas valve leads are not crosse...

Page 35: ...R ASSEMBLY Exploded View LEGEND 10 Burner manifold 11 Air box and pilot assembly 12 Main burner 13 Main burner injector 16 Pilot shield LEGEND 19 Control box 21 Thermostat potentiometer 23 Printed circuit board 26 Thermostat knob 58 Mains on off switch 17 Gas control valve 42 Gas service cock ...

Page 36: ... 1 112 701 398 043 BRAY Cat 10 size 800 FF 275 P 1 004 858 15 397 925 Pilot burner injector Propane 459 00421 003 stamped 20 23P 1 005 018 16 173 117 Pilot burner head with injector Propane 1 079 625 18 379 921 Gas control valve HONEYWELL VR 4601 EA 230 V 1 111 074 19 308 549 Ignition electrode complete with lead and backnut 410 mm long 1 111 881 20 E02 653 Controls box assembly including thermost...

Page 37: ...Classic FF Propane Installation 37 73 BOILER CASING ASSEMBLY SHORT LIST OF PARTS 74 SHORT PARTS LIST ...

Page 38: ...38 Classic FF Propane Installation NOTES ...

Page 39: ...Classic FF Propane Installation 39 NOTES ...

Page 40: ... training courses for domestic commercial and industrial heating installers engineers and system specifiers For details of courses please ring 01482 498 432 Technical Training The code of practice for the installation commissioning servicing of central heating systems Ideal Installer Technical Helpline 01482 498663 www idealboilers com Caradon Plumbing Ltd pursues a policy of continuing improvemen...

Reviews: