background image

Supplied By www.heating spares.co  Tel. 0161 620 6677

British Gas RD1


Installation & Servicing

7

GENERAL

IMPORTANT

. It is absolutely ESSENTIAL to ensure, in

practice, that products of combustion discharging from the
terminal cannot re-enter the building or any other adjacent
building through ventilators, windows, doors, other sources of
natural air infiltration, or forced ventilation/air conditioning.

If this should occur, the appliance MUST  be turned OFF,
labelled 'unsafe' and corrective action taken.

TERMINAL

The terminal assembly can be adapted to accommodate
various wall thicknesses. Refer to Frame 9.

AIR SUPPLY

Detailed recommendations for air supply are given in
BS.5440:2. The following notes are for general guidance:

1.

It is NOT necessary to have a purpose provided air vent in
the room or internal space in which the boiler is installed.

2.

If the boiler is to be installed in a cupboard or compartment,
permanent air vents are required (for cooling purposes) in

Compartment Installations

A compartment used to enclose the boiler MUST be designed
and constructed specially for this purpose.
An existing cupboard or compartment may be used, provided it
is modified for the purpose.

In both cases details of essential features of cupboards/
compartment design, including airing cupboard installation, are
to conform to the  following :

BS. 6798.

The position selected for installation MUST allow adequate
space for servicing in front of the boiler and for air circulation
around the boiler. Refer to 'Air Supply' on page 8.

For the minimum clearances required for safety and
subsequent service refer to the Wall mounting diagram,
Frame 2. In addition, sufficient space may be required to
allow lifting access to the wall mounting plate.

GAS SUPPLY

The local gas supplier should be consulted, at the installation
planning stage, in order to  establish the availability of an
adequate supply of gas. An existing service pipe must NOT be
used without prior consultation with the local gas supplier.

The boiler is to be installed only on a gas supply with a
governed meter.

A gas meter can only be connected by the local gas supplier or
by a local regional contractor.

An existing meter should be checked, preferably by the gas
supplier, to ensure that the meter is adequate to deal with the
rate of gas supply required. A MINIMUM pressure of 20 mbar
MUST be available at the boiler inlet with the boiler operating.

Installation pipes MUST be fitted in accordance with BS. 6891.
Pipework from the meter to the boiler MUST be of an adequate
size.100 models should be piped in 22mm minimum. The final
1metre may be run in 15mm if it is visible.

The complete installation MUST be tested for gas soundness
and purged as described in the above code.

FLUE INSTALLATION

The flue must be installed in accordance with the recommendations
of BS. 5440:1.

The following notes are intended for general guidance:-

1

. The boiler MUST be installed so that the terminal is exposed

to external air.

2.

It is important that the position of the terminal allows the free
passage of air across it at all times.

3.

Minimum acceptable spacing from the terminal to
obstructions and ventilation openings are specified in Table
3.

4.

Where the lowest part of the terminal is fitted less than 2m
(6'6") above a balcony, above ground or above a flat roof to
which people have access then the terminal MUST be
protected by a purpose designed guard.

Terminals guards are available from boiler suppliers - ask for
Tower Flue Guard, Model K1.
In case of difficulty seek advice from:

Tower Flue Components Ltd.,
Vale Rise, Tonbridge, Kent TN9 1TB (Model K1)
Telephone No. 01732 351 555

Ensure that the guard is fitted centrally.

5.

Where the terminal is fitted within 1000mm (39 

1/2

") of a plastic

or painted gutter or 500mm (19 

1/2

") of painted eaves then an

aluminium shield at least 1000mm (39 

1/2

") long should be

fitted to the underside of the gutter or painted surface.

6.

The air inlet/products outlet duct and the terminal of the boiler
MUST NOT be closer than 25mm (1") to combustible material.
Detailed recommendations on the protection of combustible
material are given in BS.5440: 1990.

Table 3 - Balanced flue terminal position

Terminal Position

M i n i m u m   S p a c i n g

1.

Directly below or alongside an
opening window, air vent or other
ventilation opening

300 mm (12")

2.

Below guttering, drain pipes or soil
pipes

75 mm

( 3")

3

.

Below eaves

200 mm

( 8")

4.

Below balconies or a car port roof

200 mm

( 8")

5.

From vertical drain pipes or soil pipes

75 mm

( 3")

6.

From internal or external corners

300 mm ( 12")

7.

Above adjacent ground, roof or
balcony level

300 mm (12")

8.

From a surface facing the terminal

600 mm (24")

9.

From a terminal facing a terminal

1200 mm (48")

10.

From an opening in a car port
(e.g. door or window) into dwelling

1200 mm (48")

11.

Vertically from a terminal on the
 same wall

1500 mm (60")

12.

Horizontally from a terminal on the wall

300 mm (12")

Summary of Contents for 30 RD1

Page 1: ...ww heating spares co Tel 0161 620 6677 INSTALLATION M A N U A L British Scottish Gas RD1 the wall hung boiler Wall hung gas fired fanned flue boiler 30 100 RD1 Installers guide to central heating boil...

Page 2: ...hatever the system demands Complete range There are 7 models in the range All models include a Downward Routing Pipe Kit and an overheat thermostat Full system suitability Most models are suitable for...

Page 3: ...water head m ft 0 45 1 5 Electrical supply 230 V 50 Hz Boiler power consumption 150W Fuse rating External 3A Internal F2A to BS 4265 Water content litre gal 2 7 0 6 3 65 0 8 4 65 1 0 4 65 1 0 Dry Weig...

Page 4: ...e through orifices which in this case are concentric The fan is down stream of the combustion chamber I2H An appliance designed for use on 2nd Family gas Group H only B G Certified P I No 87 BL 27 Des...

Page 5: ...water boilers of rated input not exceeding 60 kW BS 5449 Forced circulation hot water systems BS 5546 Installation of gas hot water supplies for domestic purposes 2nd Family Gases BS 7593 Treatment o...

Page 6: ...used inside the building the space in which the boiler is to be installed must be at least wide enough to accommodate the tool c If using the Complete Sealed System Unit then refer to the instructions...

Page 7: ...mbar MUST be available at the boiler inlet with the boiler operating Installation pipes MUST be fitted in accordance with BS 6891 Pipework from the meter to the boiler MUST be of an adequate size 100...

Page 8: ...ance is installed in a room containing a bath or shower then the appliance and any electrical switch or appliance control utilising mains electricity should be so situated that it cannot be touched by...

Page 9: ...boiler A suitable pump is a domestic circulator capable of providing an 11 C 20 F temperature differential e g Grunfos UPS 15 50 or equivalent The vertical distance between the pump and feed expansio...

Page 10: ...expansion vessel must be connected at a point close to the inlet side of the pump the connecting pipe being not less than 15mm 1 2 nominal size and not incorporating valves of any sort b The vessel c...

Page 11: ...ld feed pipe from the cistern should include a non return valve and a stop valve with an automatic air vent connected between them the stop valve being located between the system and the automatic air...

Page 12: ...box 24 Pressure switch 30 Fan Note Gravity horizontal pipes should be ABOVE ceiling level and as SHORT as possible A MINIMUM inclination of 25mm per 3m run 1 per 10 is required to avoid air locks If t...

Page 13: ...nstructions Hardware Pack listed below Wall mounting template Wall mounting plate Side outlet terminal mounting plate Flue extension tube Boiler sealing ring Flue elbow Downward routing pipe kit Boile...

Page 14: ...oiler terminal box and if applicable the extension flue box es 10 PACKAGING AND CASING REMOVAL 11 DOWNWARD ROUTING PIPE KIT Product Qty Downward pipe routing bracket 2 off M8 Spacing pillar 1 off M5 S...

Page 15: ...upport bracket It is MOST IMPORTANT that the boiler is installed in a vertical position Flue length mm Accessories Product No Up to 600 B Pack 1 off 150 308 600 to 1550 B Pack 1 off D Pack 1 off 15030...

Page 16: ...brackets supplied in a separate kit must be used These brackets are secured to the wall mounting plate and it is essential to use only those holes as shown on the wall mounting template Care MUST be...

Page 17: ...rably with a 125mm 5 core boring tool ensuring that the hole is square to the wall If the hole has been accurately cut with a drill then making good the wall faces is not essential as seals are provid...

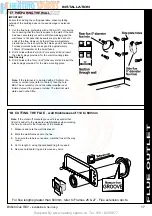
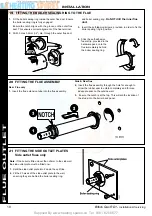
Page 18: ...ures correct alignment of the flue terminal 2 Drill 3 holes 3 2mm 1 8 dia through the outer flue duct 4 Stick the self adhesive foam strip provided in the hardware pack onto the flue immediately behin...

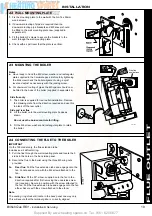
Page 19: ...e flue only 1 The boiler is supplied for rear outlet installation Remove the blanking plate from the direction required and use this to blank off the rear outlet Side and rear flue 2 Lift the boiler o...

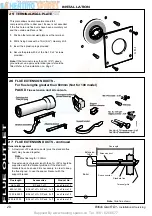
Page 20: ...off see Frame 12 600 to 1550 B Pack 1 off D Pack 1 off see Frame 12 1550 to 2500 B Pack 1 off D Pack 2 off see Frame 12 2500 to 3000 B Pack 1 off D Pack 3 off see Frame 12 Note Side flue shown 26 FLUE...

Page 21: ...ed A mains supply of 230 V 50 Hz is required All external controls and wiring must be suitable for mains voltage Wiring should be in 3 core PVC insulated sheathed cable not less than 0 75mm2 24 x 0 2m...

Page 22: ...proprietary system is used follow the instructions supplied by the manufacturer Advice on required modifications to the wiring may be obtained from the component manufacturers EC1 EC2 Volt Free Conta...

Page 23: ...w w w CH2 b b r r br b pk y w w gy w or or r b b r r w w b br y y y g y g y g y g pk y w pk y r r r w 34 PICTORIAL WIRING LEGEND b blue bk black br brown r red y yellow w white or orange v violet pk p...

Page 24: ...wiring 2 For numbering of terminals on thermostats see the manufacturer s literature 3 This is a fully controlled system set the boiler thermostat to maximum 4 Switchmaster Smiths valves are similar b...

Page 25: ...ole frost thermostat which should suffice for all systems which do not use the OFF terminals of the programmer Diagram B shows a change over frost stat which will cover most systems which do use CH OF...

Page 26: ...a a flexible tube 5 Swing the control box back into its working position 6 Switch the electricity supply ON and check that all external controls are calling for heat 7 Press the boiler reset switch H...

Page 27: ...ler you may wish to undertake the service contract yourself or alternatively offer to the customer the benefits of the British Gas Services details of which are outlined in the household pack supplied...

Page 28: ...ner support strap to the combustion chamber Remove the M5 pozi situated at the LH bottom rear of the burner and pull the burner downwards to disengage the retention tab Remove the burner to a safe pla...

Page 29: ...to the fan Disconnect the connector from the fan and slide into the flue 4b Side or top flue Slacken off two M4 screws securing the flue elbow and flue connector Disconnect the flue connector from the...

Page 30: ...checking the injector as detailed in Frame 48 and ensuring that there is an inlet pressure of 20 mbar available the pilot does not light then contact British Gas Services Relight in accordance with In...

Page 31: ...trical leads from the rear of the switch 12 Press in the 2 side retaining clips and remove the switch 13 Replace and re assemble in reverse order 14 Check the operation of the boiler 54 CONTROL POTENT...

Page 32: ...etention tab and remove the burner 4 At this stage the main burner injector can be removed checked cleaned or replaced as required Ensure that an approved jointing compound is used sparingly 5 Fit the...

Page 33: ...he mounting posts and withdraw from the control box 6 Fit the new PCB and re assemble in reverse order 7 Check the operation of the boiler Fuse To change the fuse prise the top off the holder and dise...

Page 34: ...sembly Refer to Frame 46 3 Drain the system 4 Disconnect the water connections If compression fittings are used then cut the pipes both above and below the fittings in order to allow the heat exchange...

Page 35: ...fan Is fault corrected YES NO Change pressure switch Is fault corrected Is the boiler casing correctly fitted Does the main burner light NO YES YES Does the hot surface ignitor turn off NO Is there a...

Page 36: ...ot burner injector HONEYWELL 4580 1075002 30 80 1 004982 386 131 Pilot burner injector HONEYWELL 4580 1075001 100 1 004 981 15 308 358 Pilot burner head Q359A with 308 358 Honeywell 4580 1075002 injec...

Page 37: ...rvicing 37 SHORT LIST OF PARTS LEGEND Numbers up to 51 relate to the B G spares list 10 Burner manifold 11 Air box and pilot assembly 12 Main burner 13 Main burner injector 16 Pilot shield 17 Gas cont...

Page 38: ...Installation Servicing Cla 1801 58A 26 21A LED 1 LED 2 LED 3 LED 4 23A Fuse SHORT LIST OF PARTS LEGEND 19 Control box 21A Thermostat potentiometer 26 Thermostat knob 23A Printed circuit board 58A Lock...

Page 39: ...Supplied By www heating spares co Tel 0161 620 6677 British Gas RD1 Installation Servicing 39...

Page 40: ...1994 Quality System accepted by BSI British Gas Services Limited Registered in England No 3141243 Registered Office Charter Court 50 Windsor Road Slough Berkshire SL1 2HA British Gas Services Ltd has...

Reviews: