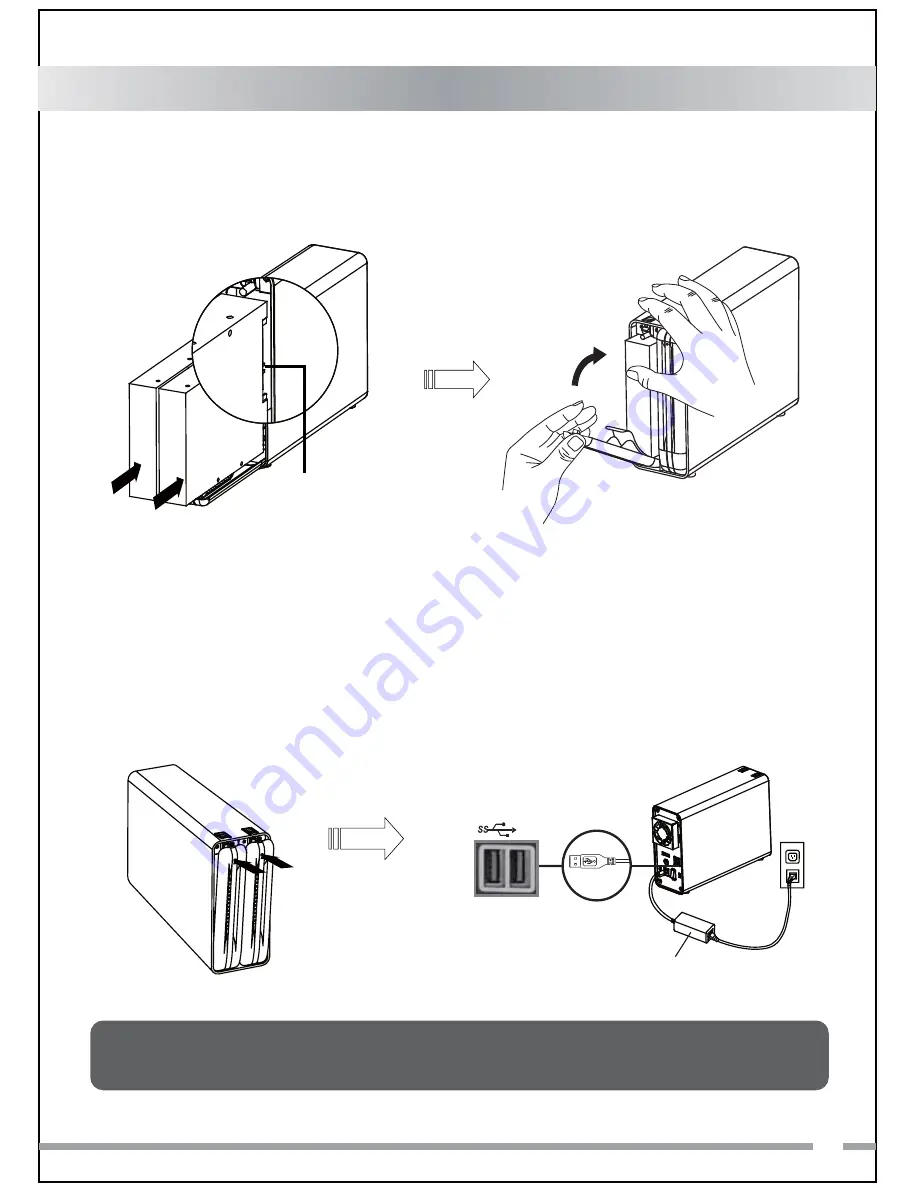
3. Insert the hard drive in the correct position, insert the drive by slowly pushing
the drive in and closing the front door panel at the same time.
3
English
4. Push to close the front panel until a
"click" sound is audible, indicating
the panel is locked in securely.
5. Connect the power adapter to the
unit. Plug the included USB 3.0
cable to the unit and other end to
PC or Mac.
( Note: the default mode is
preset to JBOD mode. To change RAID
modes, please refer to Section 5 - Using
the RAID Mode.)
Power Adapter
USB 3.0 Cable
USB
3.0
Note: Always ensure enough airflow around the enclosure for best performance.
SATA 7 + 15 PIN
connector
Summary of Contents for MB662U3-2S R1
Page 35: ...1 2 33...
Page 37: ...35 USB 3 0 USB 3 0...
Page 38: ...36 6 LED 5 RAID...
Page 39: ...JBOD RAID 0 BIG RAID 1 RAID 0 JBOD JBOD RAID 0 BIG RAID 1 BIG JBOD RAID 0 BIG RAID 1 7 RAID 37...
Page 40: ...HDD 2 HDD 1 JBOD RAID 0 BIG RAID 1 RAID 1 38...
Page 42: ...40 2 10 1 RAID IC 3 RAID 4 RAID 0 RAID 1 RAID Enterprise edition...
Page 43: ...2 1 41...
Page 45: ...USB 3 0 USB 3 0 43 86 2 5 5 6 7 SATA 7 15 PIN...
Page 46: ...6 LED Rebuild RAID RAID Rebuild RAID Rebuild 5 RAID 2 5 2 5 5 5HVHW 44 5 5...
Page 48: ...RAID 1 Safe JBOD RAID 0 BIG RAID 1 RAID 1 HDD 2 HDD 1 46...
Page 50: ...10 RAID RAID RAID RAID Enterprise edition RAID 0 RAID 1 RAID RAID RAID http www icydock com 48...
Page 51: ...2 1 49...
Page 53: ...USB 3 0 USB 3 0 51 86 2 5 5 6 7 SATA 7 15 PIN...
Page 54: ...52 6 LED Rebuild RAID RAID Rebuild RAID Rebuild 5 RAID...
Page 56: ...HDD 2 HDD 1 54 JBOD RAID 0 BIG RAID 1 RAID 1...
Page 58: ...56 10 RAID RAID RAID RAID Enterprise edition RAID 0 RAID 1 RAID RAID RAID http www icydock com...
Page 59: ...MB662U3 2S R1...
Page 60: ...650223 VER 1 0 Bringing Innovation Difference...


