ISaGRAF WinCE ViewPAC User Manual , V.1.6 , 1/2017 by ICP DAS
3-2
3.2 Steps To Set Up A Web HMI Demo
3.2.1 Step 1 – Set up The Hardware
A. Please have one VP-25W7 and then plug one I-87055W board in its slot 0.
If you don’t have the I-87055W (8 IN & 8 OUT board), please follow the same steps as below
however your Web HMI demo may be replaced to “vphmi_01” not “vphmi_05”
B. Prepare one Ethernet cable and then connect them to the ViewPAC. Keyboard is using the software
keyboard on the bottom-right of the ViewPAC screen)
C. Power up the ViewPAC.
3.2.2 Step 2 - Setting The Web Options
A.
Please refer to the
to set a fixed IP address to the ViewPAC. (
No DHCP
)
B.
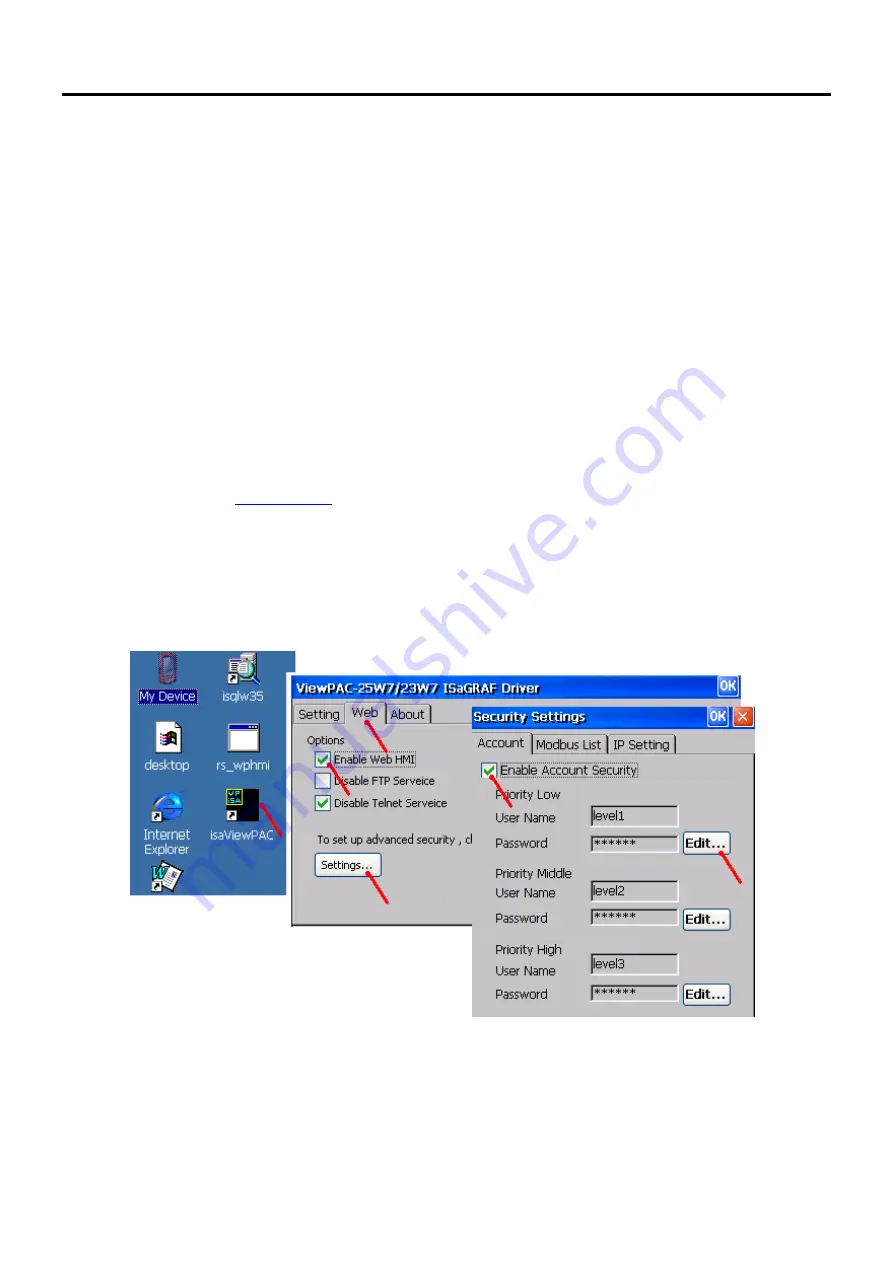
Check on “Enable Web HMI” and then click on “Setting”, Please check the “Enable Account Security”
and then click on “Edit” to set (username , password).
Then remember to click on “OK”
Note:
If “Enable Account Security” is not checked, any user can easily get access to your ViewPAC
through the Internet Explorer
.
Summary of Contents for ISaGRAF WinCE ViewPAC
Page 44: ......
Page 118: ......
Page 177: ...ISaGRAF WinCE ViewPAC User Manual V 1 6 1 2017 by ICP DAS Ap 17 VP 23W7 23W6 Unit mm...
Page 178: ...ISaGRAF WinCE ViewPAC User Manual V 1 6 1 2017 by ICP DAS Ap 18 VP 25W7 25W6 Unit mm...
Page 179: ...ISaGRAF WinCE ViewPAC User Manual V 1 6 1 2017 by ICP DAS Ap 19...
Page 180: ...ISaGRAF WinCE ViewPAC User Manual V 1 6 1 2017 by ICP DAS Ap 20 VP 41x7 41x6 Unit mm...
Page 185: ...ISaGRAF WinCE ViewPAC User Manual V 1 6 1 2017 by ICP DAS Ap 25...


