background image

31

9

DSC OPERATION


D

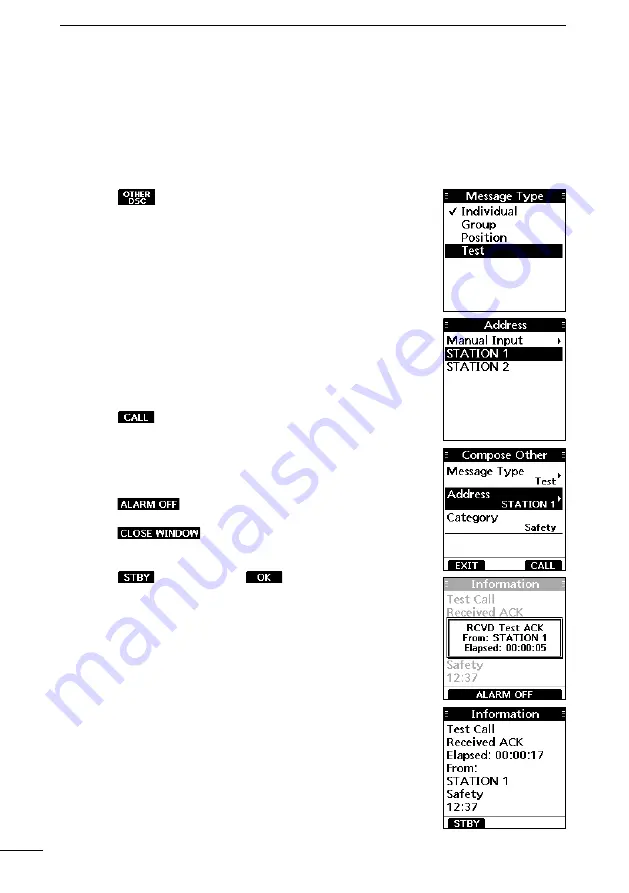
Sending a Test call

You should avoid sending test calls on the exclusive DSC Distress channels and safety 

calling channels. When you cannot avoid testing on a Distress or safety channel, you 

should indicate that these are test calls.

Normally the Test call would require no further communications between the two stations 

involved.
1.  Push 

.

 •The “Compose Other” screen is displayed.


L

You can also display the “Compose Other” screen by 

selecting the “Compose Other” item on the Menu screen.

2.  Select “Message Type,” and then push [ENT].

 •The “Message Type” screen is displayed.

3.  Select “Test,” and then push [ENT].

 •The Test call is selected, and returns to the “Compose Other” 

screen.

4.  Select “Address,” and then push [ENT].

 •The “Address” screen is displayed.

5.  Select a station to send the Test call to.


L

You can also select “Manual Input” to manually enter the 

calling station.

6.  Push 

 to send the Test call.


L

If Channel 70 is busy, the transceiver stands by until the 

channel becomes clear.

7. 

When you receive an Acknowledgement:

 •An alarm sounds.

 •The screen to the right is displayed.

8.  Push 

 to turn OFF the alarm.

 •

The Acknowledgement information is displayed.

9.  Push 

.

 •The received call’s information is displayed.

 •The call is saved in the DSC Log.

10.  Push 

, and then push 

 to return to the 

operating screen.

Summary of Contents for IC-M94DE

Page 1: ...INSTRUCTION MANUAL This device complies with Part 15 of the FCC Rules Operation is subject to the condition that this device does not cause harmful interference VHF MARINE TRANSCEIVERS M94D M94DE...

Page 2: ...disasters disturbances riots war or radioactive contamination The use of Icom transceivers with any equipment that is not manufactured or approved by Icom Icom Icom Inc and the Icom logo are register...

Page 3: ...Guard by sending a distress call on Channel 16 or transmit your Distress call using Digital Selective Calling DSC on Channel 70 D D USING CHANNEL 16 1 Push 16 C to switch to Channel 16 2 While holdin...

Page 4: ...the transceiver in bags and so on Carry them so that shorting cannot occur with metal objects Shorting may damage not only the battery pack but also the transceiver CAUTION DO NOT use harsh solvents s...

Page 5: ...plosive Cela pourrait causer une explosion mortelle R R AVERTISSEMENT N utilisez JAMAIS et ne rechargez JAMAIS des blocsbatteries Icom avec des metteurs r cepteurs non Icom ou des chargeurs non Icom S...

Page 6: ...following guidelines DO NOT operate the radio without a proper antenna attached as this may damage the radio and may also cause you to exceed FCC and IC RF exposure limits A proper antenna is the ante...

Page 7: ...ans des cas o des personnes sont expos es en raison de leur travail pourvu qu elles soient conscientes du risque d expositionet qu elles puissent exercer un contr le sur cette exposition Votre radio I...

Page 8: ...lise et peut mettre un rayonnement de fr quence radio S il n a pas t install conform ment aux instructions il peut par ailleurs cr er des interf rences perturbant les communications radio L utilisatio...

Page 9: ...ents Important i Features i Explicit definitions i D finitions explicites i In case of emergency ii Recommendation ii Precautions iii Pr cautions iv Safety training information v Infomation en mati re...

Page 10: ...on for radio purposes 2 OPERATOR S LICENSE A Restricted Radiotelephone Operator Permit is the license most often held by small vessel radio operators when a radio is not required for safety purposes T...

Page 11: ...ng accessories D D Antenna Connect the supplied antenna to the antenna connector CAUTION DO NOT carry the transceiver by holding only the antenna DO NOT connect an antenna other than those listed in t...

Page 12: ...ing damaged When attaching or removing the battery cover make sure the rubber seal is correctly set in the groove of the cover If the seal is not correctly in the groove it may be damaged when attachi...

Page 13: ...function ON or OFF p 17 5 CHANNEL 16 KEY 16 C Push to select Channel 16 p 13 Hold down for 1 second to select the Call channel p 13 6 ENTER KEY ENT Push to set the entered data selected item and so on...

Page 14: ...led messages is read 6 CPA TCPA ICON Displayed when there is a target in the CPA TCPA alarm area p 52 7 BATTERY INDICATOR Displays the battery s remaining power Full Mid Charging required Battery exha...

Page 15: ...TRI 16 Displayed while using the Dualwatch or Tri watch function p 21 16 OPERATING CHANNEL NUMBER p 13 Displays the selected operating channel number 17 STATUS INDICATOR STBY Standby mode RT Displayed...

Page 16: ...y to return to the regular channel mode p 14 High Low Push to set the output power to high or low L L Some channels are set to only low power p 5 AIS Push to display the AIS plotter screen p 45 Waypoi...

Page 17: ...h fire R R DANGER NEVER let fluid from inside the battery get in your eyes This can cause blindness Rinse your eyes with clean water without rubbing them and immediately go to a doctor R R WARNING NEV...

Page 18: ...he charger is not waterproof CAUTION DO NOT use the power adapter unless the power outlet is easily accessible and near the unit Remove it from the power outlet when not in use NOTE DO NOT charge the...

Page 19: ...May not be supplied or the shape may be different depending on the transceiver version L L Charging is displayed and bars of the battery icon scroll while charging L L Full Charge is displayed when t...

Page 20: ...CLR twice If you skip the entry you cannot make a DSC call To enter the code after skipping turn OFF the power and then turn it ON again 3 Enter the MMSI code TIP Select a number using and Push ENT to...

Page 21: ...o start entering The ATIS ID Input screen is displayed 3 Enter your ATIS ID TIP Select a number using and Push ENT to enter the selected number Select or to move the cursor 4 Repeat step 3 to enter al...

Page 22: ...selected and used to store your most often used channel in each Channel Group for quick recall L L See page 15 for details on setting the Call channel z z Hold down 16 C for 1 second to select the Cal...

Page 23: ...ct a Weather channel The Weather channel list WX channel Frequency MHz WX channel Frequency MHz 1 162 550 6 162 500 2 162 400 7 162 525 3 162 475 8 161 650 4 162 425 9 161 775 5 162 450 10 163 275 D D...

Page 24: ...o that you can receive only stronger signals A lower level enables you to hear weak signals 1 Push VOL SQL twice The squelch level adjustment screen is displayed 2 Push or to adjust the squelch level...

Page 25: ...h and then speak at your normal voice level NOTE To conserve battery power the Power Save function automatically turns ON when no signal is received for 5 seconds When the temperature is extremely hig...

Page 26: ...is displayed on the bottom of the display while the Lock function is ON Monitor function The Monitor function temporarily cancels the Squelch function to check for weak signals 1 Hold down VOL SQL to...

Page 27: ...OFF the function TIP You can also use the function by selecting the AquaQuake item on the Menu screen MENU AquaQuake Editing a channel name You can edit the name of each operating channel and weather...

Page 28: ...el 16 is not scanned unless it is set as a Favorite channel For the USA AUS and EXP versions When the Weather Alert function is ON the previously selected Weather channel is also scanned CH 04 CH 02 C...

Page 29: ...e default By default some channels are preset as Favorite channels The preset channels may differ depending on the transceiver version Starting a scan Except the HOL version Example Starting a Normal...

Page 30: ...screen MENU Settings Radio Dual Tri Watch 2 Push or to select a channel 3 Push or to display Dualwatch or Tri watch 4 Push or Dualwatch or Tri watch starts is displayed for Dualwatch and is displayed...

Page 31: ...ndividual or Group ID TIP Select a number using Push ENT to set the selected number Select or on the screen to move the cursor NOTE For a Group ID the first digit is fixed as 0 For any coast station I...

Page 32: ...NOTE The manual entry is disabled while valid GPS data is received The manually entered position and time is valid only for 4 hours or until turning OFF the transceiver 1 Open the Position Input scre...

Page 33: ...edgement is received or a Distress Cancel call is sent 4 When you receive an Acknowledgment an alarm sounds Push to turn OFF the alarm Channel 16 is automatically selected 5 Hold down PTT and then exp...

Page 34: ...ENT Example Flooding The setting is saved and returns to the previous screen L L If no valid GPS data is being received select Position and then enter the latitude longitude and UTC See Entering the p...

Page 35: ...ent Be sure to report the purpose of the cancellation 1 While waiting for an Acknowledgement push The screen to the right is displayed 2 Push The Distress Cancel call is sent Channel 16 is automatical...

Page 36: ...ain Pauses the countdown to resend the next Distress call Displays the information of the Distress call that you have sent After receiving an Acknowledgement Closes the Distress operation and returns...

Page 37: ...s to the Compose Other screen L L You can also select Manual Input to manually enter the target station ID 6 Select Channel and then push ENT 7 Select a channel to assign and then push ENT L L The ass...

Page 38: ...unicate and want to return to the operating screen push L L If you want to hold the RX call task and return to the Main screen push L L If you want to send an Acknowledgement Able to comply right away...

Page 39: ...n is displayed 3 Select Group and then push ENT The Group call is selected and returns to the Compose Other screen 4 Select Address and then push ENT The Address screen is displayed 5 Select the group...

Page 40: ...The Message Type screen is displayed 3 Select Test and then push ENT The Test call is selected and returns to the Compose Other screen 4 Select Address and then push ENT The Address screen is display...

Page 41: ...the calling station p 42 If the function is set to Manual do the following steps to send an Acknowledgement 1 After a Test call is being received push to turn OFF the alarm 2 Push The received call s...

Page 42: ...selected and returns to the Compose Other screen 4 Select Address and then push ENT The Address screen is displayed 5 Select a target to send a Position Request call to and then push ENT L L You can a...

Page 43: ...h The received call s information is displayed 3 Push The Compose Other screen is displayed 4 Select the Acknowledgement type in the Comply item Able Comply Sends an Acknowledgement without any change...

Page 44: ...saved in the DSC Log blinks continuously until you display the call message Hold Puts the received call on hold and returns to the operating screen L L You can check the DSC calls that are on hold in...

Page 45: ...Push to turn OFF the alarm 2 Push the Software Key below for your next operation Ignore Ignores the call and returns to the operating screen The call is saved in the DSC Log blinks continuously until...

Page 46: ...ll is saved in the DSC Log blinks continuously until you display the call message Hold Puts the received call on hold and returns to the operating screen L L You can check the DSC calls that are on ho...

Page 47: ...ware Key below for the intended operation Able Comply Sends an Acknowledgement Able comply right away The call is saved in the DSC Log Unable Comply Sends an Acknowledgement Unable Comply The call is...

Page 48: ...and returns to the operating screen L L You can check the DSC calls that are on hold in the Unread List p 41 Able Comply Sends a Test Acknowledgement Able Comply The call is saved in the DSC Log Acce...

Page 49: ...then push ENT L L Distress displays the received Distress call log and Others displays the received DSC call log TIP You can also display the Received screen by pushing on the operating screen 4 Selec...

Page 50: ...reen is displayed 2 Select a DSC call 3 Push the Software Key below for your next operation Delete Deletes the selected DSC call Active Displays the received call s information Displays the details on...

Page 51: ...n Acknowledgement Manual Manually sends an Acknowledgement CH Auto Switch Select whether or not to automatically switch to channel 16 or the specified channel or ignore the call L L The function is au...

Page 52: ...n data has not been updated for 10 minutes The received position data has not been updated for 4 hours The manually entered position data has not been updated for 4 hours z z Self Terminate An alarm s...

Page 53: ...el Class B AIS Other vessel Class A AIS Vessel Information Base Station Your vessel Class B AIS AIS classes There are 7 types of AIS stations vessels base stations Search and Rescue SAR Aids to Naviga...

Page 54: ...ge Selects the display range p 46 Target Selects the farthest target from your vessel Target Selects the closest target to your vessel Detail Displays the details on the selected target p 50 L L Displ...

Page 55: ...the plotter screen are filtered p 52 MENU Settings AIS Target Display Indicator Description Only Danger targets are displayed p 48 Only Friend targets are displayed p 48 No indicator All targets are d...

Page 56: ...May not be displayed depending on the selected target Navigation Starts navigation to the selected target p 59 Friend Sets the selected target as a Friend p 49 L L Displayed only in the Target List or...

Page 57: ...FORMATION Displays the following AIS target information MMSI code or name Range RNG from your vessel to the target unit NM Bearing BRG from your vessel to the target unit degree D D Danger List screen...

Page 58: ...een MENU AIS Target List or Danger List 2 Push or to select an AIS target 3 Push is displayed on the details screen L L A beep sounds and a popup screen is displayed when the memory is full Selecting...

Page 59: ...ftware Key below for your next operation DSC Displays the Compose Other screen to send an Individual call p 28 L L May not be displayed depending on the selected target NAV Starts navigation to the se...

Page 60: ...ass MMSI code Vendor ID LAT Latitude LON Longitude PA Position Accuracy H High L Low Range Bearing Elapsed time SAR aircraft AIS class MMSI code Name Country name Call Sign Vendor ID LAT Latitude LON...

Page 61: ...not to display the CPA TCPA icon on the operating screen when there is an AIS target in the CPA TCPA alarm area ON The icon is displayed when there is an AIS target in the CPA TCPA alarm area OFF The...

Page 62: ...e to between 0 1 and 6 0 NM in 0 1 NM steps for the alarm function z z TCPA Set a TCPA Time to CPA value to between 1 and 60 minutes in 1 minute steps for the alarm function z z Slow Warn The GPS rece...

Page 63: ...also change the output power level by pushing OFF Turns OFF the function z z Range Set the area range to between 0 1 and 6 0 NM in 0 1 NM steps for the function Friends z z Friends List Displays all F...

Page 64: ...aypoint list 1 Open the Waypoint screen MENU Navigation Waypoint 2 Push or to select a waypoint 3 Push the Software Key below for your next operation Add Enters a waypoint p 56 Edit Edits the selected...

Page 65: ...up to 15 characters 5 Select Next and then push ENT to enter the latitude 6 Enter the latitude L L When GPS data is received or your position is entered your current position information is automatic...

Page 66: ...NU Navigation Waypoint 2 Push or to select a waypoint L L Push to sort the waypoints by Name or Range 3 Push L L See steps 3 9 in Entering a waypoint on page 56 D D Navigating to a waypoint The transc...

Page 67: ...ys the Compose Other screen to send an Individual call p 28 L L Displayed only when a target is selected Stop Stops the MOB mode Range Selects the display range p 46 Target Selects the farthest target...

Page 68: ...xt operation DSC Displays the Compose Other screen to send an Individual call p 28 L L Displayed only when a target is selected Stop Stops navigation p 60 MOB Starts the MOB mode p 58 L L The transcei...

Page 69: ...he details on the AIS target or waypoint 1 Repeat steps 1 2 2 Push ENT or The Details screen is displayed 3 Repeat steps 3 4 D D Stopping navigation 1 Push the Software Key below to stop navigation de...

Page 70: ...s A Vessel is moving between 0 and 14 knots Class B Vessel is moving between 2 and 14 knots 60 seconds N A 180 seconds 4 Class A Vessel is moving between 0 and 14 knots while changing course Class B V...

Page 71: ...screen Sky view description Satellite signal strength status description L L Push or to scroll through all the satellite numbers L L A blank bar is displayed for the untracking satellite D D Informat...

Page 72: ...then push ENT The Settings screen is displayed L L Holding down or sequentially scrolls up or down through the Menu screen 3 Push or to select Radio and then push ENT The Radio screen is displayed 4 P...

Page 73: ...tude p 23 Longitude UTC Compose Other Message Type p 28 Address Category Mode Latitude p 34 Longitude UTC Channel p 28 Unread List p 41 AIS Plotter p 45 Target List p 47 Danger List Friends List Navig...

Page 74: ...er as default L L The default setting may differ depending on the transceiver version or presetting UTC Offset Set the offset time between Universal Time Coordinated UTC and your local time to between...

Page 75: ...unds every time the battery indication is lower than a displayed value The beep interval changes as shown below according to the number of bars displayed Option Beep interval OFF This function is OFF...

Page 76: ...ault some channels are preset The Favorite channels differ depending on the transceiver version L L See page 20 for details Set All Channels Sets all channels as Favorite channels Clear All Channels C...

Page 77: ...Operating temperature range 20 C 60 C 4 F 140 F 15 C 55 C 5 F 131 F 10 C 55 C 14 F 131 F Power supply voltage Negative ground 7 2 V DC nominal Current drain at 7 2 V DC approximate Receive Maximum aud...

Page 78: ...B 65 dB Intermodulation 70 dB typical 68 dB 65 dB Hum and noise 40 dB Audio frequency response 1 dB 3 dB of 6 dB octave from 300 Hz 3000 Hz Receiver DSC IC M94D IC M94DE IC M94DE AUS Sensitivity typic...

Page 79: ...ers FA SC59V antenna MB 133 belt clip MB 96F MB 96FL leather belt hanger HM 165 HM 228 speaker microphone Full sized waterproof speaker microphone including alligator type clip to attach to your shirt...

Page 80: ...remove any water that may be inside the speaker grill and or microphone hole The DSC alarms sound from the transceiver even while the speaker microphone is attached D D Attaching the HM 165 1 Turn OFF...

Page 81: ...eceive 61 156 075 160 675 1061 156 075 156 075 62 156 125 160 725 1062 156 125 156 125 63 156 175 160 775 1063 1063 3 1063 156 175 156 175 64 64 156 225 160 825 1064 156 225 156 225 65 156 275 160 875...

Page 82: ...25 P4 5 161 425 161 425 1 Low power only 2 Low power only for the HOL version 3 For only the HOL and UK versions 4 For only the HOL version 5 For only the UK version L L 1037 and P4 channels are UK Ma...

Page 83: ...ttery is overcharged Confirm that the battery voltage is correct Scan does not start z z More than 2 favorite channels are not set Set the Favorite channels p 20 No beep sounds z z The Key Beep functi...

Page 84: ...ll 25 Sending 24 Simple call 24 Software Key 27 DSC Address ID 22 Log received 40 Log transmitted 40 Settings 42 Unread List 41 DSC Switch 42 DST at PW OFF 43 Dual Tri watch Description 21 Operation 2...

Page 85: ...call receiving 38 Request call sending 33 Power Save Configuration 66 Power Support 54 R Radio Info 67 Receiving 16 RT Indicator Radio settings 67 S Scan Starting 20 Types 19 Scan Timer Radio setting...

Page 86: ...MEMO...

Page 87: ...1 7 4 10 15 18 2 8 13 5 11 16 3 9 14 6 12 17 MEMO...

Page 88: ...1 1 32 Kamiminami Hirano ku Osaka 547 0003 Japan A7615H 1EX 4 Printed in Japan 2020 2022 Icom Inc Feb 2022 How the World Communicates...

Reviews: