background image

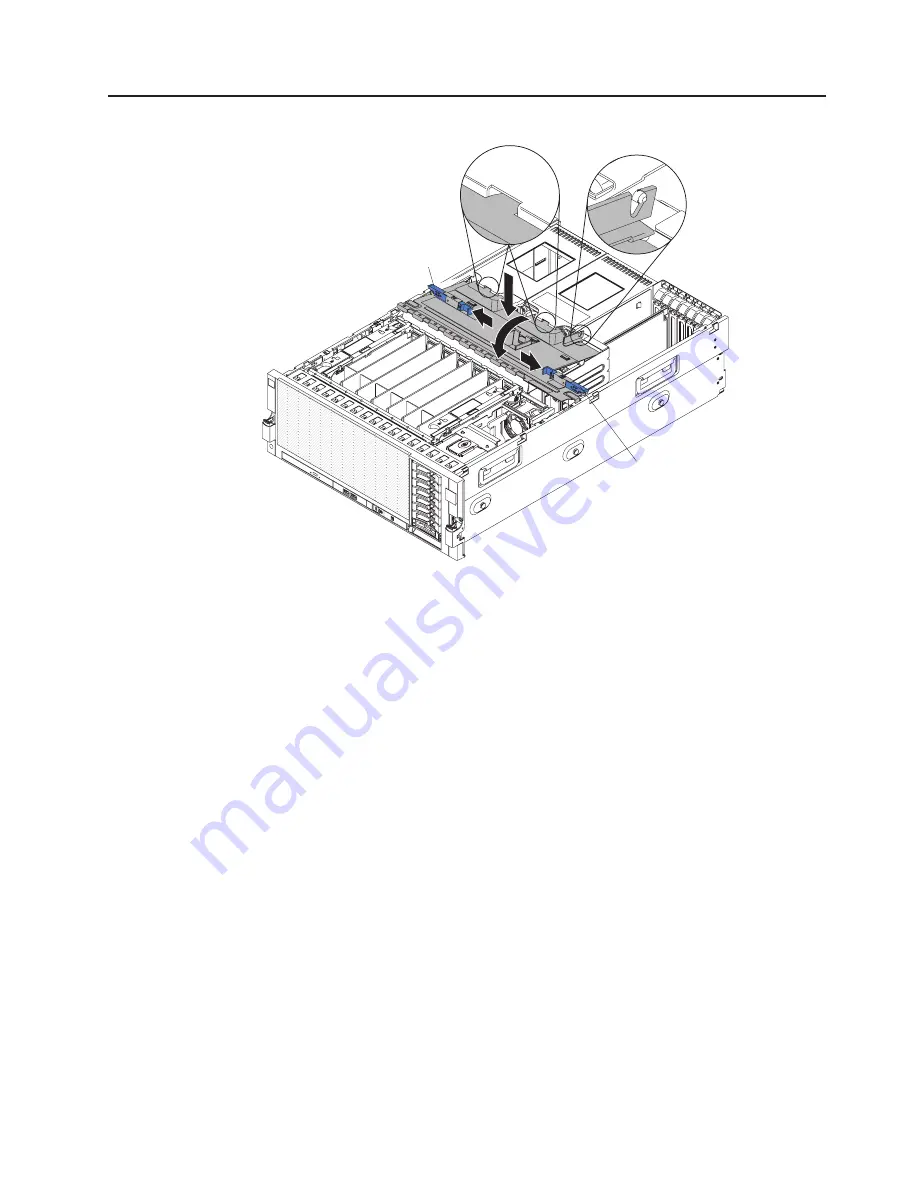
Installing the top-cover bracket

Latch

Latch

To replace the top-cover bracket, complete the following steps:

1. Make sure that all internal cables are correctly routed.

2. Align the top-cover bracket on top of the server so that the metal tabs line up

correctly on the chassis, and then rotate it into place.

3. Slide the blue latches on the top cover bracket toward the outside of the server

to lock it in place.

Chapter 2. Installing optional devices

33

Summary of Contents for x3850 X5 7145

Page 1: ...IBM System x3850 X5 and x3950 X5 Types 7145 and 7146 Installation and User s Guide...

Page 2: ......

Page 3: ...IBM System x3850 X5 and x3950 X5 Types 7145 and 7146 Installation and User s Guide...

Page 4: ...ge 77 the IBM Safety Information and Environmental Notices and User Guide documents on the IBM Documentation CD and the Warranty Information Second Edition March 2010 Copyright IBM Corporation 2010 US...

Page 5: ...rd LEDs 23 I O board connectors 24 I O board jumpers 24 I O board LEDs 25 Installation guidelines 25 A single power supply server operating at 208 V ac 27 System reliability guidelines 27 Working insi...

Page 6: ...A Getting help and technical assistance 75 Before you call 75 Using the documentation 75 Getting help and information from the World Wide Web 75 Software service and support 76 Hardware service and s...

Page 7: ...alleert eerst de veiligheidsvoorschriften Ennen kuin asennat t m n tuotteen lue turvaohjeet kohdasta Safety Information Avant d installer ce produit lisez les consignes de s curit Vor der Installation...

Page 8: ...of the caution or danger statement in the Safety Information document For example if a caution statement is labeled Statement 1 translations for that caution statement are in the Safety Information d...

Page 9: ...quipment when there is evidence of fire water or structural damage v Disconnect the attached power cords telecommunications systems networks and modems before you open the device covers unless instruc...

Page 10: ...place it only with the same module type made by the same manufacturer The battery contains lithium and can explode if not properly used handled or disposed of Do not v Throw or immerse into water v He...

Page 11: ...he device v Use of controls or adjustments or performance of procedures other than those specified herein might result in hazardous radiation exposure DANGER Some laser products contain an embedded Cl...

Page 12: ...the power switch on the power supply do not turn off the electrical current supplied to the device The device also might have more than one power cord To remove all electrical current from the device...

Page 13: ...inside any component that has this label attached There are no serviceable parts inside these components If you suspect a problem with one of these parts contact a service technician Statement 11 CAU...

Page 14: ...ing when the server unit is extended Statement 17 CAUTION The following label indicates moving parts nearby Statement 26 CAUTION Do not place any object on top of rack mounted devices Attention This p...

Page 15: ...crease performance reliability and availability For more information see What your server offers on page 7 and Reliability availability and serviceability on page 9 You can obtain up to date informati...

Page 16: ...________________________ The model number and serial number are on labels on the bottom of the server and on the front visible through the bezel as shown in the following illustration ID labels For a...

Page 17: ...ents for your server Some documents might be in folders A plus sign indicates each folder or document that has additional documents under it Click the plus sign to display the additional documents Whe...

Page 18: ...nformation about tools for updating managing and deploying firmware device drivers and operating systems The ToolsCenter for System x and BladeCenter is at http publib boulder ibm com infocenter tools...

Page 19: ...ormation is a summary of the features and specifications of the server Depending on the server model some features might not be available or some specifications might not apply Notes 1 Racks are marke...

Page 20: ...g 110 lb when fully configured Integrated functions v Integrated management module IMM which provides service processor control and monitoring functions video controller and remote keyboard video mous...

Page 21: ...terfaces Intelligent Platform Management Interface IPMI version 2 0 Simple Network Management Protocol SNMP version 3 Common Information Model CIM Web browser For more information see Using the integr...

Page 22: ...the hardware support for the Trusted Computing Group TCG specification You can download the software to support the TCG specification when the software is available v Large data storage capacity and...

Page 23: ...wo hot swap power supplies which provide redundant power for many server configurations v ServeRAID support The server supports ServeRAID controllers to create redundant array of independent disks RAI...

Page 24: ...agnostics service processor and read only memory ROM resident code locally or over the LAN v Vital product data VPD on microprocessors system boards power supplies and SAS hot swap drive backplane v W...

Page 25: ...ment and IBM Systems Director The UpdateXpress System Pack Installer UXSPI The UpdateXpress System Pack Installer detects supported and installed device drivers and firmware in the server and installs...

Page 26: ...on locator LED Power control button cover The following controls and LEDs are on the operator information panel v Power control button and power on LED Press this button to turn the server on and off...

Page 27: ...the light path diagnostics panel slide the blue release button on the operator information panel to the left Pull forward on the operator information panel until the hinge of the panel is free of the...

Page 28: ...ice Guide on the IBM Documentation CD Rear view The following illustration shows the connectors on the rear of the server AC DC System management Ethernet System serial Video USB Gigabit Ethernet 1 2...

Page 29: ...of LEDs see the Problem Determination and Service Guide DC power LED Each hot swap power supply has a dc power LED and an ac power LED When the dc power LED is lit it indicates that the power supply...

Page 30: ...on The server can also be turned on in any of the following ways v If a power failure occurs while the server is turned on the server will restart automatically when power is restored v The systems ma...

Page 31: ...fter an orderly shutdown of the operating system the server will be turned off automatically v You can press the power control button to start an orderly shutdown of the operating system and turn off...

Page 32: ...18 IBM System x3850 X5 and x3950 X5 Types 7145 and 7146 Installation and User s Guide...

Page 33: ...lled or that a 19990305 error code is displayed indicating that an operating system was not found but the server is otherwise working correctly If the server is not working correctly see the Problem D...

Page 34: ...abel on or near a component indicates that the component can be hot swapped which means that if the server and operating system support hot swap capability you can remove or install the component whil...

Page 35: ...tion shows the LEDs on a memory card DIMM 1 error LED DIMM 2 error LED DIMM 3 error LED DIMM 4 error LED DIMM 5 error LED DIMM 6 error LED DIMM 7 error LED DIMM 8 error LED Memory card only error LED...

Page 36: ...d connectors The following illustration shows the connectors on the microprocessor board Scalability link Scalability link I O board power I O board PCIe 2 x 8 connector for SAS RAID card Fan 3 SAS ba...

Page 37: ...ration shows the LEDs on the microprocessor board Microprocessor 4 error LED Microprocessor 3 error LED Microprocessor 2 error LED Microprocessor 1 error LED H8 heartbeat LED Microprocessor board erro...

Page 38: ...ernet 1 Ethernet 2 Video Serial USB 6 7 USB 4 5 Internal USB Internal USB SATA DVD Front USB PCIe auxiliary power Power supply 1 Power supply 2 System management Ethernet I O board jumpers The followi...

Page 39: ...lot 2 error LED Slot 1 error LED Power fault LED Installation guidelines Before you install optional devices read the following information v Read the safety information that begins on page v Working...

Page 40: ...lift a heavy object To avoid straining the muscles in your back lift by standing or by pushing up with your leg muscles v Make sure that you have an adequate number of properly grounded electrical out...

Page 41: ...ckets 1 4 each always contain either a heat sink blank or a microprocessor and heat sink Working inside the server with the power on Attention Static electricity that is released to internal server co...

Page 42: ...s static protective package touch it to an unpainted metal surface on the outside of the server for at least 2 seconds This drains static electricity from the package and from your body v Remove the d...

Page 43: ...tion shows the routing of the DVD power fans 1 and 2 scalability LED and operator information cables DVD power cable connector Fan 1 cable connector Scalability LED cable Fan 2 cable connector Operato...

Page 44: ...990305 error code is displayed indicating that an operating system was not found but the server is otherwise working correctly If the server is not working correctly see the Problem Determination and...

Page 45: ...ating the server for more than 2 minutes with the top cover removed might damage server components Removing the top cover bracket To remove the top cover bracket complete the following steps 1 Read th...

Page 46: ...the server 7 If you are instructed to return the top cover bracket follow all packaging instructions and use any packaging materials for shipping that are supplied to you 32 IBM System x3850 X5 and x3...

Page 47: ...all internal cables are correctly routed 2 Align the top cover bracket on top of the server so that the metal tabs line up correctly on the chassis and then rotate it into place 3 Slide the blue latc...

Page 48: ...id touching the components and gold edge connectors on the adapter v If you are installing a ServeRAID adapter with a battery installed on the adapter you must install the adapter in a full length exp...

Page 49: ...n page 25 2 Turn off the server and peripheral devices and disconnect the power cords and all external cables 3 Remove the server cover see Removing the top cover on page 30 and determine which PCI Ex...

Page 50: ...ting the installation on page 59 Installing a hot swap power supply Statement 5 CAUTION The power control button on the device and the power switch on the power supply do not turn off the electrical c...

Page 51: ...rive The following notes describe the types of hard disk drives that the server supports and other information that you must consider when you install a hard disk drive v The server supports up to eig...

Page 52: ...hard disk drive to any unpainted surface on the outside of the server then remove the hard disk drive from the package 4 Make sure that the drive handle is open then install the hard disk drive into...

Page 53: ...tall a hard disk drive backplane complete the following steps 1 Read the safety information that begins on page v and Installation guidelines on page 25 2 Turn off the server and peripheral devices an...

Page 54: ...the backplane filler from the backplane carrier a Push the tabs on the backplane outward b Pull the filler out of the backplane carrier 12 Orient and install the new backplane into the backplane carr...

Page 55: ...backplane to make sure that you cable the new backplane correctly 15 Slide the backplane carrier into place until it latches while you hold the SAS power cable handle out of the way 16 Install the SA...

Page 56: ...g the top cover bracket on page 33 20 Push the hard disk drives and hard disk drive fillers back into place so that they connect to the backplane 21 Install the top cover 22 Connect the cables and pow...

Page 57: ...stallation guidelines on page 25 2 Turn off the server and peripheral devices and disconnect the power cord and all external cables 3 Rotate the blue release latch on the QPI wrap card handle and pull...

Page 58: ...ower supply that is closest to the USB connector that you plan to use 3 Reach through the empty power supply bay and make sure that the locking collar on the connector is pushed down to the unlocked p...

Page 59: ...If you have other devices to install or remove do so now Otherwise go to Completing the installation on page 59 Chapter 2 Installing optional devices 45...

Page 60: ...ach other v You do not have to save new configuration information to the IMM when you install or remove DIMMs The only exception is if you replace a DIMM that was designated as disabled in the Setup u...

Page 61: ...Memory card 5 Memory card 6 Memory card 7 Memory card 8 Microprocessor 1 connector Microprocessor 2 connector Microprocessor 3 connector Microprocessor 4 connector v The following illustration shows t...

Page 62: ...Table 3 for each memory card Install the memory cards in the installation sequence shown in Table 4 Table 4 Low cost and low power memory card installation sequence Memory card pairs Memory card conne...

Page 63: ...4 and 5 Thirtieth 8 4 and 5 Thirty first 4 4 and 5 Thirty second 6 4 and 5 To enable memory mirroring you must install DIMMs in sets of four one pair in each memory card All DIMMs in each set must be...

Page 64: ...welfth 5 2 and 7 6 2 and 7 Thirteenth 1 4 and 5 2 4 and 5 Fourteenth 7 4 and 5 8 4 and 5 Fifteenth 3 4 and 5 4 4 and 5 Sixteenth 5 4 and 5 6 4 and 5 v If a problem with a DIMM is detected light path d...

Page 65: ...hat a DIMM has failed Light path diagnostics button power LED When this LED is lit it indicates that the capacitor has power and error LEDs can be lit as necessary Light path diagnostics button Press...

Page 66: ...d Slide the blue release latch to the locked position If you have other devices to install or remove do so now Otherwise go to Completing the installation on page 59 Installing DIMMs DIMMs must be in...

Page 67: ...a memory card on a flat static protective surface with the DIMM connectors facing up Attention To avoid breaking the DIMM retaining clips or damaging the DIMM connectors open and close the clips gent...

Page 68: ...pplying pressure on both ends of the DIMM simultaneously The retaining clips snap into the locked position when the DIMM is seated in the connector Note If there is a gap between the DIMM and the reta...

Page 69: ...orts and other information that you must consider when you install a microprocessor v For a list of supported optional devices for the server see http www ibm com servers eserver serverproven compat u...

Page 70: ...com servers eserver serverproven compat us v You can use the Setup utility to determine the specific type of microprocessor in the server v Microprocessor sockets must always contain either a heat sin...

Page 71: ...processor socket if one is present Store the dust cover in a safe place 9 Install the microprocessor in the microprocessor installation tool a Touch the static protective package that contains the new...

Page 72: ...over the microprocessor socket Twist the microprocessor tool counterclockwise to insert the microprocessor into the socket 11 Close the load plate and then rotate the microprocessor release lever to s...

Page 73: ...ou removed the front bezel slide the bezel onto the front of the server chassis 2 If you removed the top cover bracket reinstall it Slide the blue latches into the locked position 3 Place the top cove...

Page 74: ...about installing device drivers see the documentation that comes with each device The server comes with at least one microprocessor If more than one microprocessor is installed the server can operate...

Page 75: ...t module Use the integrated management module IMM for configuration to update the firmware and sensor data record field replaceable unit SDR FRU data and to remotely manage a network For information a...

Page 76: ...ed press F1 If you have set an administrator password you must type the administrator password to access the full Setup utility menu If you do not type the administrator password a limited Setup utili...

Page 77: ...ng the device Power Select this choice to view or change power settings Active Energy Manager Select this choice to enable or disable power capping If you enable power capping the Active Energy Manage...

Page 78: ...e the static IP address or have DHCP assign the IMM IP address save the network changes and reset the IMM Reset IMM to Defaults Select this choice to view or reset the IMM to the default settings Rese...

Page 79: ...generated by the baseboard management controller that is embedded in the integrated management module Important If the system error LED on the front of the server is lit but there are no other error i...

Page 80: ...r a user and an administrator password for a system administrator you can type either password to complete the system startup A system administrator who types the administrator password has access to...

Page 81: ...Z a z and 0 9 for the password Attention If you set an administrator password and then forget it there is no way to change override or remove it You must replace the I O board Using the Boot Selection...

Page 82: ...tallation CD you must have your operating system CD to install the operating system To start the ServerGuide Setup and Installation CD complete the following steps 1 Insert the CD and restart the serv...

Page 83: ...stalling This section describes a typical ServerGuide operating system installation Note Features and functions can vary slightly with different versions of the ServerGuide program 1 After you have co...

Page 84: ...ressing a nonmaskable interrupt button on the information panel for an operating system memory dump ASR is supported by Intelligent Peripheral Management Interface IPMI v Boot sequence manipulation v...

Page 85: ...h a power on password and an administrator password you must type the administrator password to access the full Setup utility menu 3 Select System Settings Integrated Management Module Network Configu...

Page 86: ...artup option appears in the startup sequence Enable and disable the Broadcom Gigabit Ethernet Utility program from the Setup utility Configuring the Broadcom Gigabit Ethernet controller The Ethernet c...

Page 87: ...the ASU program to configure the optional remote presence feature or other IMM settings The remote presence feature provides enhanced systems management capabilities In addition the ASU program provid...

Page 88: ...If your management server is not connected to the Internet to locate and install updates and interim fixes complete the following steps 1 Make sure that you have run the Discovery and Inventory collec...

Page 89: ...agnostic tests that you can perform Most systems operating systems and programs come with documentation that contains troubleshooting procedures and explanations of error messages and error codes If y...

Page 90: ...nd Canada call 1 800 IBM SERV 1 800 426 7378 Hardware service and support You can receive hardware service through your IBM reseller or IBM Services To locate a reseller authorized by IBM to provide w...

Page 91: ...s or implied warranties in certain transactions therefore this statement may not apply to you This information could include technical inaccuracies or typographical errors Changes are periodically mad...

Page 92: ...ive speed is the variable read rate Actual speeds vary and are often less than the possible maximum When referring to processor storage real and virtual storage or channel volume KB stands for 1024 by...

Page 93: ...f such remedial measures is a customer responsibility Table 7 Limits for particulates and gases Contaminant Limits Particulate v The room air must be continuously filtered with 40 atmospheric dust spo...

Page 94: ...r to meet FCC emission limits IBM is not responsible for any radio or television interference caused by using other than recommended cables and connectors or by unauthorized changes or modifications t...

Page 95: ...t this product may cause radio interference in which case the user may be required to take adequate measures European Community contact IBM Technical Regulations Pascalstr 100 Stuttgart Germany 70569...

Page 96: ...s ist die Umsetzung der EU Richtlinie 2004 108 EG in der Bundesrepublik Deutschland Zulassungsbescheinigung laut dem Deutschen Gesetz ber die elektromagnetische Vertr glichkeit von Ger ten EMVG bzw de...

Page 97: ...configuring Ethernet 72 controls 11 controls and LEDs on light path diagnostics panel 13 operator information panel 12 cooling 9 cover removing 30 D danger statements 4 dc power LED 15 device drivers...

Page 98: ...PI wrap card 43 integrated functions 6 network support 8 integrated management module 7 internal cabling DVD and USB 30 DVD power 29 fans 29 operator information cables 29 internal removable flash dri...

Page 99: ...s 3 Q QPI link LEDs 15 QPI wrap card installing 43 QPI wrap ports 14 R RAID arrays configuring 73 RAS features 9 rear LEDs 15 rear view 14 redundant cooling and power 9 related publications 3 reliabil...

Page 100: ...80 United States FCC Class A notice 80 UpdateXpress 11 updating IBM Systems Director 73 server configuration 60 61 USB connectors 14 using boot selection menu program 67 remote presence feature 72 Ser...

Page 101: ......

Page 102: ...Part Number 59Y7205 Printed in USA 1P P N 59Y7205...

Reviews: