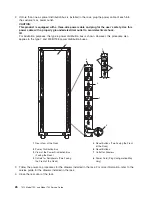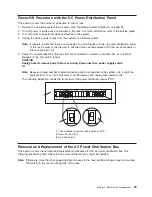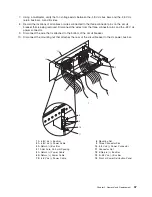
11.
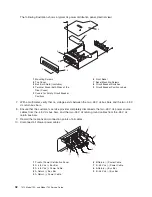
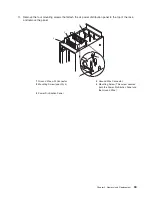
Remove
the
two
mounting
screws
holding
the
circuit
breaker
to
the
panel.
Then
remove
the
circuit
breaker
from
the
inside
of
the
panel.
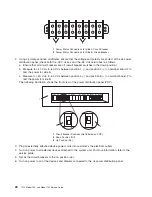
2
1
1
Front
View
of
Power
Distribution
Panel
(Without
Bezel)
2
Mounting
Screws
Note:
The
PDP
shown
is
for
reference
only.
Replacement
This
section
covers
the
replacement
procedures
for
the
-48
V
dc
circuit
breaker.
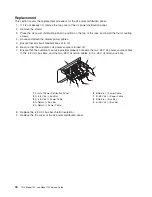
1.
Mount
the
circuit
breaker
to
the
front
of
the
dc
power
distribution
panel
using
the
two
mounting
screws.
2.
Fasten
the
rear
of
the
circuit
breaker
to
the
dc
power
distribution
panel
with
the
mounting
nut.
3.
Connect
the
-48
V
dc
cable
to
the
circuit
breaker
using
the
cable
connector
nut.
4.
Connect
the
two
wires
to
the
two
connector
pins
on
the
rear
of
the
circuit
breaker.
5.
Replace
the
front
bezel
of
the
dc
power
distribution
panel.
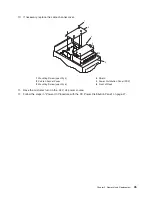
6.
Replace
the
-48
V
dc
bus
bar
shield
(insulation).
7.
Replace
the
top
cover
of
the
dc
power
distribution
panel.
8.
Have
the
customer
restore
power
to
the
dc
power
distribution
panel.
9.
Be
sure
all
circuit
breakers
are
set
to
on.
10.
Follow
the
steps
in
“Power-On
Procedure
with
the
DC
Power
Distribution
Panel”
on
page
27.
38
7014
Model
T00,
and
Model
T42
Service
Guide
Summary of Contents for THINKPAD T42 -
Page 1: ...7014 Series Model T00 and Model T42 System Rack Service Guide SA38 0577 05 ERserver...
Page 2: ......
Page 3: ...7014 Series Model T00 and Model T42 System Rack Service Guide SA38 0577 05 ERserver...
Page 10: ...viii 7014 Model T00 and Model T42 Service Guide...
Page 36: ...24 7014 Model T00 and Model T42 Service Guide...
Page 72: ...60 7014 Model T00 and Model T42 Service Guide...
Page 80: ...68 7014 Model T00 and Model T42 Service Guide...
Page 85: ......


