background image

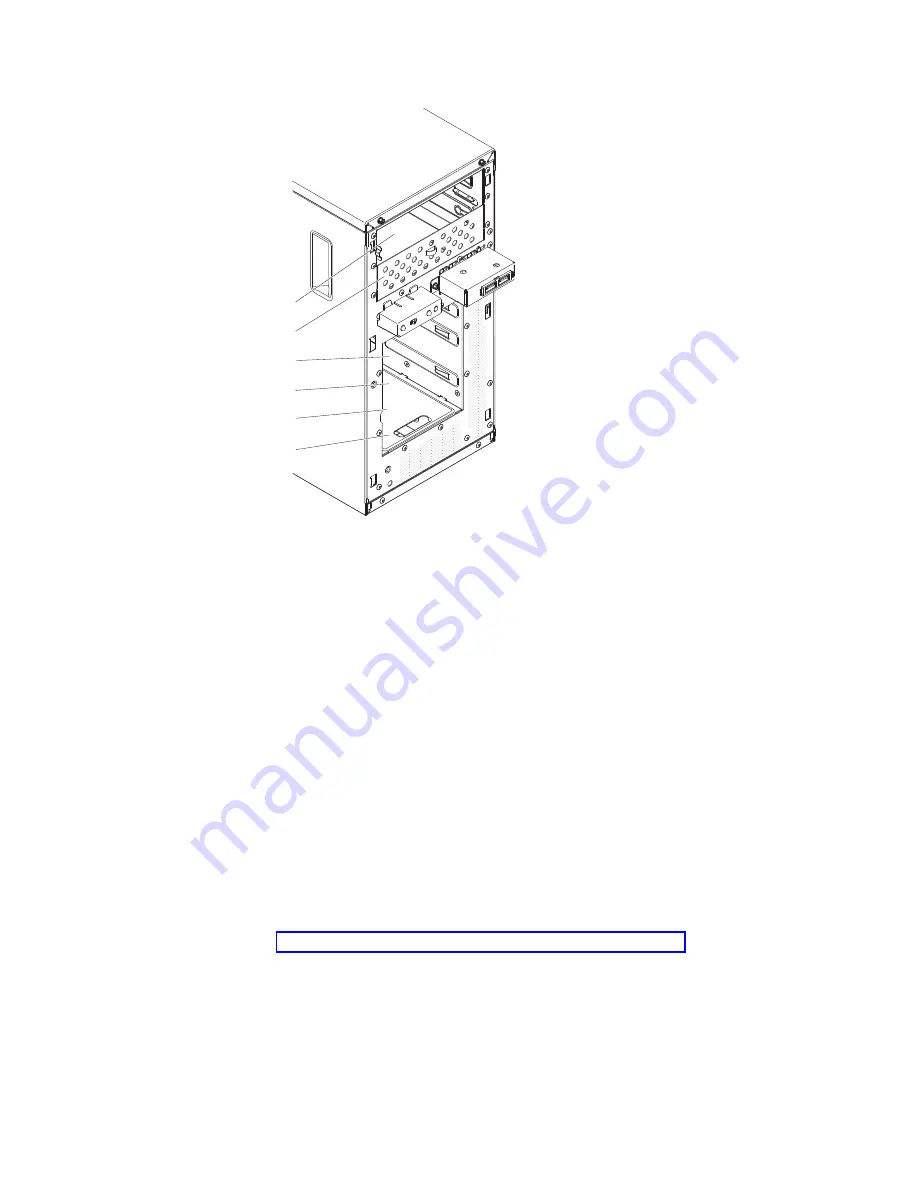
Bay 1

Bay 2

Bay 3

Bay 4

Bay 5

Bay 6

The following notes describe the types of drives that the server supports and other
information that you must consider when installing a drive:

v

Make sure that you have all the cables and other equipment that is specified in
the documentation that comes with the drive.

v

Select the bay in which you want to install the drive.

v

Check the instructions that come with the drive to see whether you have to set
any switches or jumpers on the drive. If you are installing a SATA device, be sure
to set the SATA ID for that device.

v

Optional internal or external USB diskette drives, tape drives, DVD-ROM, and
multiburner drives are examples of removable-media drives. You can install
removable-media drives in bays 1, 2, and 3 only.

v

The SATA removable-media drives that you install in bay 1 connects to the SATA
4 connector on the system board and the drive in bay 2 connects to the SATA 5
connector on the system board.

v

The electromagnetic interference (EMI) integrity and cooling of the server are
protected by having all bays and PCI and PCI Express slots covered or
occupied. When you install a drive, PCI, or PCI Express adapter, save the EMC
shield and filler panel from the bay or PCI or PCI Express adapter slot cover in
the event that you later remove the device.

v

For a complete list of supported optional devices for the server, see
http://www.ibm.com/servers/eserver/serverproven/compat/us/.

Installing a DVD drive

To install a DVD drive, complete the following steps:

1. If you are replacing a removed drive with a new drive, make sure that:

v

You have all the cables and other equipment that is specified in the
documentation that comes with the new drive.

Chapter 2. Installing optional devices

33

Summary of Contents for System x3100 M4

Page 1: ...System x3100 M4 Type 2582 Installation and User s Guide...

Page 2: ......

Page 3: ...System x3100 M4 Type 2582 Installation and User s Guide...

Page 4: ...Information and IBM Environmental Notices and User s Guide on the IBM System x Documentation CD and the Warranty Information document that comes with the server Third Edition November 2011 Copyright...

Page 5: ...oard LEDs 21 Installation guidelines 22 System reliability guidelines 23 Working inside the server with the power on 23 Handling static sensitive devices 23 Removing the side cover 25 Removing the bez...

Page 6: ...nd configuration 67 Using LSI Configuration Utility program 68 Starting the LSI Configuration Utility program 68 Formatting a hard disk drive 69 Creating a RAID array of hard disk drives 69 Creating a...

Page 7: ...Association JEITA statement 80 Korean Class A warning statement 80 Russia Electromagnetic Interference EMI Class A statement 81 People s Republic of China Class A electronic emission statement 81 Tai...

Page 8: ...vi System x3100 M4 Type 2582 Installation and User s Guide...

Page 9: ...ety Information Avant d installer ce produit lisez les consignes de s curit Vor der Installation dieses Produkts die Sicherheitshinweise lesen Prima di installare questo prodotto leggere le Informazio...

Page 10: ...book For example if a caution statement begins with a number 1 translations for that caution statement appear in the IBM Safety Information book under statement 1 Be sure to read all caution and dang...

Page 11: ...quipment when there is evidence of fire water or structural damage v Disconnect the attached power cords telecommunications systems networks and modems before you open the device covers unless instruc...

Page 12: ...hium battery replace it only with the same module type made by the same manufacturer The battery contains lithium and can explode if not properly used handled or disposed of Do not v Throw or immerse...

Page 13: ...he device v Use of controls or adjustments or performance of procedures other than those specified herein might result in hazardous radiation exposure DANGER Some laser products contain an embedded Cl...

Page 14: ...he device and the power switch on the power supply do not turn off the electrical current supplied to the device The device also might have more than one power cord To remove all electrical current fr...

Page 15: ...esent inside any component that has this label attached There are no serviceable parts inside these components If you suspect a problem with one of these parts contact a service technician Statement 1...

Page 16: ...ts do not exceed branch circuit protection requirements Refer to the information that is provided with your device for electrical specifications Statement 15 CAUTION Make sure that the rack is secured...

Page 17: ...n top of rack mounted devices This server is suitable for use on an IT power distribution system whose maximum phase to phase voltage is 240 V under any distribution fault condition Statement 27 CAUTI...

Page 18: ...xvi System x3100 M4 Type 2582 Installation and User s Guide...

Page 19: ...ty availability and serviceability on page 10 You can obtain up to date information about the server and other IBM server products at http www ibm com systems x At http www ibm com support mysupport y...

Page 20: ...document might differ slightly from your hardware You can download an IBM ServerGuide Setup and Installation CD to help you configure the hardware install device drivers and install the operating syst...

Page 21: ...use one of the following procedures If you are using a Windows operating system insert the CD into the CD or DVD drive and click Start Run In the Open field type e win32 bat where e is the drive lett...

Page 22: ...nts Each caution and danger statement that appears in the documentation has a number that you can use to locate the corresponding statement in your language in the Safety Information document Dependin...

Page 23: ...d just before the instruction or situation in which damage might occur v Caution These statements indicate situations that can be potentially hazardous to you A caution statement is placed just before...

Page 24: ...6 m 7000 0 ft Shipping 40 C to 60 C 40 F to 140 F v Humidity operating and storage 8 to 80 v Particulate contamination Attention Airborne particulates and reactive gases acting alone or in combination...

Page 25: ...ment optional features in use 2 These levels were measured in controlled acoustical environments according to the procedures specified by the American National Standards Institute ANSI S12 10 and ISO...

Page 26: ...perating systems BIOS based operating systems and BIOS based adapters as well as UEFI compliant adapters Note The server does not support DOS Disk Operating System v Dynamic System Analysis DSA Dynami...

Page 27: ...eight three quarter length cards Both slots can support PCI Express or PCI X adapters See Installing a ServeRAID adapter on page 41 for detailed information v Large system memory capacity The server s...

Page 28: ...n diagnose and repair problems The server might have the following RAS features the features vary depending on your model v 1 year parts and 1 year labor limited warranty v Advanced Configuration and...

Page 29: ...maintenance v Wake on LAN capability IBM Systems Director IBM Systems Director is a platform management foundation that streamlines the way you manage physical and virtual systems supports multiple op...

Page 30: ...Pack contains all the online driver and firmware updates for a specific machine type and operating system combination The UpdateXpress System Packs are released quarterly Use the UpdateXpress System...

Page 31: ...eject button USB 2 USB 1 Simple swap hard disk drive Front information panel Power on LED Power control button Hard disk drive activity LED System error LED Power control button and power on LED Press...

Page 32: ...nation and Service Guide on the IBM System x Documentation CD USB connectors Connect USB devices to these connectors DVD eject button Press this button to release a CD or DVD from the DVD drive DVD dr...

Page 33: ...on Turning on the server Note Approximately 1 to 3 minutes after the server is connected to ac power the power control button becomes active after the power on LED flashes slowly The server can also b...

Page 34: ...system supports this feature After an orderly shutdown of the operating system the server will be turned off automatically v You can press the power control button to start an orderly shutdown of the...

Page 35: ...Guide for information about how to run diagnostics 3 Follow the installation procedures in this chapter and use the correct tools Incorrectly installed devices can cause system failures because of da...

Page 36: ...lustration shows the major components in the server depending on the server model The illustrations in this document might differ slightly from your hardware See the PDSG on the System x Documentation...

Page 37: ...Main Power System fan connector Slot 2 PCI Slot 3 PCI Slot 4 PCI Microprocessor Front USB connector Front panel connector Power USB tape System board external connectors The following illustration sh...

Page 38: ...jumpers Jumper number Jumper name Jumper setting JP1 Clear CMOS jumper v Pins 1 and 2 Keep CMOS data default v Pins 2 and 3 Clear CMOS data JP2 BIOS boot backup boot block jumper v Pins 1 and 2 Boot...

Page 39: ...jumper pin position after the server is turned on This can cause an unpredictable problem Important 1 Before you change any switch settings or move any jumpers turn off the server then disconnect all...

Page 40: ...moved make sure that no one is near the server and that no tools or other objects have been left inside the server v Do not attempt to lift an object that you think is too heavy for you If you have to...

Page 41: ...de the server do not wear cuff links while you are working inside the server v Do not allow your necktie or scarf to hang inside the server v Remove jewelry such as bracelets necklaces rings and loose...

Page 42: ...y to set down the device put it back into its static protective package Do not place the device on the server cover or on a metal surface v Take additional care when handling devices during cold weath...

Page 43: ...r to fall over 4 Unscrew the two chassis screws on the rear side of the server 5 Pull the rear side cover handle and push the front side cover handle at the same time Chassis screws 6 If you are instr...

Page 44: ...ging instructions and use any packaging materials for shipping that are supplied to you Removing the microprocessor and heat sink To remove the microprocessor and heat sink complete the following step...

Page 45: ...ernate among the screws until they break the seal with the microprocessor b Press firmly on the captive screws and loosen them with a screwdriver c Use your fingers to gently pull the heat sink from t...

Page 46: ...IMMs with error correcting code ECC See http www ibm com systems info x86servers serverproven compat us for a list of supported memory modules for the server v The maximum amount of memory that the se...

Page 47: ...he CAS latency in clocks at maximum operating frequency bb is the JEDEC SPD Revision Encoding and Additions level cc is the reference design file for the design of the DIMM d is the revision number of...

Page 48: ...l Number of UDIMMs DIMM type Size Total memory 4 Single rank UDIMMs 1 GB 4 GB 4 Dual rank UDIMMs 2 GB 8 GB 4 Dual rank UDIMMs 4 GB 16 GB 4 Dual rank UDIMMs 8 GB when available 32 GB v The following ta...

Page 49: ...the safety information that begins on page vii and Installation guidelines on page 22 2 Turn off the server and all peripheral devices then disconnect the power cords and all external cables 3 Remove...

Page 50: ...the connector Note If there is a gap between the DIMM and the retaining clips the DIMM has not been correctly inserted open the retaining clips remove the DIMM and then reinsert it 13 Install the air...

Page 51: ...SATA removable media drives that you install in bay 1 connects to the SATA 4 connector on the system board and the drive in bay 2 connects to the SATA 5 connector on the system board v The electromag...

Page 52: ...adjustments or performance of procedures other than those specified herein might result in hazardous radiation exposure DANGER Some laser products contain an embedded Class 3A or Class 3B laser diode...

Page 53: ...screw holes on the side of the drive Drive retainer clip Release buttons 11 Push the drive into the bay 12 Carefully turn the server on its side so that it is lying flat Attention Do not allow the ser...

Page 54: ...al devices and disconnect the power cords and all external cables 4 Remove the bezel see Removing the bezel on page 25 5 Carefully turn the server on its side so that it is lying flat with the cover f...

Page 55: ...flat blade screwdriver Note Be careful of any sharp edges 12 Push the drive into the bay Note A tape drive can be installed in bay 1 or bay 2 13 Carefully turn the server on its side so that it is lyi...

Page 56: ...ee Installing the bezel on page 49 Note Remove the filler blocking the installed drive if any Bezel filler 21 Reconnect the external cables and power cords then turn on the attached devices and turn o...

Page 57: ...disk drive 2 v Drive 2 indicates hard disk drive 1 v Drive 3 indicates hard disk drive 3 2 In MegaRAID Storage Manager utility v Slot 0 indicates hard disk drive 0 v Slot 1 indicates hard disk drive...

Page 58: ...onnect SATA attached simple swap SATA devices to the power supply and to the system board See System board internal connectors on page 19 for the location of system board connectors Review the followi...

Page 59: ...ormation about the types of adapters that the server supports and other information that you might consider when you install an adapter see the Installation and User s Guide For the locations of the e...

Page 60: ...n all vacant slots This maintains the electronic emissions standards of the server and ensures proper ventilation of server components 14 Touch the static protective package that contains the adapter...

Page 61: ...ention bracket into place so that the hole in the opposite hinge point snaps into place over the hinge pin on the chassis 18 Connect any required cables to the adapter Route the cables so that they do...

Page 62: ...ake sure that the release lever on the microprocessor socket is in the fully open position before you insert the microprocessor in the socket Failure to do so might result in permanent damage to the m...

Page 63: ...oard b Tighten the screws with a screwdriver alternating among the screws until they are tight If possible each screw should be rotated two full rotations at a time Repeat until the screws are tight D...

Page 64: ...ssor and is going to be reused or when debris is found in the grease When you are installing the heat sink on the same microprocessor that is was removed from make sure that v The thermal grease on th...

Page 65: ...ely 5 mm of the edge of the microprocessor this is to ensure uniform distribution of the grease Note If the grease is properly applied approximately half of the grease will remain in the syringe 6 Ins...

Page 66: ...back up in its vertical position 8 Install the bezel see Installing the bezel on page 49 9 Reconnect the external cables and power cords then turn on the attached devices and turn on the server Compl...

Page 67: ...ver for extended periods of time more than 30 minutes with the side cover removed might damage server components To install the side cover complete the following steps 1 Make sure that all cables adap...

Page 68: ...place with the two chassis screws on the rear of the side cover 5 Reconnect the external cables and power cords then turn on the attached devices and turn on the server 50 System x3100 M4 Type 2582 In...

Page 69: ...figuration When you start the server for the first time after you add or remove an internal option or an external device you might receive a message that the configuration has changed The Setup utilit...

Page 70: ...all attached devices 3 Follow the instructions that come with the device to prepare it for installation and to connect it to the server Note If you are attaching an external device see the documentati...

Page 71: ...e firmware and sensor data record field replaceable unit SDR FRU data and to remotely manage a system For information about using the IMM2 see Using the integrated management module II on page 59 v Et...

Page 72: ...on the version of the firmware some menu choices might differ slightly from these descriptions v System Information Select this choice to view information about the server When you make changes throu...

Page 73: ...grated management module II Select this choice to view or change the settings for the integrated management module II POST Watchdog Timer Select this choice to view or enable the POST watchdog timer P...

Page 74: ...ility is only available for emulex 10G card v System Event Logs Select this choice to enter the System Event Manager where you can view the POST event log and system event log The POST event log conta...

Page 75: ...ministrator password is intended to be used by a system administrator it limits access to the full Setup utility menu If you set only an administrator password you do not have to type a password to co...

Page 76: ...ssword and then forget it there is no way to change override or remove it You must replace the system board Using the Boot Manager program The Boot Manager program is a built in menu driven configurat...

Page 77: ...times out The IMM2 allows the administrator to generate a nonmaskable interrupt NMI by pressing an NMI button on the system board for an operating system memory dump ASR is supported by IPMI v Intelli...

Page 78: ...pportportal 2 Under Product support click System x 3 Type flash utility in the search field and click Search 4 Click the link to the applicable flash utility A flash utility enables you to update hard...

Page 79: ...thernet NIC from the IMM2 to the operating system Typically the IMM2 IP address for the LAN over USB interface is set to a static address of 169 254 95 118 with a subnet mask of 255 255 0 0 In the eve...

Page 80: ...erent operating systems see the IBM white paper Transitioning to UEFI and IMM on the IBM website Installing device drivers For the IMM2 to use the LAN over USB interface you might have to install oper...

Page 81: ...ck Next click Network adapters Click Next to continue 9 When you are prompted Completing the Found New Hardware Wizard click Finish Note A new local area connection is displayed and might state This c...

Page 82: ...the ServerGuide Setup and Installation CD complete the following steps 1 Insert the CD and restart the server If the CD does not start see ServerGuide Problems in the Problem Determination and Servic...

Page 83: ...ration overview When you use the ServerGuide Setup and Installation CD you do not need setup diskettes You can use the CD to configure any supported IBM server model The setup program provides a list...

Page 84: ...d you can customize where the network startup option appears in the startup sequence Enable and disable the Intel Gigabit Ethernet Utility program from the Setup utility Configuring the Gigabit Ethern...

Page 85: ...aded 2 Update the IMM2 firmware a Download the latest version of the IMM2 firmware from http www ibm com supportportal or http www ibm com support fixcentral b Update the IMM2 firmware following the i...

Page 86: ...al hot spares All data on the primary disk can be migrated Integrated Striping IS also known as RAID 0 Use this option to create an integrated striping array of two to eight disks All data on the arra...

Page 87: ...d right use the Left Arrow and Right Arrow keys or the End key Press Alt D 5 To start the low level formatting operation select Format and press Enter Creating a RAID array of hard disk drives To crea...

Page 88: ...inux OS by default 3 Legacy OS installation is not supported when BBS boot is enabled on ServeRAID M5014 4 Brocade adapters are supported in Windows 2011 SBS with 3 0 0 0 driver package or later versi...

Page 89: ...e Welcome page of the IBM Systems Director web interface click View updates 3 Click Check for updates The available updates are displayed in a table 4 Select the updates that you want to install and c...

Page 90: ...72 System x3100 M4 Type 2582 Installation and User s Guide...

Page 91: ...agnostic tests that you can perform Most systems operating systems and programs come with documentation that contains troubleshooting procedures and explanations of error messages and error codes If y...

Page 92: ...In the U S and Canada call 1 800 IBM SERV 1 800 426 7378 Hardware service and support You can receive hardware service through your IBM reseller or IBM Services To locate a reseller authorized by IBM...

Page 93: ...SS FOR A PARTICULAR PURPOSE Some states do not allow disclaimer of express or implied warranties in certain transactions therefore this statement may not apply to you This information could include te...

Page 94: ...hannel volume KB stands for 1024 bytes MB stands for 1 048 576 bytes and GB stands for 1 073 741 824 bytes When referring to hard disk drive capacity or communications volume MB stands for 1 000 000 b...

Page 95: ...Limits Particulate v The room air must be continuously filtered with 40 atmospheric dust spot efficiency MERV 9 according to ASHRAE Standard 52 21 v Air that enters a data center must be filtered to...

Page 96: ...erence to radio communications Operation of this equipment in a residential area is likely to cause harmful interference in which case the user will be required to correct the interference at his own...

Page 97: ...kt entspricht den Schutzanforderungen der EU Richtlinie 2004 108 EG zur Angleichung der Rechtsvorschriften ber die elektromagnetische Vertr glichkeit in den EU Mitgliedsstaaten und h lt die Grenzwerte...

Page 98: ...71137 Ehningen Germany Telephone 49 7032 15 2937 Email tjahn de ibm com Generelle Informationen Das Ger t erf llt die Schutzanforderungen nach EN 55024 und EN 55022 Klasse A VCCI Class A statement Thi...

Page 99: ...Russia Electromagnetic Interference EMI Class A statement People s Republic of China Class A electronic emission statement Taiwan Class A compliance statement Appendix B Notices 81...

Page 100: ...82 System x3100 M4 Type 2582 Installation and User s Guide...

Page 101: ...ServerGuide 65 connector battery 19 cable 51 Ethernet 15 external 14 internal 19 connector continued power cord 14 serial 14 Universal Serial Bus USB 14 15 video 15 connectors external 19 contaminatio...

Page 102: ...6 help getting 73 I IBM Advanced Settings Utility program overview 70 IBM Support Line 74 IBM System x Server Firmware Setup utility 60 tools and utilities 59 IBM Systems Director 9 systems management...

Page 103: ...iew 9 P particulate contamination 6 77 password administrator 57 forgotten power on 57 power on 57 passwords 57 ports Ethernet 15 serial 14 Universal Serial Bus USB 14 15 video 15 power control button...

Page 104: ...es handling 23 status LEDs 12 support web site 73 system board internal connectors 19 jumper blocks 20 jumpers 20 LEDs 21 system reliability guidelines 23 system specifications 5 system error LED 14 s...

Page 105: ...website continued IBM support 4 publication ordering 73 ServerProven list 22 28 41 weight 5 6 working inside the server with the power on 23 Index 87...

Page 106: ...88 System x3100 M4 Type 2582 Installation and User s Guide...

Page 107: ......

Page 108: ...Part Number 00D3167 Printed in USA 1P P N 00D3167...

Reviews: