Chapter 5. Display Information
Display Power Management
The POWER GXT800P graphics adapter supports Video Electronics Standards
Association (VESA), Display Power Management Signalling (DPMS).
Change Resolution and Refresh Rates
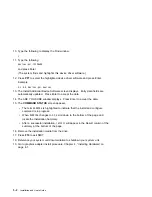
To change the resolution and refresh rates for X or CDE sessions, complete the
following steps:
1. Turn your system unit power on.
2. Log in as root
3. Type the following
smit
and press Enter.
4. From the System Management screen, select Devices and press Enter.
5. Select Graphic Displays and press Enter.
6. Select Select the Display Type.
7. Select the GXT800P Graphics Adapter and press Enter.
8. Press PF4 for a list of Display Types supported.
9. Select the
desired type
and press Enter.
Note: If POWER GXT800P detects a Data Display Channel (DDC) monitor,
"default" is your only SMIT screen option. For DDC monitor owners, pressing
PF4 here creates an information message that states the popup is not available
for this entry field. Press PF3. This brings you back to the Graphics Display
screen. Select Display Resolution and Refresh Rate. Resume process of
non-DCC monitor owner at step #12 below.
10. In Select the Display Type screen, notice the Select Display Type Field data has
been updated. Press Enter.
11. Press PF3 twice to return to the Graphics Display Screen.
12. Select Select the Display Resolution and Refresh Rate and press Enter.
13. From the Graphics Adapter screen, select the GXT800P Graphics Adapter and
press Enter.
14. Press PF4 for a list of Resolution and Refresh Rates that are supported.
Chapter 5. Display Information
5-1
Summary of Contents for Power GXT800P
Page 1: ...POWER GXT800P Graphics Adapter Installation and User s Guide...
Page 4: ...VCCI Statement 8 3 Radio Protection for Germany 8 4 iv Installation and User s Guide...
Page 6: ...vi Installation and User s Guide...
Page 8: ...viii Installation and User s Guide...
Page 10: ...x Installation and User s Guide...
Page 16: ...2 2 Installation and User s Guide...
Page 22: ...4 4 Installation and User s Guide...
Page 28: ...6 4 Installation and User s Guide...
Page 35: ......


