background image

Chapter 3. Installing Device Driver Software

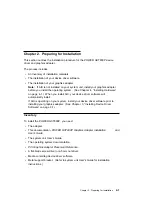
This section explains how to install device driver software.

Device Driver Software Installation

1. Be sure you have read Chapter 2, “Preparing for Installation” on page 2-1.

Ÿ

Determine if you should install your device driver software first.

Ÿ

Determine if you should install your graphics adapter hardware first.

Ÿ

If you should install your device driver software first, go to step 2 and
continue with this section.

Ÿ

If you should install your hardware first, go to Chapter 4, “Installing
Hardware” on page 4-1. When you install AIX, your device driver
automatically installs.

2. Turn the system unit power on.

3. Log in as root.

4. Insert the media containing the device driver software (example: CD-ROM) into

the appropriate media device.

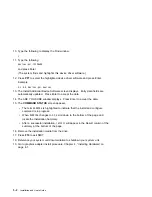
5. Type the following

smit devinst

and press Enter.

6. The Install Additional Device Software screen highlights the "INPUT

device/directory for software" option.

7. Select or type 

your input device:

Ÿ

Press F4 to display the input device list. Select the 

name of the device

(example: CD-ROM) that you are using and press Enter.

-- or --

Ÿ

In the Entry Field, type the 

name of the input device you are using and press

Enter.

8. The Install Additional Device Software window highlights the SOFTWARE to

install option.

9. Press F4 to display the SOFTWARE to install window.


Chapter 3. Installing Device Driver Software

3-1

Summary of Contents for Power GXT800P

Page 1: ...POWER GXT800P Graphics Adapter Installation and User s Guide...

Page 2: ...he publicatio The manufacturer may make improvements and or changes in the product s and or the program s described in this publication at any time without notice It is possible that this publication...

Page 3: ...oting 4 2 Chapter 5 Display Information 5 1 Display Power Management 5 1 Change Resolution and Refresh Rates 5 1 Chapter 6 Software Application Considerations 6 1 Starting the Server in Overlay and Co...

Page 4: ...VCCI Statement 8 3 Radio Protection for Germany 8 4 iv Installation and User s Guide...

Page 5: ...attached devices are unplugged When adding or removing any additional devices to or from the system ensure that the power cables for those devices are unplugged before the signal cables are connected...

Page 6: ...vi Installation and User s Guide...

Page 7: ...ry Do not leave the device where others can handle and possibly damage the device While the device is still in its anti static package touch it to an unpainted metal part of the system unit for at lea...

Page 8: ...viii Installation and User s Guide...

Page 9: ...nd manufacturing of this product Trademarks CATIA is a registered trademark of Dassault Systems CrystalEyes is a registered trademark of StereoGraphics Corporation graPHIGS is a trademark of Internati...

Page 10: ...x Installation and User s Guide...

Page 11: ...memory also provides texture acceleration Connection to the video monitor is made through a high density 15 pin D shell connector Refer to the PCI Graphics Adapter Placement Reference for supported s...

Page 12: ...le buffered alpha 8 bit single buffered overlay 8 bits of window ids 24 bit Z buffer 4 bit stencil OpenGL PEX graPHIGS and GL 3 2 API s 3D Acceleration Depth Buffering Antialiasing Gouraud shading Fog...

Page 13: ...ring Display resolution 1280x1024 and 1024x768 includes monitors that comply with ISO 9241 Part 3 Std Stereo viewing The POWER GXT800P with base and texture supports HW acceleration of trilinear mipma...

Page 14: ...rogram Product 5696 939 If support is required on an AIX release other than AIX 4 1 5 please ensure this adapter is supported on that release of AIX prior to install Contact your support representativ...

Page 15: ...r device driver software will automatically install If AIX is operating on your system install your device driver software prior to installing your graphics adapter See Chapter 3 Installing Device Dri...

Page 16: ...2 2 Installation and User s Guide...

Page 17: ...iver automatically installs 2 Turn the system unit power on 3 Log in as root 4 Insert the media containing the device driver software example CD ROM into the appropriate media device 5 Type the follow...

Page 18: ...Press Enter to accept the data 15 The COMMAND STATUS screen appears The term RUNNING is highlighted to indicate that the install and configure command is in progress When RUNNING changes to OK scroll...

Page 19: ...unit to perform the following Shutdown your system unit Install the graphics adapter in your system unit Refer to the PCI Graphics Adapter Placement Reference to identify supported installation slots...

Page 20: ...re than one display adapter be sure that each adapter is connected to a display Verify the cable connection to your video monitor is made through a high density 15 pin D shell connector For detailed c...

Page 21: ...s tried the chdisp command and continue to experience problems run diagnostics Refer to your operating system documentation for directions Verify Hardware Installation 1 To verify your system unit rec...

Page 22: ...4 4 Installation and User s Guide...

Page 23: ...desired type and press Enter Note If POWER GXT800P detects a Data Display Channel DDC monitor default is your only SMIT screen option For DDC monitor owners pressing PF4 here creates an information me...

Page 24: ...the desired rate and press Enter Note Your X session or CDE session will run at the rate specified the next time you bring up one of these sessions 16 Press F10 to exit SMIT 5 2 Installation and User...

Page 25: ...y plane default These are the only valid choices All other choices will default to layer 1 Starting the X server in the color planes xinit layer other flags Starting the X server in the overlay planes...

Page 26: ...ted by the application from the supported visuals for the color planes via the XGetVisualInfo function and passed to the XCreateWindow function to create the gP window in the color planes In this case...

Page 27: ...tion but it does not give you the best performance Since the X server and graPHIGS are both running in the color planes graPHIGS will have to handle exposure events from manipulating the X windows for...

Page 28: ...6 4 Installation and User s Guide...

Page 29: ...OWER GXT800P Graphics Accelerator Emitter models that have only a DB 9 connector will not work In this configuration both sync signal and power are supplied by the adapter to the emitter Connect the D...

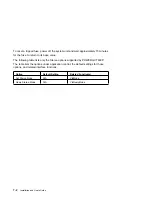
Page 30: ...owing table lists only the Stereo options supported by POWER GXT800P The table lists the options under application control the default settings for those options and related interface functions Option...

Page 31: ...wing measures Reorient or relocate the receiving antenna Increase the separation between the equipment and receiver Connect the equipment into an outlet on a circuit different from that to which the r...

Page 32: ...mission IEC Statement This product has been designed and built to comply with IEC Standard 950 United Kingdom Telecommunications Safety Requirements This equipment is manufactured to the International...

Page 33: ...tatement The following is a summary of the VCCI Japanese statement in the box above This is a Class B product based on the standard of the Voluntary Control Council for Interference from Information T...

Page 34: ...htigt in bereinstimmung mit dem deutschen EMVG vom 9 Nov 92 das EG Konformit tszeichen zu f hren Der Aussteller der Konformit tserkl rung ist die IBM Germany Dieses Ger t erf llt die Bedingungen der E...

Page 35: ......

Page 36: ...Part Number 93H2131 Printed in U S A 93H2131...

Reviews: