background image

7

Getting Started

F

EN

ES

C

Customizing Your Monitor

4

Press the 

>

?

/

/

 buttons to adjust the settings.

The OSD automatically disappears after about 30 seconds.
To close the OSD, press the 

 button again.

To reset,  press the 

?

 (reset) button while the OSD is on.

The selected item is reset to the factory setting.

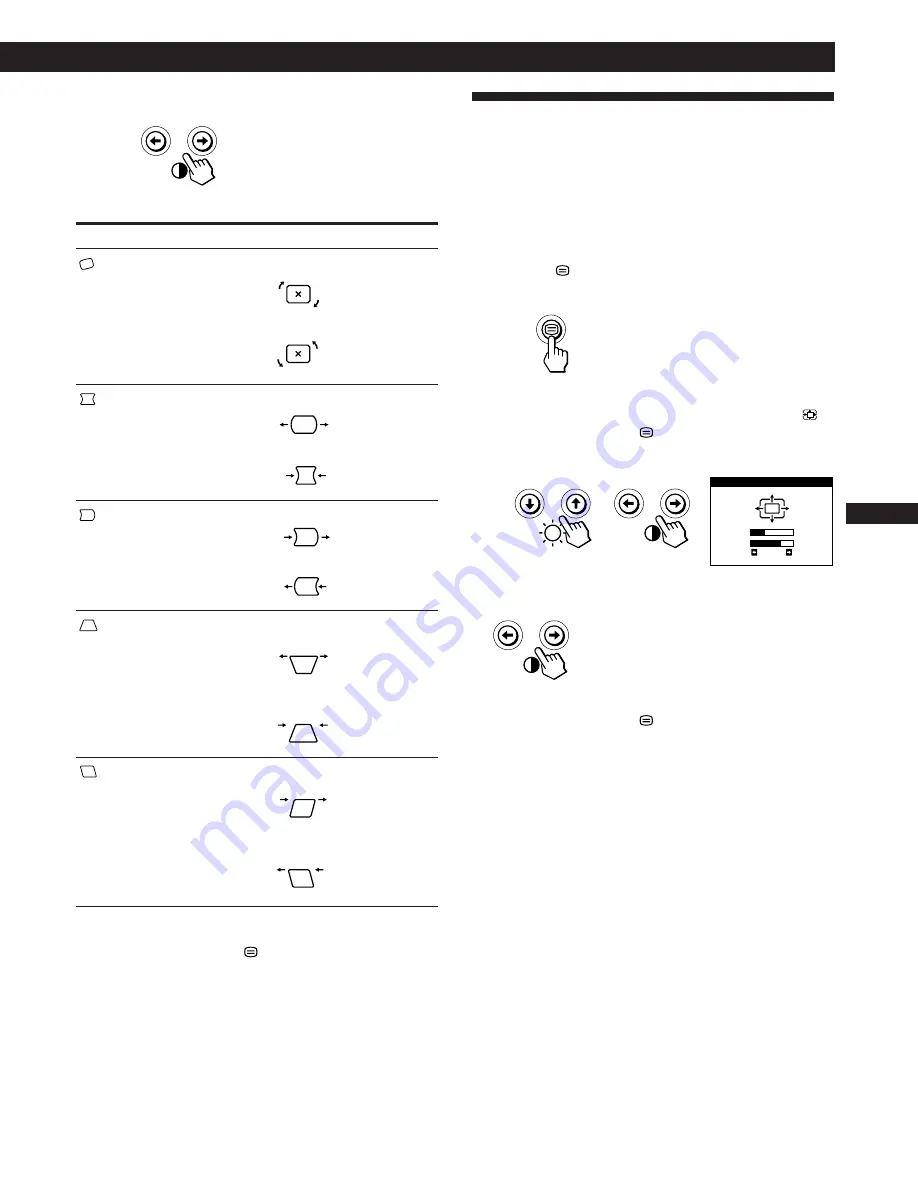
For

 ROTATION

 PINCUSHION

 PIN BALANCE

 KEYSTONE

 KEY BALANCE

Press

/

 . . . to rotate the picture clockwise

?

 . . . to rotate the picture counterclockwise

/

 . . . to expand the picture sides

?

 . . . to contract the picture sides

/

 . . . to move the picture sides to the right

?

 . . . to move the picture sides to the left

/

 . . . to increase the picture width at the

top

?

 . . . to decrease the picture width at the

top

/

 . . . to move the top of  the picture to

the right

?

 . . . to move the top of  the picture to

the left

Using the ZOOM On-screen
Display

The ZOOM settings allow you to enlarge or reduce the
picture.
Once the setting is adjusted, it will be stored in memory for
the current input signal.

1

Press the 

 button.

The MENU OSD appears.

2

Press the 

¨

.

/

>

 and 

>

?

/

/

 buttons to select “

ZOOM,” and press the 

 button again.

The ZOOM OSD appears.

3

Press the 

>

?

/

/

buttons to adjust the picture zoom.

/

 . . . to enlarge the picture

?

 . . . to reduce the picture

The OSD automatically disappears after about 30 seconds.
To close the OSD, press the 

 button again.

To reset,  press the 

?

 (reset) button while the OSD is on.

Note

The picture zoom adjustment will stop as soon as either the
horizontal or vertical size reaches its maximum or minimum value.

ZOOM

73

V

26

H

Summary of Contents for P72

Page 1: ...3 861 946 11 1 Operating Instructions P72 Color Monitor EN ...

Page 2: ...eur couleurs est lourd et doit donc être manipulé avec soin Si son poids dépasse 18 kg IBM vous conseille de le déplacer ou de le porter à deux GEFAHRENHINWEIS Um die Gefahr eines elektrischen Schlags zu vermeiden folgendes beachten Unter keinen Umständen die Abdeckungen abnehmen Das Produkt nicht in Betrieb nehmen wenn der Sockel nicht montiert ist Das Gerät nicht während eines Gewitters an eine ...

Page 3: ...te del telaio Non accendere il prodotto se il piedistallo non è stato montato Non collegare o scollegare il prodotto nel corso di un temporale La spina del cavo di alimentazione deve essere collegata ad una presa di corrente con messa a terra installata in maniera appropriata Le apparecchiature a cui il prodotto viene attaccato devono essere collegate a prese di corrente con messa a terra installa...

Page 4: ...ele sitä varoen Jos näyttö painaa enemmän kuin 18 kg IBM suosittelee että kaksi henkilöä siirtää tai nostaa sitä Varning livsfara För att undvika risk för elektriska stötar måste du tänka på följande Ta inte bort några skyddskåpor Använd inte den här produkten innan du har satt fast stativet Anslut inte produkten till ett eluttag under åskväder Koppla inte heller ur produkten från ett eluttag unde...

Page 5: ... Fargeskjermen din er tung og må håndteres med varsomhet Hvis den veier mer enn 18 kilo anbefaler IBM at skjermen flyttes eller løftes av to personer ...

Page 6: ...rams or services do not imply that IBM intends to make these available in all countries in which IBM operates Any reference to an IBM product program or service is not intended to state or imply that only IBM s product program or service may be used Any functionally equivalent product program or service that does not infringe any of IBM s intellectual property rights or other legally protectable r...

Page 7: ...ION On screen Display 10 Using the LANG Language On screen Display 12 Resetting the Adjustments 12 Selecting the Enhanced Video EV Mode 13 Technical Features Preset Modes 13 Displaying the Monitor s Information 13 Power Saving Function 14 Damper Wires 14 Plug Play 14 Additional Information Warning Messages 15 Troubleshooting 15 Self diagnosis Function 17 Specifications 17 TABLE OF CONTENTS VGA is ...

Page 8: ...f cleaner containing an anti static solution or similar additive as this may scratch the screen s coating Transportation When you transport this monitor for repair or shipment use the original carton and packing materials Use of the Tilt Swivel With the tilt swivel this monitor can be adjusted to the desired angle within 180 horizontally and 20 vertically To turn the monitor vertically and horizon...

Page 9: ...s the buttons when adjusting other items 6 u power switch and indicator pages 14 17 Turns the monitor on or off The indicator lights up in green when the monitor is turned on and lights up in orange when the monitor is in power saving mode Rear 7 AC IN connector Provides AC power to the monitor 8 Video input connector HD15 Inputs RGB video signals and SYNC signals Pin No 1 2 3 4 5 6 7 Pin No 8 9 1...

Page 10: ...the monitor and the computer and turn them on Selecting the On screen Display Language If you need to change the OSD language see Using the LANG Language On screen Display on page 12 The default setting is English Horizontal Frequency Vertical Frequency BRIGHTNESS CONTRAST 26 26 60 0kHz 85Hz Adjusting the Picture Brightness and Contrast Once the setting is adjusted it will be stored in memory for ...

Page 11: ...electing the language 8 GEOM Displays the GEOMETRY OSD for adjusting the picture rotation and pincushion etc 9 EXIT Closes the MENU OSD MENU EXIT CENTER SIZE GEOM COLOR LANG ZOOM SCREEN OPTION OK MENU Using the CENTER On screen Display The CENTER settings allow you to adjust the centering of the picture Once the setting is adjusted it will be stored in memory for the current input signal 1 Press t...

Page 12: ...ress the reset button while the OSD is on The horizontal and vertical sizes are both reset to the factory settings SIZE 26 73 Using the GEOM Geometry On screen Display The GEOM geometry settings allow you to adjust the shape and orientation of the picture Once the rotation is adjusted it will be stored in memory for all input signals received All other adjustments will be stored in memory for the ...

Page 13: ...ease the picture width at the top to move the top of the picture to the right to move the top of the picture to the left Using the ZOOM On screen Display The ZOOM settings allow you to enlarge or reduce the picture Once the setting is adjusted it will be stored in memory for the current input signal 1 Press the button The MENU OSD appears 2 Press the and buttons to select ZOOM and press the button...

Page 14: ...LOR VARIABLE 50 Using the COLOR On screen Display You can change the monitor s color temperature For example you can adjust or change the colors of a picture on the screen to match the actual colors of the printed picture Once the setting is adjusted it will be stored in memory for all input signals received 1 Press the button The MENU OSD appears 2 Press the and buttons to select COLOR and press ...

Page 15: ...d press the button again The SCREEN OSD appears Select H CONVERGENCE V CONVERGENCE CANCEL MOIRE MOIRE ADJUST To adjust the horizontal convergence adjust the vertical convergence turn the moire cancellation function ON or OFF CANCEL MOIRE must be ON for MOIRE ADJUST to appear on the screen adjust the degree of moire cancellation H CONVERGENCE SCREEN 26 3 Press the buttons to select the item you wan...

Page 16: ...magnetized when the power is turned on You can also manually degauss the monitor 1 Press the button The MENU OSD appears 2 Press the and buttons to select OPTION and press the button again The OPTION OSD appears 3 Press the buttons to select MANUAL DEGAUSS 4 Press the button The screen is degaussed for about 5 seconds If you need to degauss the screen a second time wait for at least 20 minutes bef...

Page 17: ...he reset button while the OSD is on Locking the controls The control lock function disables all of the buttons on the front panel except the u power switch and button 1 Press the button The MENU OSD appears 2 Press the and buttons to select OPTION and press the button again The OPTION OSD appears 3 Press the buttons to select CONTROL LOCK 4 Press the buttons to select ON The OPTION OSD automatical...

Page 18: ... reset to the factory settings Resetting all of the adjustment data for all input signals Press and hold the reset button for more than two seconds All of the adjustment data is reset to the factory settings Using the LANG Language On screen Display English French German Spanish and Japanese versions of the OSDs are available 1 Press the button The MENU OSD appears 2 Press the and buttons to selec...

Page 19: ...es as follows STANDARD MODE PRESENTATION MODE GRAPHICS VIDEO MODE The STANDARD MODE is ideal for spreadsheets word processing and other text oriented applications The PRESENTATION MODE is useful for presentation programs that require vivid colors The GRAPHICS VIDEO MODE gives movies and games enhanced visual appeal by increasing the sharpness and brightness The selected mode indication appears on ...

Page 20: ... 15 sec u indicator Green Green and orange alternate Green and orange alternate Orange Off Power consumption 120 W 15 W 15 W 8 W 0 W Power consumption mode Normal operation Standby 1st mode Suspend 2nd mode Active off 3rd mode Power off Screen active blank blank blank Horizontal sync signal present absent present absent Vertical sync signal present present absent absent Note If the video signal ca...

Page 21: ...omputer power switch is in the on position Check that the video signal cable is properly connected and all plugs are firmly seated in their sockets Ensure that no pins are bent or pushed in the HD15 video input connector Check that the video board is completely seated in the proper bus slot Check that the video frequency range is within that specified for the monitor Horizontal 30 85 kHz Vertical ...

Page 22: ...e fuzzy Decrease the moire cancellation effect pages 9 10 Isolate and eliminate any potential sources of electric or magnetic fields Common causes for this symptom are electric fans fluorescent lighting or laser printers If you have another monitor close to this monitor increase the distance between them to reduce the interference Try plugging the monitor into a different AC outlet preferably on a...

Page 23: ...th your monitor or computer the screen will go blank and the u indicator will either light up green or flash orange If the u u u u u indicator is green 1 Disconnect the video input cable or turn off the connected computer 2 Press and hold the button for 2 seconds If all four color bars appear white red green blue the monitor is working properly Reconnect the video input cable and check the conditi...

Page 24: ...esigned to provide reasonable protection against harmful interference in a residential installation This equipment generates uses and can radiate radio frequency energy and if not installed and used in accordance with the instructions may cause harmful interference to radio communications However there is no guarantee that interference will not occur in a particular installation If this equipment ...

Page 25: ...n sich auf Grund des Magnetfeldes am Ort der Aufstellung aus der korrekten Grundeinstellung verändern Zur Korrektur empfiehlt es sich deshalb die Regler an der Frontseite für H STAT und V STAT so einzustellen daß die getrennt sichtbaren Farblinien für Rot Grün und Blau bei z B der Darstellung eines Buchstabens zur Deckung Konvergenz gelangen Siehe hierzu auch die Erklärungen zu H STAT und V STAT N...

Page 26: ...en zu gewährleisten Es sind ordnungsgemäß abgeschirmte und geerdete Kabel und Stecker zu verwenden um das Störungspotential in bezug auf Radio und Fernsehempfang oder andere elektrische oder elektronische Geräte zu reduzieren Solche Kabel und Stecker sind bei autorisierten IBM Fachhändlern erhältlich In Übereinstimmung mit EN 50082 1 1992 Leistungskriterium A wird darauf hingewiesen daß bestimmte ...

Page 27: ...reseller will repair it or replace it with one that is at least functionally equivalent without charge The replacement may not be new but will be in good working order If IBM or your reseller is unable to repair or replace the Machine you may return it to your place of purchase and your money will be refunded If you transfer a Machine to another user warranty service is available to that user for ...

Page 28: ...or tort claim IBM is liable only for 1 damages for bodily injury including death and damage to real property and tangible personal property and 2 the amount of any other actual direct damages or loss up to the greater of U S 100 000 or the charges if recurring 12 months charges apply for the Machine that is the subject of the claim UNDER NO CIRCUMSTANCES IS IBM LIABLE FOR ANY OF THE FOLLOWING 1 TH...

Page 29: ... be provided on an exchange basis and will be either new equivalent to new or reconditioned All replaced parts and products become the property of IBM This warranty does not cover the repair of damage to the product resulting from Accident disaster misuse and abuse Use of parts not manufactured or sold by IBM Modification of the product Service provided by anyone other than IBM or an authorised IB...

Page 30: ...reece Iceland Italy Ireland Luxembourg Netherlands Norway Portugal Spain Sweden Switzerland and United Kingdom Group B Countries Albania Bosnia Herzegovina Bulgaria Croatia Czechia Russia Armenia Bellarus Georgia Kirghizia Hungary Kazakhstan Macedonia Moldova Poland Romania Slovakia Serbia Montenegro Slovenia Ukraine On Site Service Some IBM products are sold with a service entitlement which is de...

Page 31: ...l or personal property caused by IBM negligence General No statements contained herein shall affect the statutory rights of consumers International Warranty Service IBM International hardware warranty service is available for those customers travelling to countries in which their PC products are announced and sold by IBM or IBM resellers upon registering with IBM International Warranty Service Off...

Page 32: ...Warranty Service via their local IBM Office Notes 1 International Warranty Service is not available on IBM Options unless they are installed in or connected to an IBM System Unit which is registered for International Warranty Service 2 Customers are not required to register their machine for International Warranty Service if relocation is within the countries of Group A or Group B 4 ...

Page 33: ...s labelling involve This product meets the requirements for the TCO 95 scheme which provides for international and environmental labelling of personal computers The labelling scheme was developed as a joint effort by the TCO The Swedish Confederation of Professional Employees Naturskyddsforeningen The Swedish Society for Nature Conservation and NUTEK The National Board for Industrial and Technical...

Page 34: ...splay screens solders and capacitors Lead damages the nervous system and in higher doses causes lead poisoning TCO 95 requirement permits the inclusion of lead since no replacement has yet been developed Cadmium Cadmium is present in rechargeable batteries and in the colourgenerating layers of certain computer displays Cadmium damages the nervous system and is toxic in high doses TCO 95 requiremen...

Page 35: ...uthorized dealers to support the customer warranty Parts are for service use only Part No M T Model Description 61H0213 6556 03N Monitor UVNH Pearl White 61H0214 6556 43N Monitor UVNH Stealth Gray 61H0215 6556 03S Monitor UVSH Pearl White 61H0216 6556 43S Monitor UVSH Stealth Gray ...

Reviews: