background image

44

        Local Console Manager LCM8 and LCM16 Installation and User’s Guide

2. Click the 

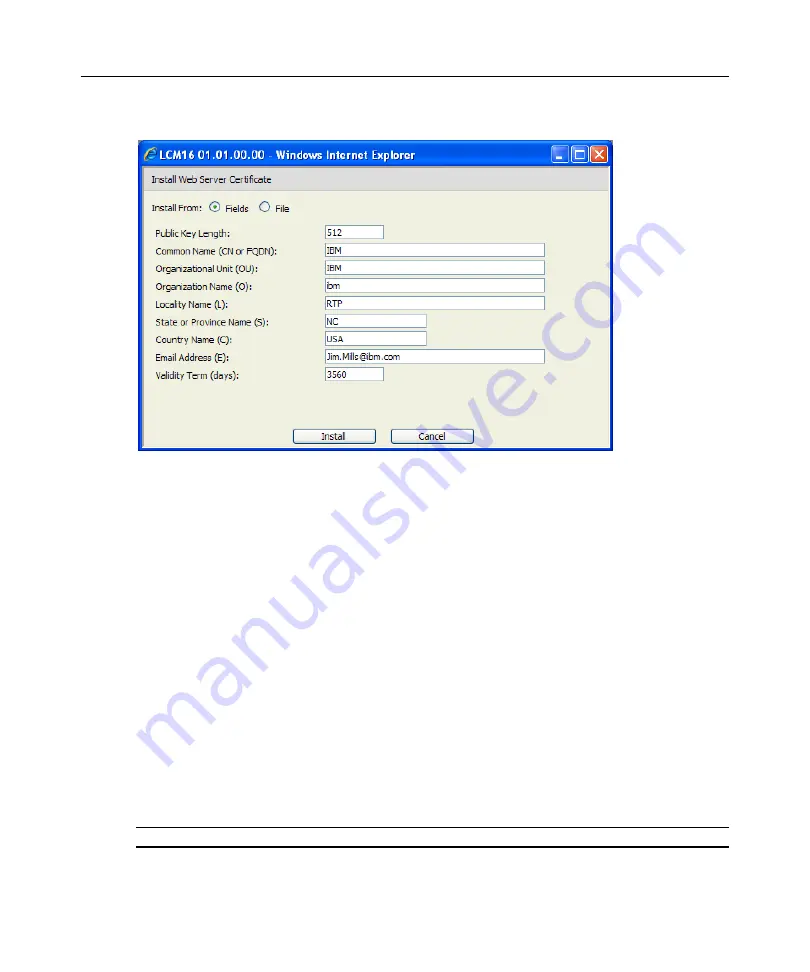
Install Web Server Certificate


button.

Figure 4.11: Install Web Server Certificate window

3. Select the Fields radio button, and enter the following fields:

Public Key Length: the number of bits you want the certificate to be.

Common Name: your name. (Since this is your root certificate, use an appropriate name 
such as, "Company_Name Certificate Authority.")

Organizational Unit (optional): organization unit name (marketing, for example).

Organization Name: the exact legal unabbreviated name of your organization.

Locality Name: the city where your organization is located.

State or Province Name: the unabbreviated state or province where your organization is 
located. 

Country Name: the two-letter ISO abbreviation for your country.

Email Address: the email address for the CA to contact.

Validity Term: number of days the certificate is valid.

-or-

Select to install from a file by clicking the 

File

 radio button, then download a company 

certificate file (*.pem). 

NOTE: 

If importing a company certificate file, it may take up to 30 seconds for the OBWI to relaunch.

4. Select 

Install

. Close the web browser, then relaunch the OBWI again for the same IP address.

Summary of Contents for LCM8

Page 1: ...46M4171 590 992 501A LOCAL CONSOLE MANAGER LCM8 AND LCM16 INSTALLATION AND USER S GUIDE...

Page 2: ......

Page 3: ...Local Console Manager LCM8 and LCM16 Installation and User s Guide...

Page 4: ......

Page 5: ...erview 5 Getting started 7 Setting up your network 7 Rack mounting an LCM8 LCM16 switch 7 Safety precautions 8 Rack mounting safety instructions 8 Connecting the LCM8 LCM16 switch hardware 10 Connecti...

Page 6: ...n information and upgrading firmware 26 Resetting the PS 2 keyboard and mouse on a device or local port 27 Chapter 4 Web interface operations 29 LCM8 LCM16 switch OBWI 29 Viewing ports and servers 29...

Page 7: ...47 Other Console Main Menu options 48 Firmware Management 48 Enable Debug Messages 48 Set Change Password 48 Restore Factory Defaults 48 Reset Appliance 48 Set Web Interface Ports 48 Input Web Server...

Page 8: ...vi Local Console Manager LCM8 and LCM16 Installation and User s Guide...

Page 9: ...R interface Main dialog box 15 Figure 4 1 LCM8 LCM16 switch Explorer window 30 Figure 4 2 Disconnect Session Status window 31 Figure 4 3 Users window 33 Figure 4 4 Add modify User window 33 Figure 4 5...

Page 10: ...viii Local Console Manager LCM8 and LCM16 Installation and User s Guide...

Page 11: ...OSCAR interface status symbols 17 Table 3 3 OSCAR interface navigation basics 18 Table 3 4 Setup features to configure the OSCAR interface 20 Table 3 5 OSCAR interface Status Flags 21 Table 3 6 Comma...

Page 12: ...x Local Console Manager LCM8 and LCM16 Installation and User s Guide...

Page 13: ...4 DHCP and IPv6 DHCPv6 and stateful auto configuration access cascading expansion each LCM8 switch supports eight directly attached servers and each LCM16 switch supports up to 16 directly attached se...

Page 14: ...OTE To open a virtual media session with a target device you must first connect the target device to a switch using the VCO or VCO2 cable For a smart card you must first connect the target device to a...

Page 15: ...h shown Table 1 1 Descriptions for Figure 1 1 Number Description Number Description 1 UTP connection 5 Network 2 KVM connection to the switch 6 Digital user computer with Internet browser 3 Remote IP...

Page 16: ...4 Local Console Manager LCM8 and LCM16 Installation and User s Guide...

Page 17: ...Ethernet Installation overview The general procedure for setting up and installing an LCM8 LCM16 switch is as follows Unpack the switch and verify that all components are present and in good conditio...

Page 18: ...ger LCM8 and LCM16 Installation and User s Guide Figure 2 1 illustrates a basic configuration for the LCM8 LCM16 switch Descriptions follow in Table 2 1 Figure 2 1 Basic LCM8 LCM16 switch configuratio...

Page 19: ...o uniquely identify the switch and target devices The LCM8 LCM16 switch supports both Dynamic Host Configuration Protocol DHCP and static IP addressing Make sure that an IP address is reserved for eac...

Page 20: ...ystems networks and modems before you open the device covers unless instructed otherwise in the installation and configuration procedures Connect and disconnect cables as described in the following in...

Page 21: ...ntion to supply connections other than direct connections to the branch circuit such as the use of power strips Do not mount the switch with the rear panel facing in the downward position To install t...

Page 22: ...ack mounting flange of the rack so that each nut is positioned on the inside of the rack 5 Mount the switch assembly to the rack by matching the holes in the short side of each mounting bracket to a s...

Page 23: ...onnect the power cord into a grounded earthed outlet that is easily accessible at all times Disconnect the power from the product by unplugging the power cord from either the electrical outlet or the...

Page 24: ...opened in a firewall if outside access is desired NOTE Ports 80 and 443 are configurable by the appliance administrator In a typical configuration as shown in Figure 2 4 the user s computer is locate...

Page 25: ...tch OBWI from outside the firewall Open a web browser and enter the external IP address of the firewall The LCM8 LCM16 Explorer window will open and prompt you to login Verifying the connections LCM8...

Page 26: ...m each available target port on the main LCM8 LCM16 switch will connect to a CO or ACI port on each cascaded switch Each cascaded switch can then be connected to a device with a CO cable To cascade mu...

Page 27: ...WI see Chapter 4 Basic operations Main dialog box functions To access the OSCAR interface Main dialog box Press Print Screen to launch the OSCAR interface The Main dialog box will appear NOTE If the O...

Page 28: ...oard and mouse to the settings for the selected device To select a device Double click the device name eID or port number or If the display order of your list is by port the Port button is depressed t...

Page 29: ...me of the device to establish it as unique and press Enter To switch back to the previous device press Print Screen then Backspace Viewing the status of your LCM8 LCM16 switching system The status of...

Page 30: ...ns when used with underlined or other designated letters Alt X Closes current dialog box and returns to previous one Alt O Selects the OK button then returns to the previous dialog box Enter Completes...

Page 31: ...pecify that the virtual media connection can be accessed only by your user name and that no other user can connect to that target device If both Locked and Reserved are selected the session will be re...

Page 32: ...AR interface and click Setup Menu in the Main dialog box To choose the display order of devices 1 Select Name to display devices alphabetically by name or Select eID to display devices numerically by...

Page 33: ...erface displaying To perform a soft switch see the Soft switching on page 17 Controlling the status flag The status flag displays on your desktop and shows the name or eID number of the selected devic...

Page 34: ...ick OK to save settings or Click X to exit without saving changes Setting the keyboard country code NOTE Using a keyboard code that supports a language different from that of your LCM8 LCM16 switch fi...

Page 35: ...the device using LCM8 LCM16 port 6 switch port 2 would be 06 02 and so on To assign a device type 1 In the Devices dialog box select the desired port number 2 Click Modify to open the Device Modify di...

Page 36: ...Names dialog box NOTE If a CO cable has not been assigned a name the eID is used as the default name Commands dialog box functions From the OSCAR interface Commands dialog box you can manage your LCM...

Page 37: ...box to the right of the device double click on the desired entry or highlight the device and click the Add Remove button to toggle the scan check box setting You can select up to 100 devices for incl...

Page 38: ...umber of the switch firmware and any auxiliary devices connected to the switch as well as upgrade your firmware for optimum performance To display version information and upgrade firmware 1 Activate t...

Page 39: ...go offline briefly and return or Click X or press Escape to cancel the operation 4 Click X to close the CO Select dialog box Resetting the PS 2 keyboard and mouse on a device or local port NOTE This f...

Page 40: ...28 Local Console Manager LCM8 and LCM16 Installation and User s Guide...

Page 41: ...e browser enter the IP address or host name assigned to the LCM8 LCM16 switch you wish to access Use https xxx xx xx xx or https hostname as the format NOTE If using IPv6 mode you must include square...

Page 42: ...LCM8 LCM16 switch Explorer window Viewing and terminating user sessions You may view and disconnect the current active user connections using the Status tab in the OBWI You can view the session type...

Page 43: ...ssion button A message appears prompting you to confirm the disconnect command 4 Click OK to disconnect the user or Click Cancel to exit without completing the disconnect command NOTE The appropriate...

Page 44: ...wn password Setting up user accounts When you select the User category the OBWI will retrieve and display a list of usernames from the LCM8 LCM16 switch From here you can add modify or delete users Th...

Page 45: ...existing user The Add Modify User window appears Figure 4 4 Add modify User window 3 Type the username and password you wish to assign to the user and then verify the password by typing it in the Ver...

Page 46: ...ts are subject to this lock out policy An Appliance Administrator can specify the number of hours 1 to 99 that accounts will remain locked When Enable Lock outs is unchecked the Security Lock out feat...

Page 47: ...o the switch Viewing switch parameters The Appliance category allows you to view the product type product name product description eID MAC address number of digitizers ARI ports and local ports for th...

Page 48: ...yed If connected to a cascaded switch the switch channel is also displayed Modifying a server name You can use the OBWI to rename a server from a remote workstation rather than from the OSCAR interfac...

Page 49: ...Administrators NOTE The Reboot Required button will only appear if a reboot is required Viewing and configuring cascaded switch connections The Cascaded Devices window lets you view the cascaded swit...

Page 50: ...d CO cables to have their firmware upgraded to what is available on the LCM8 LCM16 switch This guarantees that CO cable firmware is compatible with LCM8 LCM16 switch firmware When you select the Versi...

Page 51: ...a CO that is connected directly to a server not a cascaded switch may cause the mouse keyboard to fail When this occurs reboot the target server To reset a CO cable 1 Click the Configure tab in the OB...

Page 52: ...to enable an auto upgrade for CO cable firmware You can override the auto upgrade at any stage using the Load Firmware button described in the next section To upgrade appliance firmware 1 Click the T...

Page 53: ...iles The configuration files contain all of the settings for the LCM8 LCM16 switch including switch settings SNMP settings and NTP settings You can save your configuration file in case it becomes nece...

Page 54: ...anaging user databases User database files contain all user accounts assigned in an LCM8 LCM16 switch You can save your user account database file and use it to configure users on multiple LCM8 LCM16...

Page 55: ...essage appears prompting you to confirm the write completion Once confirmed the Restore User Database File window will close and you are returned to the Tools window Installing a Web Certificate A web...

Page 56: ...Organization Name the exact legal unabbreviated name of your organization Locality Name the city where your organization is located State or Province Name the unabbreviated state or province where yo...

Page 57: ...ions 45 5 When prompted click to view the certificate and follow the instructions to import the certificate into the Root Certificate Authority folder After the certificate is stored the user should n...

Page 58: ...46 Local Console Manager LCM8 and LCM16 Installation and User s Guide...

Page 59: ...inue Network configuration To configure network settings using the Console menu 1 When you turn on your LCM8 LCM16 switch the switch initializes for approximately one minute After it completes initial...

Page 60: ...mware Management Enable Debug Messages Set Change Password Restore Factory Defaults Reset Appliance Set Web Interface Ports Input Web Server Certificate and Exit Each menu item is discussed in this se...

Page 61: ...the User Defined Web Certificate Import or Export Web Certificate options Exit This menu selection will return you to the ready prompt If the Console menu interface password is enabled you must exit...

Page 62: ...50 Local Console Manager LCM8 and LCM16 Installation and User s Guide...

Page 63: ...de the LCM8 LCM16 switch firmware using the console menu interface NOTE If you do not have a TFTP server you can find several shareware and freeware programs on the Internet that you can download and...

Page 64: ...ack panel of the switch blinks continuously the switch is in recovery mode To recover from a failed Flash upgrade 1 Download the latest Flash firmware 2 Save the Flash upgrade file to the appropriate...

Page 65: ...unwanted interference CAT 5 cable is generally used for networks running at 10 or 100 Mbps CAT 5E enhanced cable has the same characteristics as CAT 5 but is manufactured to somewhat more stringent s...

Page 66: ...idge the cable at any point Keep the UTP cable as far away as possible from potential sources of EMI such as electrical cables transformers and light fixtures Do not tie the cables to electrical condu...

Page 67: ...Standard screen 640 x 480 60 Hz 800 x 600 75 Hz 960 x 720 75 Hz 1024 x 768 75 Hz 1280 x 1024 75 Hz 1600 x 1200 60 Hz Widescreen 800 x 500 60 Hz 1280 x 800 60 Hz 1440 x 900 60 Hz 1680 x 1050 60 Hz Sup...

Page 68: ...ower resource end Ambient atmospheric condition ratings Temperature 32 to 122 degrees Fahrenheit 0 to 50 degrees Celsius operating 4 to 158 degrees Fahrenheit 20 to 70 degrees Celsius nonoperating Hum...

Page 69: ...oduct The documentation that comes with IBM systems also describes the diagnostic tests that you can perform Most systems operating systems and programs come with documentation that contains troublesh...

Page 70: ...Line and other IBM services see http www ibm com services or see http www ibm com planetwide for support telephone numbers In the U S and Canada call 1 800 IBM SERV 1 800 426 7378 Hardware service and...

Page 71: ...IMITED TO THE IMPLIED WARRANTIES OF NONINFRINGEMENT MERCHANTABILITY OR FITNESS FOR A PARTICULAR PURPOSE Some states do not allow disclaimer of express or implied warranties in certain transactions the...

Page 72: ...be trademarks or service marks of others Important notes Processor speeds indicate the internal clock speed of the microprocessor other factors also affect application performance CD drive speeds list...

Page 73: ...aused damage to the device IBM may condition provision of repair or replacement of devices or parts on implementation of appropriate remedial measures to mitigate such environmen tal contamination Imp...

Page 74: ...o conditions 1 this device may not cause harmful interference and 2 this device must accept any interference received including interference that may cause undesired operation Industry Canada Class A...

Page 75: ...ine Verantwortung f r die Einhaltung der Schutzanforderungen wenn das Produkt ohne Zustimmung der IBM ver ndert bzw wenn Erweiterungskomponenten von Fremdherstellern ohne Empfehlung der IBM gesteckt e...

Page 76: ...ibm com Generelle Informationen Das Ger t erf llt die Schutzanforderungen nach EN 55024 und EN 55022 Klasse A Japan VCCI Class A statement This is a Class A product based on the standard of the Volunt...

Page 77: ...Appendixes 65 Russia Electromagnetic Interference EMI Class A statement People s Republic of China Class A electronic emission statement Taiwan Class A compliance statement...

Page 78: ...66 Local Console Manager LCM8 and LCM16 Installation and User s Guide...

Page 79: ......

Page 80: ...46M4171 590 992 501A LOCAL CONSOLE MANAGER LCM8 AND LCM16 INSTALLATION AND USER S GUIDE...

Reviews: