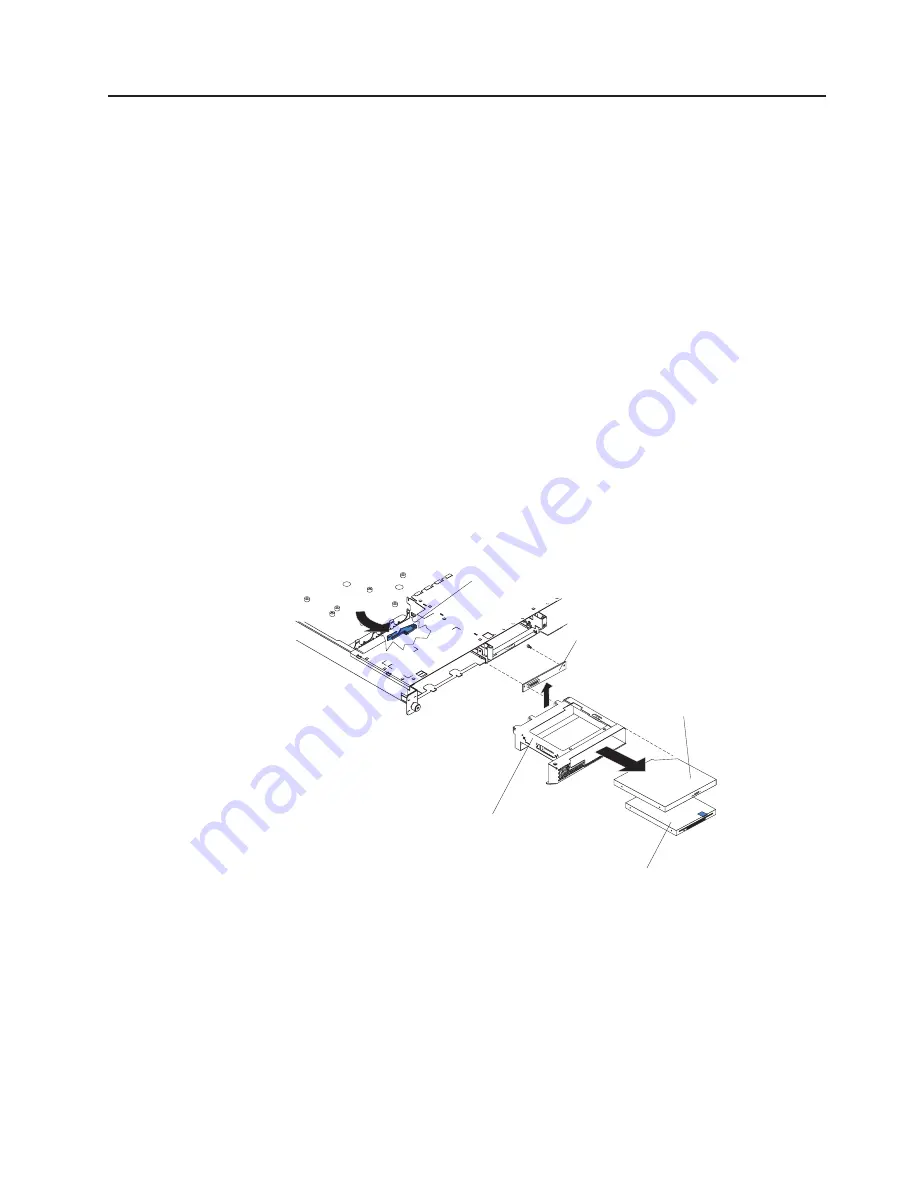
Diskette drive
Complete the following steps to remove the diskette drive.
Note:
v
Read “Installation guidelines” on page 39.
v
Read the safety notices at “Safety information” on page 123.
v
Read “Handling electrostatic discharge-sensitive devices” on page 126.
1. Turn off the server and all attached devices.
2. Disconnect all power cords and external cables from the back of the server.
3. Remove the server from the rack.
4. Remove the server cover (see “Removing the cover and bezel” on page 46);
then, take out the air baffle.
5. Remove the four microprocessor fans, making note of their orientation for later
replacement.
6. Disconnect the diskette drive signal and CD-ROM drive power cables from the
system board.
7. Disconnect the IDE cable from the CD-ROM drive.
8. Press the release cam until the media tray protrudes slightly from the front of
the server.
Note:
The illustrations in this publication might differ slightly from your
hardware.
Release cam
Media tray
CD-ROM
disk drive
Diskette
drive
Interposer
card
9. Carefully pull the drive assembly out of the chassis.
10. Remove the retaining wires on the drive assembly.
11. To remove the CD-ROM drive from the media tray, pull gently on the drive and
slide it out of the tray.
12. To remove the diskette drive from the media tray, pull gently on the drive and
slide it out of the tray.
13. To remove the interposer card, remove the screw that secures it to the media
tray and pull the card away from the media tray.
To replace the diskette drive, reverse the previous steps.
Chapter 5. Service replaceable units
77
Summary of Contents for eServer xSeries 335 Type 8676
Page 2: ......
Page 6: ...iv xSeries 335 Type 8676 Type 8830 Hardware Maintenance Manual and Troubleshooting Guide ...
Page 10: ...viii xSeries 335 Type 8676 Type 8830 Hardware Maintenance Manual and Troubleshooting Guide ...
Page 92: ...82 xSeries 335 Type 8676 Type 8830 Hardware Maintenance Manual and Troubleshooting Guide ...
Page 124: ...114 xSeries 335 Type 8676 Type 8830 Hardware Maintenance Manual and Troubleshooting Guide ...
Page 130: ...120 xSeries 335 Type 8676 Type 8830 Hardware Maintenance Manual and Troubleshooting Guide ...
Page 143: ...Appendix B Related service information 133 ...
Page 144: ...134 xSeries 335 Type 8676 Type 8830 Hardware Maintenance Manual and Troubleshooting Guide ...
Page 145: ...Appendix B Related service information 135 ...
Page 146: ...136 xSeries 335 Type 8676 Type 8830 Hardware Maintenance Manual and Troubleshooting Guide ...
Page 147: ...Appendix B Related service information 137 ...
Page 148: ...138 xSeries 335 Type 8676 Type 8830 Hardware Maintenance Manual and Troubleshooting Guide ...
Page 149: ...Appendix B Related service information 139 ...
Page 150: ...140 xSeries 335 Type 8676 Type 8830 Hardware Maintenance Manual and Troubleshooting Guide ...
Page 160: ...150 xSeries 335 Type 8676 Type 8830 Hardware Maintenance Manual and Troubleshooting Guide ...
Page 161: ...Appendix B Related service information 151 ...
Page 162: ...152 xSeries 335 Type 8676 Type 8830 Hardware Maintenance Manual and Troubleshooting Guide ...
Page 163: ...Appendix B Related service information 153 ...
Page 164: ...154 xSeries 335 Type 8676 Type 8830 Hardware Maintenance Manual and Troubleshooting Guide ...
Page 165: ...Appendix B Related service information 155 ...
Page 166: ...156 xSeries 335 Type 8676 Type 8830 Hardware Maintenance Manual and Troubleshooting Guide ...
Page 170: ...160 xSeries 335 Type 8676 Type 8830 Hardware Maintenance Manual and Troubleshooting Guide ...
Page 176: ...166 xSeries 335 Type 8676 Type 8830 Hardware Maintenance Manual and Troubleshooting Guide ...
Page 177: ......


