20
User Guide
Note:
Be careful not to push too hard on the retaining clips, because the RIMM or
C-RIMM might eject too quickly.
3.
Store the RIMM or C-RIMM in a static-protective package. Do not discard or lose
this part. It might be needed later if you change your memory configuration.
Installing a RIMM or C-RIMM
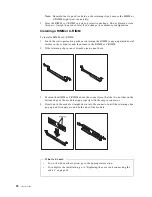
To install a RIMM or C-RIMM:
1.
Touch the static-protective package containing the RIMM to any unpainted metal
surface in the computer, and then remove the RIMM or C-RIMM.
2.
If the retaining clips are not already open, open them.
3.
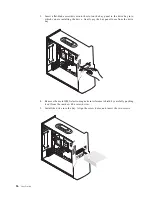
Position the RIMM or C-RIMM above the connector so that the two notches on the
bottom edge of the module align properly with the empty connector.
4.
Firmly push the module straight down into the connector until the retaining clips
pop up and fit snugly around both ends of the module.
•
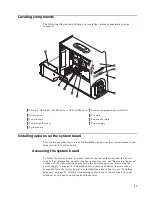
To work with another option, go to the appropriate section.
•
To complete the installation, go to “Replacing the cover and connecting the
cables” on page 30.
What to do next:
Summary of Contents for A60 Type 6833
Page 1: ...IBM NetVista User Guide A60 Type 6833 A60i Type 6832...
Page 2: ......
Page 3: ...IBM NetVista User Guide A60 Type 6833 A60i Type 6832...
Page 6: ...vi User Guide...
Page 20: ...8 User Guide...
Page 44: ...32 User Guide...
Page 48: ...36 User Guide...
Page 50: ...38 User Guide...
Page 56: ...44 User Guide...
Page 57: ......

