background image


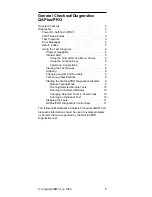
 General Checkout

This general checkout procedure is for computers that are
supported by the QAPlus/PRO Diagnostics test.

Diagnostic error messages appear when a test program
finds a problem with a hardware option. For the test
programs to properly determine if a test 

Passed, Failed, or

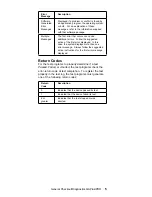
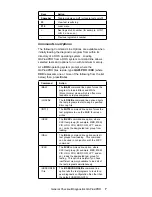
Aborted, the test programs check the error-return code at
test completion. (See “Return Codes” on page 5.)

General error messages appear if a problem or conflict is
found by an application program, the operating system, or
both. For an explanation of these messages, refer to the
information supplied with that software package.

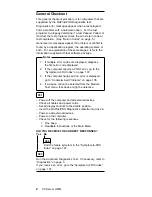
  Notes 

1. If multiple error codes are displayed, diagnose

the first error code displayed.

2. If the computer reports a POST error, go to the

“Symptom-to-FRU Index” on page 107.

3. If the computer hangs and no error is displayed,

go to “Undetermined Problems” on page 135.

4. If a device cannot be selected from the Module

Test menu, that device might be defective.

001

– Power-off the computer and all external devices.
– Check all cables and power cords.
– Set all display controls to the middle position.
– Insert the QAPlus/PRO Diagnostics diskette into drive A.
– Power-on all external devices.
– Power-on the computer.
– Check for the following responses.

  1. One beep.

2. Readable instructions or the Main Menu.

DID YOU RECEIVE THE CORRECT RESPONSES?
Yes  No

002

Find the failure symptom in the “Symptom-to-FRU
Index” on page 107.

003

Run the Advanced Diagnostics Test. If necessary, refer to
“Diagnostics” on page 3.
If you receive an error, go to the“Symptom-to-FRU Index”
on page 107 .

2

PC Server HMM 


Summary of Contents for 8639 - PC Server 325

Page 1: ...S84H 3049 00 IBM PC Servers PC Server 325 Type 8639 Hardware Maintenance Manual Supplement November 1996 Use this supplement with the PC Servers Hardware Maintenance Manual IBM...

Page 2: ...lly made to the information herein these changes will be incorporated in new editions of the publication IBM may make improvements and or changes in the product s and or the program s described in thi...

Page 3: ...diagnostic tests and the information in the IBM Personal System 2 Hardware Maintenance Manual part number 83G8990 form number S52G 9971 and IBM PC Servers Hardware Maintenance Manual part number 70H0...

Page 4: ...0 700 701 720 750 755 IBM Mobile Systems Hardware Maintenance Manual Volume 2 S82G 1502 ThinkPad Computers ThinkPad 365 560 760 SelectaDock IBM Mobile Systems Hardware Maintenance Manual Volume 3 S82G...

Page 5: ...ion 18 Locations 88 Symptom to FRU Index 107 Parts Listings 115 Parts Listing PC Server Advanced Systems Management Adapter 123 Related Service Information 125 Safety Information 126 Battery Notice 13...

Page 6: ...8 Scripting 8 Changing Logical Unit Numbers 8 Test Group Specifications 9 Starting the QAPlus PRO Diagnostics Diskette 9 Module Testing Mode 9 Running Selected Module Tests 10 Running All Selected Mo...

Page 7: ...isplayed 2 If the computer reports a POST error go to the Symptom to FRU Index on page 107 3 If the computer hangs and no error is displayed go to Undetermined Problems on page 135 4 If a device canno...

Page 8: ...ral error messages to appear When you correct the cause of the first error message the other error messages probably will not appear on the screen the next time you power on the system POST Beep Codes...

Page 9: ...IRQ DMA assignments memory usage device drivers and so on Select System Utilities Format a diskette Error Messages Messages generated by the software the operating system or application programs gener...

Page 10: ...em displays more than one error message Always follow the suggested action instructions for the first error message displayed Return Codes For the test programs to properly determine if a test Passed...

Page 11: ...s the same as moving to that item with the cursor and pressing Enter however this function is not enabled on Test Group Screens Using the Function Keys Use the following keys to maneuver throughout th...

Page 12: ...on laptop computers LOG file The LOG file command line option directs the test programs to start using a specified Error Log file INT10 The INT10 command line option forces the test programs to use th...

Page 13: ...reduce memory testing time Scripting Scripting allows you to select specific groups of tests testing parameters and options Your selection is saved for later use as a test Script To set up a test scri...

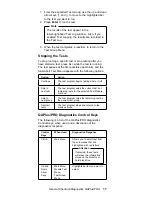
Page 14: ...Enter 5 Follow the instructions that appear on the screen If an error is displayed go to the Symptom to FRU Index on page 107 Module Testing Mode If the test programs do not find a problem or you wan...

Page 15: ...on Changing Selected Tests in Test Groups To change selected tests in a Test Group 1 In the Module Tests Menu use the up and down arrow keys and to move the cursor to your selection 2 Press Tab to mov...

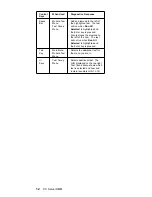
Page 16: ...following is a list of the QAPlus PRO Diagnostics Control Keys when used and a description of the diagnostics response Option Action Continue The test program begins testing where it left off Skip to...

Page 17: ...pressed Also removes the diamond to the left of the item The test will not run when Run All Selected is highlighted and the Enter key is pressed Tab Key Main Menu Module Test Menu Selects the additio...

Page 18: ...Resolving Hardware Configuration Conflicts 31 Resolving Software Configuration Conflicts 32 Configuration Setup Utility Program 33 Advanced Setup 33 Cache Control 34 ROM Shadowing 34 PCI Bus Control 3...

Page 19: ...on and Indicators 78 Power Supply 80 SCSI Drives 82 Setting SCSI IDs 82 Termination Requirements 82 SCSISelect Utility Program 83 Starting the SCSISelect Utility Program 83 SCSISelect Utility Program...

Page 20: ...m to FRU Index 107 No Beep Symptoms 107 Beep Symptoms 107 Error Codes 111 Parts Listings 115 System 117 Cables 120 Keyboards 101 102 Key 121 Power Cords 122 Parts Listing PC Server Advanced Systems Ma...

Page 21: ...ing Code 4 DIMM sockets Diskette Drive Supports one diskette Drive Standard one 3 5 inch 1 44 MB Optional internal 3 5 inch 2 88 MB 3 5 inch 1 44 MB Hard Disk Drive Supports up to 6 SCSI hard disk dri...

Page 22: ...p Security error indicator Integrated Functions 2 serial ports Infrared port 1 parallel port Mouse port Keyboard port 16 bit Ultra SCSI controller 1 External connector 16 bit 1 Internal connector 16 b...

Page 23: ...processing on page 87 Checkpoint Codes During POST the computer displays the status of the components being tested in the form of Checkpoint CP codes in the upper right hand corner of the screen The f...

Page 24: ...Cold 3C Mfg Boot Fork Cold 3D SignOn Cold Warm 3E CPU Name Cold Warm 3F CPU Speed Cold Warm 40 Enable Video SAD 41 Size Memory Above 64 K Cold Warm 42 Password Not Entered Cold 43 Test PS2 Mouse Cold...

Page 25: ...4 CSET_AFT_MTEST Cold Warm 65 CSET_AFT_CMCFG Cold Warm SR 66 CSET_BFR_OPROM Cold Warm SR 67 Phase 2 Exit Big Real Cold Warm SAD SR 90 Disable Video Cold Warm SAD 91 Phase 1 Enter Big Real Cold Warm SA...

Page 26: ...ine Boot Mode E0 Reclaim Onboard Option ROM Space Cold Warm SAD SR EA PCI Reset Cold Warm EB PCI Video Cold Warm EC PCI Configure Cold Warm SR ED PCI IDE Cold Warm EE PCI SCSI Cold Warm PC Server 325...

Page 27: ...d accessing the Setup program and allows IRQ assignments of PCI devices PC Server 325 EISA Configuration Diskette Configures EISA and ISA adapters Built in SCSISelect Utility program Configures SCSI d...

Page 28: ...EISA or ISA adapter the same interrupt that you have assigned to a PCI adapter This is because the server does not support interrupt sharing among PCI EISA and ISA adapters If a situation occurs wher...

Page 29: ...e Add choice allows you to add ISA devices to the configuration If EISA adapters are installed in the server and you have not copied the CFG file to the EISA Configuration Diskette you are prompted to...

Page 30: ...nter is attached to the server you can use the Print Screen key to print these settings The settings are helpful when you install additional options Also record the new settings each time you make cha...

Page 31: ...Step 3 The View or edit details screen appears 3 Press F7 The Advanced functions screen appears 4 Follow the instructions on the screen to a Lock or unlock boards b View additional system information...

Page 32: ...option diskette to the EISA Configuration Diskette See Files for important information about configuring ISA adapters 3 Start the EISA Configuration Diskette see Starting the EISA Configuration Diske...

Page 33: ...press F5 then select Create CFG file 7 Press Enter 8 At the Create a board CFG file screen type in the adapter manufacturer and description for example IBM Token Ring then press Enter 9 Refer to the...

Page 34: ...plied with the option for additional information Sample Applications Some optional devices provide small applications or sampler files These applications demonstrate the capabilities of the device and...

Page 35: ...f you install an ISA network adapter and an EISA network adapter both requesting IRQ 5 only one of the adapters can be configured A device resource is changed for example changing jumper settings A de...

Page 36: ...ecifies how the server checks for resource conflicts Initially this verification mode is set to automatic Use the Advanced selection of the EISA Configuration Diskette s View or edit details screen to...

Page 37: ...tion supplied with the device 5 Change system board jumpers or switches Remove the cover then refer to the system board diagram inside the server 6 Remove the device or adapter Some configurations are...

Page 38: ...curs a prompt appears before the operating system starts see Configuration Conflicts on page 30 2 Record the current settings before making changes to the configuration 4 Follow the instructions on th...

Page 39: ...y error occurs If an adapter requires a memory address in the C8000 to CFFFF hexadecimal range the memory address of the server s SCSI ROM must be changed Select SCSI ROM Address to assign an alternat...

Page 40: ...l port can be configured as bidirectional In bidirectional mode the server supports Extended Capabilities Port ECP and Enhanced Parallel Port EPP Note When the parallel port is configured as bidirecti...

Page 41: ...PCI Ethernet Diagnostics diskette is supplied with the PC Server 325 for viewing Ethernet parameters and testing Option Diskettes An optional device or adapter might come with a diskette If it does fo...

Page 42: ...s to be found and executed 3 If the program executable file is in a directory other than the root directory or other directory you have designated to contain the QA files that directory must be listed...

Page 43: ...2 CMD 1 CMD 2 CMD 3 The diagnostic program automatically assigns a test number to each test The test numbers start at 201 and continue upward as needed The numbers for the tests listed above are as fo...

Page 44: ...active eliminates the need for a media type parameter and facilitates changing from one media type to another Note Before installing an IBM PC Ethernet adapter be sure to run the Ethernet diagnostics...

Page 45: ...efault enabled position 2 Go to General Checkout Diagnostics QAPlus PRO on page 1 to run the diagnostic utility PCNTNW NW 58 The board did not respond to the initialization command Explanation The IRQ...

Page 46: ...tion Add more memory or free some memory resources in the server Then restart the server PCNTNW NW 074 The hardware interrupt cannot be set Explanation An attempt was made to initialize a given hardwa...

Page 47: ...078 The firmware file cannot be read Explanation The driver to read a firmware file The read process failed Action Make sure that the support files that accompany the driver are present Restart the s...

Page 48: ...before it schedules an AES event Action Restart the server If the error is still present replace the system board PCNTNW NW 093 Cannot schedule interrupt time call back without an HSM routine Explana...

Page 49: ...nd Explanation The driver cannot find an Ethernet controller in the server Action Perform the following steps 1 Verify that the Ethernet enable jumper is set to the default enable position 2 Go to Gen...

Page 50: ...NW 180 The DMA parameter is not necessary for PCI device Explanation The Ethernet controller does not require a DMA setting Action Delete the DMA parameter from the NET CFG file PC Server 325 Type 86...

Page 51: ...decreasing the number of frame types activated by Multiple Link Interface Driver MLID PCNTW DOS 3 Could not find PCNTNW MLID to unload Explanation A request was made to unload PCNTNW MLID but the MLI...

Page 52: ...nd add the commands for both PCNTNW MLID boards to the file Then restart the server PCNTNW DOS 8 A NET CFG is required to load the MLID again Explanation You tried to load the PCNTNW MLID a second tim...

Page 53: ...use the following format LINK DRIVER PCNTNW PROTOCOL IPX 8137 ETHERNET_II Action Specify a frame with the PROTOCOL option PCNTNW DOS 13 The MLID could not register Protocol ID string for protocol stac...

Page 54: ...d keyword was specified in NET CFG on line xx Explanation The keyword specified in the NET CFG file is incorrect Action Check the keyword in question Make sure that the keyword is correctly spelled PC...

Page 55: ...neral Checkout Diagnostics QAPlus PRO on page 1 to run the diagnostic utility PCNTNW DOS 58 The board did not respond to the initialization command Explanation The IRQ setting might be incorrect with...

Page 56: ...ault enable position 2 Use the BUSTYPE keyword to specify a value of PCI1 3 If the problem persists go to Ethernet Diagnostics on page 67 to run the Ethernet diagnostics PCNTNW DOS 75 Unsupported bus...

Page 57: ...alization failed Action Perform the following steps 1 Verify that the Ethernet enable jumper is set to the default enable position 2 Go to General Checkout Diagnostics QAPlus PRO on page 1 to run the...

Page 58: ...he IO address specified in the NET CFG file Action Verify that the IO address in NET CFG matches with the board Otherwise remove the PORT keyword from the NET CFG file PCNTNW OS2 67 PCI scan specified...

Page 59: ...7 Protocol Manager device error Explanation The NDIS stack is not configured properly Action Check and correct the configuration PCNTND DOS 8 Bad status for Protocol Manager Explanation The NDIS stac...

Page 60: ...Diagnostics QAPlus PRO on page 1 to run the diagnostic utility 3 Replace the system board PCNTND DOS 21 Board failed checksum test Please run configuration utility Explanation The driver cannot find...

Page 61: ...y for PCI device Explanation The Ethernet controller does not require a DMA setting Action Remove the DMA setting in PROTOCOL INI PCNTNW DOS 32 IRQ number is already in use by another PCNET device Exp...

Page 62: ...another device Explanation The specified IRQ is specified by another device Action Modify the IRQ setting in the setup dialog box PCNTN3 18 PCI scan specified device not found Explanation The driver c...

Page 63: ...cannot find any PCnet device Action Perform the following steps 1 Verify that the Ethernet enable jumper is set to the default Enable position 2 Go to General Checkout Diagnostics QAPlus PRO on page...

Page 64: ...TPK DOS 2 Unable to reset the PCnet device Explanation The software could not reset the Ethernet controller Action Perform the following steps 1 Verify that the Ethernet enable jumper is set to the de...

Page 65: ...ernet enable jumper is set to the default enable position 2 Go to General Checkout Diagnostics QAPlus PRO on page 1 to run the diagnostic utility PCNTPK DOS 8 INT packet_int_no should be in the range...

Page 66: ...us PRO on page 1 to run the diagnostic utility Packet driver is at segment xxxx Explanation The memory address where the packet driver is loaded is xxxx Action None Packet interrupt number xxxx Explan...

Page 67: ...stem is out of Streams memory blocks Action Perform the following steps 1 Use the CRASH utility to increase the number of Streams memory blocks for the failing size 2 Modify the IRQ settings in the Co...

Page 68: ...pecified or found conflicts with other devices in the system Action Perform the following steps 1 Modify the hardware settings 2 Run netconfig to match the hardware settings pnt0 14 Cannot locate hard...

Page 69: ...for PCnet hardware does not match pnt conf Explanation This is a warning message referring to the IRQ that the SunSoft Solaris driver found in the system Action Ignore this message if you are sure th...

Page 70: ...at different IPL Explanation The IRQ specified or found conflicts with other devices in the system Action Perform the following steps 1 Modify the hardware settings 2 Run netconfig to search for anot...

Page 71: ...TND OS2 A LANSRVR PCNTND OS2 ODI Driver DOS OS 2 Server A NOVELL SERVER 3 1X PCNTNW LAN A NOVELL SERVER 4 X PCNTNW LAN Novell Support files A NOVELL WKSTN DOSODI PCNTNW COM A NOVELL WKSTN OS2ODI PCNTN...

Page 72: ...ons on the screen 5 When the diagnostic tests are complete remove the diskette from the diskette drive then restart the server Ethernet Ports The PC Server 325 Type 8639 has Ethernet connectors for 10...

Page 73: ...tart the server POST proceeds without prompting for the password for this startup only Start the Configuration Setup Utilities programs and set a new power on password Leave the power on password jump...

Page 74: ...Server World Wide Web page at http www pc ibm com servers IBM PC Company Bulletin Board Service BBS at 919 517 0001 Read the README file for instructions Device drivers for OS 2 Microsoft Windows NT...

Page 75: ...iguous address bytes as shown in the table on page 70 Make sure there are no conflicts between the adapter port I O addresses and interrupts you configure and previously assigned system I O addresses...

Page 76: ...ta Worksheet on page 72 7 Follow the on screen prompts to exit the utility program Go to Adapter Configuration on page 72 Configuration Setup Utility ISA Legacy Resources 1 Restart the system and run...

Page 77: ...Power off the system 2 Make sure the adapter configuration diskette is not write protected 3 Insert the adapter configuration diskette into the diskette drive 4 Press Ctrl Alt Del to restart the syste...

Page 78: ...tion Check 34 pin interface cable connection Replace Cable then Adapter Note For Advanced Systems Management External Power Control Units replace the 10 pin External Power Source Cable then the Extern...

Page 79: ...tall the adapter device driver and dynamic link library DLL 1 Insert the adapter configuration diskette into the diskette drive 2 Open an OS 2 window 3 At the OS 2 prompt type A and press Enter 4 At t...

Page 80: ...pied to the hard disk as SYS SYSTEM IBMSPN NLM and the AUTOEXEC NCF file is updated 4 To load the adapter device driver a Restart the system Or b At the NetWare prompt type SEARCH ADD path where path...

Page 81: ...onnector C2 Monitor Jumper J7 PC Server 325 Refer to the IBM PC Server 325 Hardware Maintenance Manual for system board layout 34 pin cable from Adapter J16 to System Management Cable Connector J19 on...

Page 82: ...separately purchased 26 pin end of the systems management cable to the System Management Cable Connector J3G1 on the system board 34 pin end of the systems management cable to Adapter connector J16 Co...

Page 83: ...er is disabled to the system The Cable Attached LED 3 On indicates the power unit control cable is connected to the adapter The Cable Attached LED Off indicates the external power control unit control...

Page 84: ...dapter 2 External power control unit signal cable 3 External power control unit 4 Adapter Indicates System power is enabled and the external power control unit signal cable is connected to adapter The...

Page 85: ...r supply voltages The power supply is rated at 250 watts Too many devices adapters or hard disk drives can cause power consumption to exceed 250 watts and cause the power supply to shut down Remove ad...

Page 86: ...4 8V 12 6V 5 25V Lead Pin Lead Pin V dc Minimum V dc Maximum 3 1 4 8V 5 25V Pin Description 2 Power On Request 4 EPW No connection on system board 5 VFAN No connection on system board Lead Pin Lead P...

Page 87: ...he IDs to any unused number between 8 and 15 For 8 bit devices set the IDs to any unused number between 0 and 6 The preinstalled SCSI CD ROM drive is shipped with the SCSI ID set to 3 If the server is...

Page 88: ...tings Use the SCSISelect Utility program to View and change the default SCSI ID values Verify and change configuration conflicts Perform a low level format on a SCSI hard disk Starting the SCSISelect...

Page 89: ...settings for advanced configuration options These options include enabling support for large hard disk drives and support for drives with Ultra SCSI speed SCSI Disk Utilities To view the IDs that are...

Page 90: ...program erases all data and programs 1 If the hard disk is working make a backup copy of all the files and programs on the hard disk 2 Select Format disk from the SCSISelect Disk Utilities menu then f...

Page 91: ...4 m 3000 ft to 2133 m 7000 ft Server off 10 to 43 C 50 to 110 F Maximum Altitude 2133 m 7000 ft Humidity Server on 8 to 80 Server off 8 to 80 Maximum altitude 2133 m 7000 ft Electrical Input Sine wave...

Page 92: ...system board are installed and seated correctly on the new board Note If the processor s are not seated correctly intermittent problems can occur Symmetric Multiprocessors Multiprocessing The PC Serve...

Page 93: ...93 Input Output Connectors on page 94 Internal Drive Bays on page 95 Keylock Assembly Exploded View on page 96 Operator Panel and Cable on page 97 Operator Panel Status Indicators on page 98 Optional...

Page 94: ...rive is accessed Diskette Drive In Use Light This lights when the drive is accessing a diskette CD ROM Eject Button Push this button to release a CD from the CD ROM drive Power On Light This green LED...

Page 95: ...ecified date and time or when it receives a signal from either serial port The result of pressing the power switch varies depending on whether the server is in attended unattended or standby mode To p...

Page 96: ...Covers Floor Model Captive Screws Drawer Model Captive Screws Doors Floor Model Drawer Model Flange PC Server 325 Type 8639 91...

Page 97: ...Drawer Model Rails Drives 92 PC Server HMM...

Page 98: ...EISA ISA EISA ISA PCI PCI PCI PCI PCI 6 5 4 3 2 1 Notes Expansion slots 2 through 5 are shared slots That is the shared slots use the same expansion slot opening on the back of the server See System B...

Page 99: ...e 10BASE T device Mouse Connector This is where the mouse cable connects to the server This connector sometimes is called an auxiliary device or pointing device port Keyboard Connector The cable from...

Page 100: ...tte drive or tape backup unit that uses the diskette cable All models are supplied with a diskette drive preinstalled in bay 3 Bays 4 7 are for 3 5 inch drives A full high drive occupies two bays betw...

Page 101: ...Removable media drive hard disk drive1 41 3 mm 1 6 in 2 5 25 inch CD ROM 41 3 mm 1 6 in 3 3 5 inch Diskette drive 41 3 mm 1 6 in 4 7 3 5 inch Hard disk2 25 4 mm 1 0 in 41 3 mm 1 6 in 3 Notes 1 Remova...

Page 102: ...Operator Panel and Cable Note Loosen do not remove screw Screw PC Server 325 Type 8639 97...

Page 103: ...ts Power On Light This green LED lights when you power on the server by pressing the power switch and when the server powers on in unattended mode Unattended Power On Light This green LED lights when...

Page 104: ...hts during POST When installed this optional microprocessor becomes the boot or startup processor Ethernet Transmit Light This amber LED shows transmit activity on the network Ethernet Receive Light T...

Page 105: ...cessor 6 Fan power cable connector J21 7 Optional processor board socket U6 empty with lever in closed locked position 8 Primary processor board socket U5 with lever in closed locked position 9 Option...

Page 106: ...tors J2 J3 J4 J5 5 Reserved J9 J10 J12 6 PMC Frequency Selection Jumper J17 J18 7 Core Frequency Jumper J30 J29 J28 J27 8 Optional Microprocessor Fan Connector J21 9 Optional Microprocessor Connector...

Page 107: ...to core ratio jumper is set properly Jumper Description Frequency Setting J1 Clock Frequency 200 66 180 60 166 66 Jumper No Jumper Jumper J17 PMC Frequency 200 66 180 60 166 66 No Jumper Jumper No Jum...

Page 108: ...System Board Note Note A black square indicates pin 1 PC Server 325 Type 8639 103...

Page 109: ...or 11 Operator Panel Connector 12 System Fan Connector 13 System Management Connector 14 Diskette Drive Connector 15 Flash Write Protect Jumper J30 16 EISA ISA Connectors 17 C2 Security Cable Connecto...

Page 110: ...26 SCSI Controller Enable Pins 1 2 Disabled Pins 2 3 Enabled default J29 External SCSI Termination See Termination Requirements on page 82 Pins 1 2 8 bit External SCSI device attached Pins 2 3 16 bit...

Page 111: ...he cable through the U bolt and around an object that is not a part of or permanently secured to the building structure or foundation and from which it cannot be removed then fasten the cable ends tog...

Page 112: ...example 0S 2 Trap errors or Related Service Information on page 125 Possible software and hardware mismatch problems Not repairable by replacing FRUs Software Hardware Mismatch Problems on page 133 Me...

Page 113: ...oprocessor Board 1 3 2 1st 64K RAM parity test failed 1 DIMM 2 Microprocessor Board 3 System Board 2 1 1 Secondary DMA register failed 1 System board 2 Microprocessor Board 2 1 2 Primary DMA register...

Page 114: ...System Board 3 2 1 Serial port failed 1 System Board 3 2 2 Parallel port failed 1 System board 3 2 3 Math coprocessor failed 1 Optional Microprocessor if installed 2 Microprocessor 3 Microprocessor Bo...

Page 115: ...U Action One Long and One Short Beep 1 Video adapter if present 2 System Board 3 One Long and Two Short Beeps 1 Video adapter if present 2 System Board Two Long and Two Short Beeps 1 Video adapter 110...

Page 116: ...ck error 1 Failing EISA ISA Adapter 2 Memory DIMM 3 System Board 114 Adapter read only memory error 1 Failing Adapter 2 Run Diagnostics 129 Internal Cache error 1 Optional Microprocessor if installed...

Page 117: ...iguration Setup 2 System board 185 Drive startup sequence information corrupted 1 Run Configuration Setup 2 System board 186 System board or security hardware error 1 Run Configuration Setup 2 System...

Page 118: ...ernal cable on serial port 2 Run Configuration Setup 3 System board 1762 Fixed Disk Configuration error 1 Fixed Disk Cables 2 Run Configuration Setup 3 Fixed Disk Adapter 4 Fixed Disk Drive 5 System B...

Page 119: ...Run Configuration Setup 2 Move failing adapter to slot 1 or 2 3 Failing Adapter 4 System Board 2400 Video controller test failure 1 Video Adapter if installed 2 System Board 2462 Video memory configur...

Page 120: ...Parts Listings 1 2 3 4 5 6 7 8 9 10 12 11 13 14 15 16 17 18 20 19 PC Server 325 Type 8639 115...

Page 121: ...21 23 24 25 22 26 27 28 29 30 116 PC Server HMM...

Page 122: ...ssembly 55H8160 14 Fan Assembly 92 mm with Connector 06H2647 15 Processor Board with Voltage Regulator without processor chip 75H7419 16 Shadow box 55H8164 17 System Board without Memory and Processor...

Page 123: ...Kit 32X5 16 Inch Screws 6 each EMC Contact EMC Ground Contacts 4 each I O Blank FEM Nut 4 40 Screws 2 each Floppy M3 Screws 2 each HF 6 32 Screws 2 each PL M3X8 HEX Screws 3 each Planar Edge Support P...

Page 124: ...Index System PC Server 325 Type 8639 FRU No Voltage Regulator Module Note This FRU can be used if Voltage Regulator FRU number 76H1815 is not available 75H1097 PC Server 325 Type 8639 119...

Page 125: ...478 2 Cable Cover Tower models only 55H8188 3 SCSI Hard File Fast Wide Cable 7X 55H8192 4 SCSI Short Cable to I O Panel Bulkhead Cable 55H8190 5 Diskette Signal Cable 92F0423 6 Parallel Data Cable 55H...

Page 126: ...1391495 Italy 1393395 Latvia 1391406 Norwegian 1391409 Polish 1399580 Portuguese 1391410 Romanian 1399582 Russian Cyrillic 1399579 Serbian Cyrillic 1399578 Slovak 1399571 Slovenia Croatia Bosnia 1393...

Page 127: ...520 Germany 1339520 Hungary 1339520 Israel 14F0087 Italy 14F0069 Latvia 1339520 Netherlands 1339520 Norway 1339520 Poland 1339520 Portugal 1339520 Serbia 1339520 Slovakia 1339520 South Africa 14F0015...

Page 128: ...or Adapter 76H3240 Lithium battery See Battery Notice on page 131 33F8354 External Power Control Unit 71G6222 Cables 1 2 3 4 Index Cables PC Server Advanced Systems Management Adapter FRU No 1 16 pin...

Page 129: ...124 PC Server HMM...

Page 130: ...lement and the PS 2 Hardware Maintenance Manual part number 83G8990 form number S52G 9971 02 Safety Information 126 General Safety 126 Electrical Safety 127 Safety Inspection Guide 128 Handling Electr...

Page 131: ...he customer s personnel are not in a hazardous position Place removed covers and other parts in a safe place away from all personnel while you are servicing the machine Keep your tool case away from w...

Page 132: ...ot unplug it ask the customer to power off the wall box that supplies power to the machine and to lock the wall box in the off position If you need to work on a machine that has exposed electrical cir...

Page 133: ...accident occurs Use caution do not become a victim yourself Switch off power Send another person to get medical aid Safety Inspection Guide The intent of this inspection guide is to assist you in ide...

Page 134: ...the external ground pin and frame ground b The power cord should be the appropriate type as specified in the parts listings c Insulation must not be frayed or worn 4 Remove the cover 5 Check for any o...

Page 135: ...nt the part from touching your clothing Most clothing is insulative and retains a charge even when you are wearing a wrist strap Use the black side of a grounded work mat to provide a static free work...

Page 136: ...inen Sicherheitsbestimmungen beachten Se la batteria sostituita in modo non corretto potrebbe esserci pericolo di esplosione Si raccomanda di sostituirla con una batteria dello stesso tipo o equivalen...

Page 137: ...Electrotechnical Commission IEC 825 and CENELEC EN 60 825 for Class 1 laser products When a CD ROM drive is installed note the following CAUTION Use of controls or adjustments or performance of proce...

Page 138: ...referred to as a patch to the direct driver software Make certain the software is current and that all known revisions are installed The IBM on line bulletin board sometimes referred to as PCPROD and...

Page 139: ...rt is especially important for but not limited to all LAN adapters and RIPL applications Software Failures After a Hardware Change After the initial installation any changes in the hardware configurat...

Page 140: ...ve or disconnect the following one at a time until you find the failure power on the computer and reconfigure each time Any external devices Surge suppressor device on the computer Modem printer mouse...

Page 141: ...nostics Diskette Version Type and version level Hardware configuration Print print screen configuration currently in use BIOS level Operating system software Type and version level Important To elimin...

Page 142: ...80 IBM Warranty Parts Claims Center Number Information 919 517 0001 Bulletin Board Service PC Company 800 426 8322 Customer Education Business Unit 800 999 0052 Customized Operational Services 800 237...

Page 143: ...M 9990 PartnerLine 800 263 2769 Parts Orders Exchange or Emergency 416 443 5808 Fax Parts Regular Orders Exchange 416 443 5755 Parts Orders Inquiries 514 938 3022 PC Co Bulletin Board Montreal 905 316...

Page 144: ...he following terms are trademarks of other companies Microsoft is a trademark or registered trademark of Microsoft Corporation UNIX is a registered trademark in the United States and other countries l...

Page 145: ...IBM Part Number 84H3049 Printed in U S A S84H 3 49...

Reviews: