background image


Manual 

ibaMS4xAI-380VAC


14 

Issue 1.5 


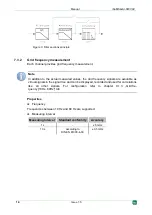
Figure 3: Filter sections principle 


7.3.2 

Grid frequency measurement 

Each channel provides grid frequency measurement.


Note 

In addition to the actual measured values, the grid frequency signals are available as 

virtual signals in the signal tree and can be displayed, recorded and used for calculations 

like all other  signals.  For configuration refer to chapter 9.1.3  „Grid fre-

quency [10Hz..80Hz]“ tab. 


Properties 

  Frequency 

Frequencies between 10 Hz and 80 Hz are supported. 

  Measuring interval 

Measuring interval  Standard conformity 

Accuracy 

1 s 

± 5 mHz 

10 s 

according to  

DIN EN 61000-4-30 

± 0.5 mHz 


Summary of Contents for ibaMS4xAI-380VAC

Page 1: ...ibaMS4xAI 380VAC Input module for analog signals Manual Issue 1 5 ...

Page 2: ...d registered trademark of the Microsoft Corporation Other product and company names mentioned in this manual can be labels or registered trademarks of the corre sponding owners Certification The product is certified according to the European standards and directives This product meets the general safety and health requirements Further international customary standards and directives have been obse...

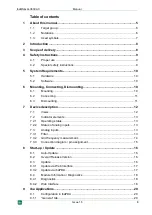
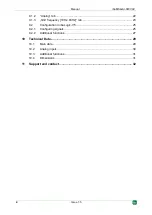
Page 3: ...ting 11 6 3 Dismounting 11 7 Device description 12 7 1 Views 12 7 2 Indicator elements 13 7 2 1 Operating status 13 7 2 2 Status of analog inputs 13 7 3 Analog inputs 13 7 3 1 Filter 13 7 3 2 Grid frequency measurement 14 7 3 3 Connection diagram pin assignment 15 8 Start up Update 16 8 1 Auto Update 16 8 2 Overall Release Version 16 8 3 Update 16 8 3 1 Update via Web Interface 17 8 3 2 Update via...

Page 4: ... Grid frequency 10Hz 80Hz tab 23 9 2 Configuration in ibaLogic V5 25 9 2 1 Configuring signals 25 9 2 2 Additional functions 27 10 Technical Data 29 10 1 Main data 29 10 2 Analog inputs 30 10 3 Additional functions 31 10 4 Dimensions 31 11 Support and contact 32 ...

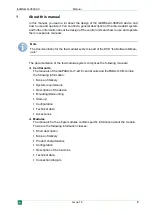
Page 5: ... Software Man uals The documentation of the iba modular system comprises the following manuals Central units The manuals of the ibaPADU S IT 2x16 central units and ibaPADU S CM contain the following information Scope of delivery System requirements Description of the device Mounting Demounting Start up Configuration Technical data Accessories Modules The manuals for the single modules contain spec...

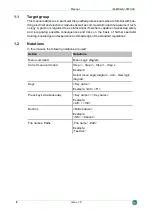
Page 6: ...possible consequences and risks on the basis of his her specialist training knowledge and experience and knowledge of the standard regulations 1 2 Notations In this manual the following notations are used Action Notations Menu command Menu Logic diagram Call of menu command Step 1 Step 2 Step 3 Step x Example Select menu Logic diagram Add New logic diagram Keys Key name Example Alt F1 Press keys s...

Page 7: ...ocess and the system or machine to be controlled there is a risk of death or severe injury The non observance of this safety information may result in a potential risk of death or severe injury The non observance of this safety information may result in a potential risk of injury or material damage Note A note specifies special requirements or actions to be observed Important note Note if some spe...

Page 8: ...o 40 kHz freely adjustable Real parallel data capturing with an A D converter per channel Analog and digital filter per channel Grid frequency measurement Rugged design easy mounting Certification according to CE Fields of application Capturing analog input signals 380 V AC in the fields Power generation and distribution Power factor compensation plants Test benches General voltage measurement Con...

Page 9: ...ed to from the device under voltage The device must not be connected to CAT III and CAT IV categories The device is approved for the measuring category CAT II and the overvoltage category II Caution The rated data of the inputs maximum measuring voltage input signal upper range value are specified in the technical data see chapter 10 1 Main data and 10 2 Ana log inputs Modules must NOT be attached...

Page 10: ...the power supply Note Mount one or more modules on the right next to the central unit slot X2 to X5 can be freely selected 6 1 Mounting 1 Disconnect the central unit from the power supply 2 Remove the cover from the backplane bus to which the module should be attached 3 Attach the device to the backplane bus and press it firmly against the backplane 4 Secure the device with the fixing screws 5 Con...

Page 11: ...If all required cables are connected connect the central unit to the power supply 3 Switch on the central unit 6 3 Dismounting 1 Disconnect the central unit from the power supply 2 Remove all cables 3 Remove the both fixing screws on the upper and the lower side of the device 4 Pull the device straight from the backplane 5 Put the cover on the backplane bus ...

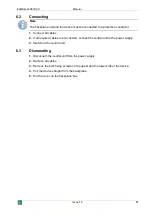
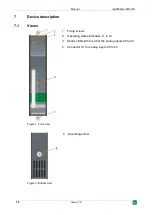
Page 12: ... Device description 7 1 Views 1 2 3 4 Fixing screws Operating status indicators L1 to L4 Status LEDs L26 to L29 of the analog inputs 00 to 03 Connector X1 for analog inputs 00 to 03 Figure 1 Front view 5 Grounding screw Figure 2 Bottom view ...

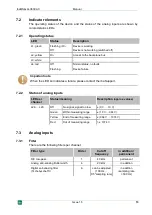
Page 13: ...ates a failure please contact the iba Support 7 2 2 Status of analog inputs LED per channel Status meaning Description approx values L26 L29 Off No signal signal too low 0 V 10 V Green Within measuring range 10 V 964 V Yellow End of measuring range 964 V 1074 V Red Out of measuring range 1074 V 7 3 Analog inputs 7 3 1 Filter There are the following filters per channel Filter type Order Cutoff freq...

Page 14: ...frequency signals are available as virtual signals in the signal tree and can be displayed recorded and used for calculations like all other signals For configuration refer to chapter 9 1 3 Grid fre quency 10Hz 80Hz tab Properties Frequency Frequencies between 10 Hz and 80 Hz are supported Measuring interval Measuring interval Standard conformity Accuracy 1 s 5 mHz 10 s according to DIN EN 61000 4...

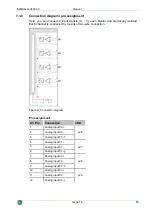
Page 15: ... Each channel is connected by means of two wire connection Figure 4 Connection diagram Pin assignment X1 Pin Connection LED 1 Analog input 00 L26 2 Analog input 00 3 Analog input 00 4 Analog input 01 L27 5 Analog input 01 6 Analog input 01 7 Analog input 02 L28 8 Analog input 02 9 Analog input 02 10 Analog input 03 L29 11 Analog input 03 12 Analog input 03 ...

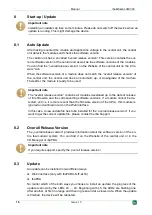
Page 16: ...ules developed up to the date of release of this firmware and the corresponding software versions If a module cannot be de tected yet i e it is more recent than the firmware version of the CPU this module is ignored and outlined in red on the Web interface In this case a new update file has to be installed for the overall release version If you want to get the current update file please contact th...

Page 17: ...te Figure 5 Update via Web interface 8 3 2 Update via ibaPDA Open the ibaPDA I O Manager and choose your iba modular system in the tree structure On the Diagnostics tab click on the Write firmware button and choose the padusit2x16_v xx yy zzz iba or paduscm_v xx yy zzz iba update file You start the update by clicking on OK Figure 6 Update via ibaPDA Important note When updating the iba modular sys...

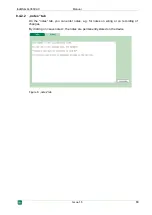
Page 18: ...b Open the ibaPDA I O Manager and choose your iba modular system in the tree structure see also the figure above 8 4 2 Web Interface On the module Website general information about the module is displayed You cannot change the values Important note The Web interface is available only with the central unit ibaPADU S IT 2x16 8 4 2 1 info tab The info tab displays general information and technical sp...

Page 19: ... Manual Issue 1 5 19 8 4 2 2 notes tab On the notes tab you can enter notes e g for notes on wiring or on recording of changes By clicking on save notes the notes are permanently stored on the device Figure 8 notes tab ...

Page 20: ...e 9 Automatic detection of the module Note The automatic detection requires a bidirectional FO connection from the ibaPDA com puter to the central unit Other documentation If you want to install the iba modular system at first refer to the manual of the central unit chapter Configuration with ibaPDA 9 1 1 General tab If the module is detected click on the module in the signal tree and the General ...

Page 21: ...splayed the configuration of the modules and signals is set by the embedded application on the device In this case it is possi ble to import user defined signal names which are configured in the embedded application provided that the embedded application supports this function Import signal names True The modules and signals configured by the embedded application cannot be con figured in ibaPDA th...

Page 22: ... rate The entry 0 Hz corresponds to the setting Auto Enable frequency measurement Select TRUE to enable the measurement of the grid frequency of the connected signals The Grid frequency 10Hz 80Hz tab appears additionally 9 1 2 Analog tab The following settings apply to the Analog tab Figure 11 I O Manager ibaMS4xAI 380VAC Analog tab Name You can enter a name for the signal and two additional comme...

Page 23: ...hysical value e g 100 C Filter You can select the anti aliasing filter Butterworth 4th order 20 kHz Active Enabling disabling the signal You can show or hide more columns via the context menu click with the right mouse button in the headline 9 1 3 Grid frequency 10Hz 80Hz tab When grid frequency measuring is enabled this tab appears additionally Figure 12 I O Manager ibaMS4xAI 380VAC Grid frequenc...

Page 24: ...al You can select the measuring interval via a dropdown menu 1s or 10 s according to DIN EN 61000 4 30 Active Enabling disabling the signal You can show or hide more columns via the context menu click with the right mouse button in the headline ...

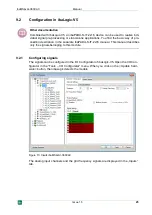
Page 25: ...cription in the separate ibaPADU S IT 2x16 manual This manual describes only the signals belonging to this module 9 2 1 Configuring signals The signals can be configured in the I O Configurator of ibaLogic V5 Open the I O Con figurator in the Tools I O Configurator menu When you click on the Update hard ware button then ibaLogic detects the module Figure 13 Inputs ibaMS4xAI 380VAC The analog input...

Page 26: ...see additional signals in the signal tree that can be configured as output or input resources Signals Description Inputs AI_380VAC_Ch 00 03 Analog input signals AI_Frequency_Ch 00 03 Calculated grid frequencies StatusIn Status information about the plugged input module for output module without function 0 Module not initialized 1 Module running 1 Mistake e g module cannot be initialized StatusOut ...

Page 27: ...ncies BufferFillCount Counter when buffer is filled BufferOverrun Counter for Buffer overrun Additional output signals for buffered access BufferSize Buffersize SubSampling Subsampling of the signals 9 2 2 Additional functions Activating analog filters If you want to use anti aliasing filters these are set up as configuration output and con figured as Off task connector OTC or function block First...

Page 28: ... Digital anti aliasing filter DigitalFilterMode The digital anti aliasing filter can only be enabled when sampling rate 500 Hz 0 off default setting 2 Digital anti aliasing filter activated once for all channels Data type DINT Cutoff frequency of the digital anti aliasing filter AntiAliasingFrequency 0 Auto 1 3 of the sampling rate default setting 0 cutoff frequency in Hz permissible values 100 Hz...

Page 29: ...25 C to 70 C Installation position Vertical plugged into backplane bus Installation height Up to 6562 ft 2000 m Cooling Passive Humidity class F no condensation Protection class IP20 Certification Standards EMC IEC 61326 1 FCC part 15 class A Safety EN 61010 1 Measurement category CATII Maximum measuring voltage 380 V MTBF1 233 973 hours 26 years Dimensions Width x height x depth 1 69 in x 8 43 in...

Page 30: ...AC 4 kV AC 4 kV Connector type 12 pin multi pin connector clamp type terminal 0 08 mm2 to 2 5 mm2 and interlocking device included in delivery 2 can only be enabled when sampling rate 500 Hz cutoff frequency can be adjusted from 100 Hz to 0 5 sampling rate Supplier s Declaration of Conformity 47 CFR 2 1077 Compliance Information Unique Identifier 10 124521 ibaMS4xAI 380VAC Responsible Party U S Co...

Page 31: ...C Manual Issue 1 5 31 10 3 Additional functions Additional functions Grid frequency measurement 10 Hz 80 Hz Interval 1 s 10 s according to DIN EN 61000 4 30 10 4 Dimensions Figure 18 Module dimensions dimensions in mm ...

Page 32: ...he product Contact Headquarters iba AG Koenigswarterstrasse 44 D 90762 Fuerth Germany Phone 49 911 97282 0 Fax 49 911 97282 33 E mail iba iba ag com Mailing address iba AG Postbox 1828 D 90708 Fuerth Germany Delivery address iba AG Gebhardtstrasse 10 DE 90762 Fuerth Germany Regional and Worldwide For contact data of your regional iba office or representative please refer to our web site www iba ag...

Reviews: