background image

1. Confirming the Specifications


22


ME0375-4A


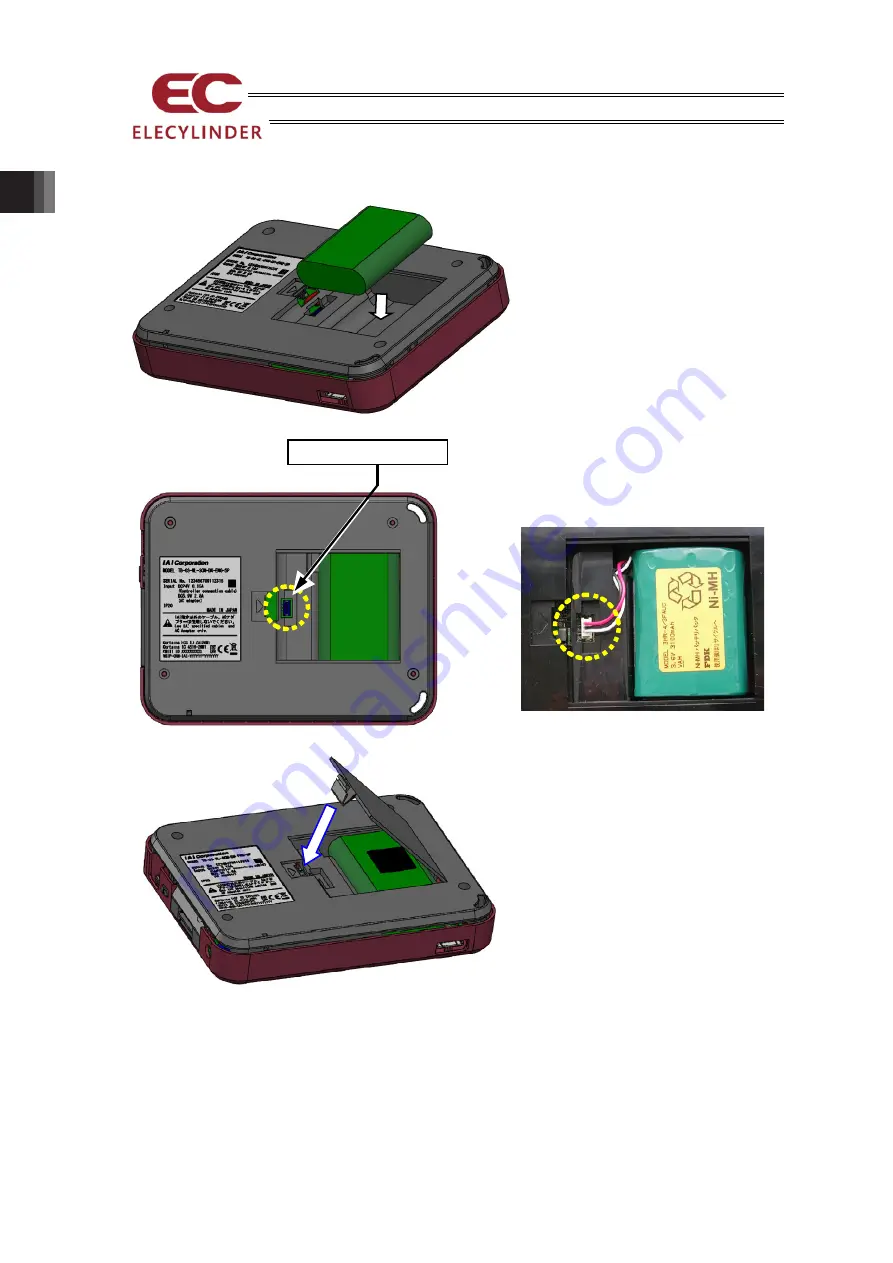
1.5.2  How to Attach Battery Unit 


1.5.3  Caution When Battery Taken Off 


When a battery is taken off and then put back on, the power would not turn on even with the 

power supply switch being pressed. Establish a connection with an AC adapter or a controller 

and supply power to TB-03 before turning it on. 


2) Join the connector.


3) Attach the battery cover. 


Pay attention not to get the cable 

pinched. 

1) Set the battery unit in. 

Connector Position


Summary of Contents for ELECYLINDER TB-03

Page 1: ...ller and ELECYLINDER Wired Link Instruction Manual ME0376 For how to use the Program SEL system controllers wired link refer to the following instruction manual Touch Panel Teaching Pendant TB 03 Program Controller and Wired Link Instruction Manual ME0377 For details of applicable controllers refer in the section for the supported models Touch Panel Teaching Pendant T TB B 0 03 3 ME0376 ME0377 ELE...

Page 2: ......

Page 3: ...書は本製品専用に書かれたオリジナルの説明書です この取扱説明書に記載されている以外の運用はできません 記載されている以外の運用 をした結果につきましては 一切の責任を負いかねますのでご了承ください この取扱説明書に記載されている事柄は 製品の改良にともない予告なく変更させて頂 く場合があります この取扱説明書の内容について ご不審やお気付きの点などがありましたら アイエイ アイお客様センターエイト もしくは最寄りの当社営業所までお問合せください この取扱説明書の全部または一部を無断で使用 複製する事はできません 本文中における会社名 商品名は 各社の商標または登録商標です Important This Instruction Manual is original The product cannot be operated in any way unless expressly speci...

Page 4: ...rs in those started to be supported in V2 00 and later are available for operation with versions before the support was started but some of the functions would not activate It is recommended to have the version updated to one that covers the support when using those actuators Note 1 For the digital speed controller type the model code includes D in the type e g EC S3 EC DS3 EC RR6 EC DRR6 There ar...

Page 5: ...ME0375 4A Variation Applied to Axis Operation with Wireless Connection ELECYLINDER Type Supported from version ELECYLINDER with Option Code WL2 V2 30 ...

Page 6: ...s Compliances 8 Precautions for Handling Wireless Operation 9 Precautions for Axis Operation with Wireless Connection 11 Product Check 12 1 Confirming the Specifications 15 2 Connection 31 3 Operation of ELECYLINDER 33 4 Offline Function 87 5 Error Display 91 6 Appendix 97 7 Warranty 101 ...

Page 7: ...s 26 1 11 Maintenance Parts 27 1 12 Specifications Related to Wireless 28 1 13 Specifications Related to Battery Charge 29 2 Connection 31 2 1 Wireless Link to ELECYLINDER 31 2 2 To Turn Power OFF 32 3 Operation of ELECYLINDER 33 3 1 Displayed Language Change 33 3 2 Operating Menu 35 3 3 Initial Screen 37 3 4 Wireless Axis Selection Window Change Operation Axis 39 3 5 Menu Selection 43 3 6 Monitor...

Page 8: ...Teaching Update 98 7 Warranty 101 7 1 Warranty Period 101 7 2 Scope of Warranty 101 7 3 Honoring the Warranty 101 7 4 Limited Liability 101 7 5 Conditions of Conformance with Applicable Standards Regulations Etc and Applications 102 7 6 Other Items Excluded from Warranty 102 Change History 103 ...

Page 9: ...mportant safety parts of machinery Safety device etc Do not use the product outside the specifications Failure to do so may considerably shorten the life of the product Do not use it in any of the following environments 1 Location where there is any inflammable gas inflammable object or explosive 2 Place with potential exposure to radiation 3 Location with the ambient temperature or relative humid...

Page 10: ...ider the safety factor of the hook in such factors as shear strength Do not get on the load that is hung on a crane Do not leave a load hung up with a crane Do not stand under the load that is hung up with a crane 3 Storage and Preservation The storage and preservation environment conforms to the installation environment However especially give consideration to the prevention of condensation Store...

Page 11: ...ere is no disconnection or looseness Failure to do so may cause a fire electric shock or malfunction of the product Never cut and or reconnect the cables supplied with the product for the purpose of extending or shortening the cable length Failure to do so may cause the product to malfunction or cause fire 3 Grounding The grounding operation should be performed to prevent an electric shock or elec...

Page 12: ...ssary to secure safety Do not insert a finger or object in the openings in the product Failure to do so may cause an injury electric shock damage to the product or fire When releasing the brake on a vertically oriented actuator exercise precaution not to pinch your hand or damage the work parts with the actuator dropped by gravity 5 Teaching When the work is carried out with 2 or more persons make...

Page 13: ...e terminal block or any of the various setting switches in the power ON mode Failure to do so may result in an electric shock or malfunction 7 Automatic Operation Check before starting the automatic operation or rebooting after operation stop that there is nobody in the safety protection fence Before starting automatic operation make sure that all peripheral equipment is in an automatic operation ...

Page 14: ...ay result in a damage to the product When releasing the brake on a vertically oriented actuator exercise precaution not to pinch your hand or damage the work parts with the actuator dropped by gravity The slider or rod may get misaligned OFF the stop position if the servo is turned OFF Be careful not to get injured or damaged due to an unnecessary operation Pay attention not to lose the cover or u...

Page 15: ... if the product is not handled correctly will result in death or serious injury Danger Warning This indicates a potentially hazardous situation which if the product is not handled correctly could result in death or serious injury Warning Caution This indicates a potentially hazardous situation which if the product is not handled correctly may result in minor injury or property damage Caution Notic...

Page 16: ...depending on the peripheral environment of use Also be aware that even if an axis is displayed in the wireless axis select window with distance over 5m the connection could get unstable as the distance goes far For a SD memory card choose a SD SDHC memory card with 1G to 32G Toshiba made recommended Also use FAT32 Format for the file system International Standards Compliances This TB 03 comply wit...

Page 17: ...limits This transmitter must not be colocated or operating with any other antenna or transmitter CANADA This device complies with Industry Canada licence exempt RSS standards Operation is subject to the following two conditions 1 This device may not cause interference and 2 This device must accept any interference including interference that may cause undesired operation of the device Le présent a...

Page 18: ...ai Co Ltd 한국 KOREA 식별 부호 MSIP CRM IAI TB 03 제조사명 주식회사 IAI 모델명 TB 03 본체부분 TB 03 로 인증 받고 있습니다 제조국 일본 Made in Japan 수입업자명 IAI KOREA Corp 해당 무선설비는 전파혼신 가능성이 있으므로 인명안전과 관련된 서비스는 할 수 없습니다 ประเทศไทย Thailand ผู ผลิต IAI CORPORATION ชื อโมเดล TB 03 ได รับใบรับรองภายใต ชื อ TB 03 ประเทศผู ผลิต ญี ปุ น Made in Japan ผู นําเข า IAI Robot Thailand Co Ltd México Mexico Número de Certificación IFETEL RCPIATB19 ...

Page 19: ...ent to forward and backward ends jog operation inching operation is possible but the control device is not designed for purposes of automatic operation Construct a mechanical system based on the risks of the operating environment Carry out risk assessment based on the standard spec requirements of the machinery for installation Dangerous operation such as that requiring an automatic stop when cont...

Page 20: ... 1 Accessories 2 Battery unit AB 7 1 3 Touch pen TCH TB03 1 Provided with the teaching pendant φ4 5 100 5mm 4 AC adapter UN318 5928 For use in Japan North America Mexico and Thailand UNZ318 5928 For use in China UNE318 5928 For use in Europe UNR318 5928 For use in Korea 1 Depends on model code enclosed AC adapter type 5 Safety guide 1 The picture shows an image 6 First step guide ME0378 1 The pict...

Page 21: ...uct stored in the DVD No Name Control number 1 Teaching Pendant Wireless Link Instruction Manual This guide ME0375 2 ELECYLINDER Instruction Manual ME3778 ME3779 ME3793 ME3794 ME3798 ME3799 ME3800 3 How to Read Model Nameplate Serial number Product number ...

Page 22: ...e main unit in order to avoid loosing or dropping it Grip Belt GRP 2 Prepare your own and attach Refer to 1 10 1 Grip Belt GRP 2 Battery Unit for Main Unit AB 7 Maintenance part code Remark Touch Pen TCH TB03 φ4 5 100 5mm Cable Type SCN With No Cable Main body only Language option Not specified Screens are displayed in Japanese Display can be changed to other languages ENG Screens are displayed in...

Page 23: ...D backlight Backlight life 15 000 hours Touch panel screen 7 inch TFT color WVGA 800 480 Touch detection method 4 wire resistive type Touch panel life 1 million times External memory SD SDHC memory card interface installed 1G to 32G Toshiba made recommended Touch pen Accessory φ4 5 100 5mm Language selection Japanese English Chinese Touch sound ON OFF Volume Settable in 3 steps S M and L Data save...

Page 24: ...Environment with no corrosive or flammable gas Avoid use in places with dust or in places where oil mist or cutting fluid splashes Vibration resistance Frequency 10 to 57Hz Swing width 0 035mm Continued 0 075mm Continual Frequency 57 to 150Hz Acceleration 4 9m s2 Continued 9 8m s2 Continued XYZ Each direction Sweep time 10 min Number of sweep 10 times Dropped in package From height 800mm dropped o...

Page 25: ... to turn it off 4 SD memory card slot cover There is an inlet for SD memory card inside the cover Refer to 1 4 How to Set in out SD Memory Card to set in or out a SD memory card 5 AC adapter connection It is a connector to have the AC adapter joined in Caution When the wireless link operation can not be stopped with the stop switch 3 Power supply switch Used for wireless link 1 STOP switch Used fo...

Page 26: ...two or more locations are touched at the same time the centers of all touched locations may respond and trigger multiple operations 3 When operating the touch panel do not apply a force exceeding 0 5 N If any greater force is applied the touch panel may be damaged 4 The life of touch panel is approx 1 million touches at the same location Assuming a use environment of 25 C 7 Cable connection It sho...

Page 27: ...rd 1 4 1 How to Insert SD Memory Card 1 2 3 Front Side Push the extruded part tab slightly on the SD memory card slot cover towards the rear side and pull it up to open Rear Side Face the electrode side of a SD memory card to the front and insert it till it makes a clicking noise ...

Page 28: ...1 Confirming the Specifications 20 ME0375 4A Press the SD memory card softly and release and the card comes out slightly 1 4 2 How to Take out SD Memory Card 1 2 Pull it out straight ...

Page 29: ...ons ME0375 4A 21 Connector Position 1 5 How to Set in out Battery Unit 1 5 1 How to Take Out Battery Unit 1 Push the tab towards the battery cover and the pull up batter cover 2 Pull out the connector and take out the battery unit ...

Page 30: ...off and then put back on the power would not turn on even with the power supply switch being pressed Establish a connection with an AC adapter or a controller and supply power to TB 03 before turning it on 2 Join the connector 3 Attach the battery cover Pay attention not to get the cable pinched 1 Set the battery unit in Connector Position ...

Page 31: ...nd that of the LCD backlight is 15 000 hours Ambient temperature at 25 C 1 8 Life of Battery and Replacement of Battery The nominal life of the button battery CR2032 that the manufacturer states is approximately five years Ambient temperature at 25 C The replacement of the battery cannot be held at customer s site Please contact IAI when you require a replacement ...

Page 32: ...cations Power Input Voltage Range Single Phase 100 to 240V 10 Power Current 0 4Amax Power Frequency Range 50 60Hz 5 In Rush Current 50A at 25 C Output Voltage 5 9V DC 5 7 to 6 3V Output Current 2 8Amax Cable Length 1500 100mm 1 9 2 AC adapter appearance For use in Japan North America Mexico and Thailand UN318 5928 ...

Page 33: ...1 Confirming the Specifications ME0375 4A 25 For use in China UNZ318 5928 For use in Europe UNE318 592 For use in Korea UNR318 5928 ...

Page 34: ...ems 1 10 1 Grip Belt GRP 2 1 10 2 Strap STR 1 Put it through the slit on the left bottom of the main body 1 Put the belt through the slit on the left of the main body and fix it on the fabric hook and loop fastener on the open grip 2 Close the grip Belt Grip 1 2 ...

Page 35: ...Enclosed to Main Unit 1 11 2 Touch Pen TCH TB03 Enclosed to Main Unit For purpose of lost and damaged Putting it through the hole on the touch pen and then put it through the hole allocated on the bottom the main body In case the spiral code would not go through the hole well pull the cord using a tool such as tweezers ...

Page 36: ...less with no interruption The connection may get unstable even in distance of 5m or less depending on the peripheral environment of use Also be aware that even if an axis is displayed in the wireless axis select window with distance over 5m the connection could get unstable as the distance goes far 1 12 3 Directivity Shown below is the result of directivity measurement in the measurement distance ...

Page 37: ...e to the voltage characteristics of NiMH battery electrical discharge the duration of the battery remained display should not be constant Duration of battery full or remained small should be short In case when the battery remained at start and the duration for charging is short the display may show the battery condition full but show empty in short period Example Battery gets charged quickly from ...

Page 38: ...1 Confirming the Specifications 30 ME0375 4A ...

Page 39: ...of 5m or less with no interruption Refer to 1 12 2 Reference for Wireless Link Reachable Distance Press the power switch to turn the power on 1 Initial display window starts up 2 Wireless axis selection window appears It may take time to show the display depending on the reception of the signal Displays on actuators turn on from those with reception stronger to weaker when there are several units ...

Page 40: ...2 Connection 32 ME0375 4A 2 2 To Turn Power OFF 2 Press and hold the power switch for two seconds or longer to turn the power on 1 ...

Page 41: ... from English to Japanese 1 Touch Menu2 in Menu1 2 Touch Env set in Menu2 3 Touch Japanese 4 Touch 上記設定を書き込み Note Skipping to another window without touching 上記設定を書き込み will allow language to go back to that before changed Display change from Japanese to English 1 Touch メニュー2 へ in メニュー1 2 Touch 環境設定 in メニュー2 3 Touch 英語 4 Touch Write the above setting Note Skipping to another window without touching...

Page 42: ...Note Skipping to another window without touching 写 写入上述设定 will allow language to go back to that before changed Display change from Chinese to English 1 Touch 菜単 2 in 菜単 1 2 Touch 环境设定 in 菜単 2 3 Touch 英语 4 Touch Write the above setting Note Skipping to another window without touching Write the above setting will allow language to go back to that before changed ...

Page 43: ...c 3 14 Information menu Software version display Edit Axis Name Production Information display Maintenance Information display Connectable Model display Inquiry Information display Data transfer between memory and controller 3 16 SD Memory Card menu Save data from controller to SD memory card Transfer data from SD memory card to controller Teaching Update Move to menu 2 Menu 2 window display Infor...

Page 44: ...t and brightness changes Time setting Startup initial window setting and guide display select Display of maintenance part list 6 17 Maintenance part list display Setting and execution of easy program 6 18 Execution of operation stop setting continuous operation and repeated operation Move to menu 1 Menu 1 window display Other Settings Parameter Initializing Window Axis Number Setting Window Parame...

Page 45: ...ndow will show up Select the axes to operate in this teaching pendant Four units at maximum can be shown in one window Up to 4 screens 16 units In case more than four units are connected and the axis you would like to operate is not displayed touch Pr pg Nx pg buttons to show the axis you would like to operate Refer to 3 4 Wireless Axis Select Window Change Operation Axis The number of axis to be ...

Page 46: ... what is written and touch OK button The Menu 1 window appears It is available to show a window other than Menu 1 Window Refer to 3 15 Environment Setting Caution Before starting axis operation make sure that you check the contents described in the 10 page Precautions for Axis Operation with Wireless Connection and follow it to secure the safety ...

Page 47: ...s at maximum can be shown in one window Up to 4 screens 16 units In case more than four units are connected and the axis you would like to operate is not displayed touch Pr pg Nx pg buttons to show the axis you would like to operate 3 4 2 Display Wireless Axis Status 1 Pr pg and Nt pg Buttons You can change pages with these buttons Four pages 16 units should be able to show at maximum 2 Update But...

Page 48: ...me Edit 2 S N serial number Here displays the serial number of ELECYLINDER 3 Link Status Here displays the status of ELECYLINDER connection The status of link should be shown in either of four types below Wireless axis operation icon should be displayed when operation with wireless connection is available Display Status Selectable motion ok It is a condition wireless link is available to select Ax...

Page 49: ...istance of drive in the maintenance information Refer to 3 6 2 Maintenance Information Window In case of any item exceeded the threshold for warning it should be shown here in red 8 Over load Lv Here displays overload level in the driver monitor information Refer to 3 6 1 Monitor Window In case of any item exceeded the threshold for warning it should be shown here in red Refer to 3 6 2 Maintenance...

Page 50: ...ay Content Normal Condition Wireless Link Unavailable Wire Linked Condition Disconnected Condition Alarm Not Generated Alarm Generated 1 Axis Name Displayed as EC 2 S N serial number 3 Link Status 4 Servo on Display 5 Current Position Display 6 Travel Cnt 7 Travel Dist 8 Over load Lv 9 Alarm Display ...

Page 51: ... the explanation screen for special terms 4 Monitor Button Opens the monitor screen 5 Battery Display It displays the condition and remaining of battery 1 13 2 1 Refer to Display of Battery Remained 6 Change operation axis Button Opens the Change operation axis Screen There are eight types of menu button in Menu 1 and six types menu button in Menu 2 Select one of them and touch it The screen goes ...

Page 52: ...maintenance information and models available for connection Refer to 3 14 Information Display Troubleshooting Shows the contents of an alarm and the countermeasure when an alarm has been generated Menu 2 list Change operation axis Select an axis to operate Refer to 3 4 Wireless Axis Selection Window Change Operation Axis TP op mode Switch over between forbidden and permitted for PIO operation and ...

Page 53: ... Menu 1 screen If the TP operation mode is not Monitor Mode 1 or 2 the following message screen appears Touch Yes to change to Monitor Mode 1 or 2 If not touch No Note The safety speed does not change If the current mode is Teaching Mode 1 it changes to Monitor Mode 1 If the current mode is Teaching Mode 2 it changes to Monitor Mode 2 Touch OK The monitor screen appears ...

Page 54: ... current current ratio with ripple compensation or without ripple compensation Yes Shown in command current Note 2 No Shown in output current Note 3 Overload level The overload level is shown in the rate that the motor raising temperature assumed to generate the overload alarm set as 100 PCB temp Temperature of the control PC board in the actuator is shown Alarm Group The applicable alarm group is...

Page 55: ...vel distance has exceeded each setting Touch m km and the display of unit for the total travel distance current value can be switched between m and km Display in m for distance Display in km for distance Contents of Display Total travel count The cumulative total number of actuator movements is shown Total travel distance The cumulative total distance travelled by the actuator is shown m km ...

Page 56: ...l distance threshold to change the setting for the total travel distance threshold When Total Travel Count has Exceeded Total Travel Count Threshold You will be notified in Maintenance warning 1 window The number in total travel count blinks in maintenance information window When Total Travel Distance has Exceeded Total Travel Distance Threshold You will be notified in Maintenance warning 2 window...

Page 57: ...ate an overload alarm set as 100 an overload warning can get output when the temperature has exceeded the rate of the motor temperature set in this window Touch Edit button on the right of Over load warning level to change the setting for the over load warning level Items of Setting Over load warning level Set the level to generate the over load warning alarm Set to 100 and a warning should be gen...

Page 58: ...on edit password is other than 0000 the password entry screen appears Enter the position edit password Touch ENT The simple data setting screen appears Unit Change switches the unit between and mm s for velocity and G for acceleration deceleration and and N for pressing force Simple Data Setting screen Positioning Operation Refer to 3 7 1 Positioning Operation Setting Simple Data Setting screen Pr...

Page 59: ...ing the formula below Min Velocity mm s Lead Length mm 800 0 001 s 3 Acc or G Set the acceleration at start Set a number from 1 to 100 Also the unit can be switched to G by pressing Unit Change Input can be made down to the two decimal places for G 4 Dec or G Set the deceleration at stop Set a number from 1 to 100 Also the unit can be switched to G by pressing Unit Change Input can be made down to...

Page 60: ...n for the way forth and the way back is transferred by pressing Transfer button the old setting parameters will be shown in the previous setting area and the new parameters in the current setting area and the cycle time calculated from these parameters will be displayed Caution If the actuator or work part receives impact or generates vibration lower the acceleration deceleration If the system is ...

Page 61: ...it is mm and input can be made down to two decimal places 2 Vel and Acc Dec Setting can be made for the velocity acceleration and deceleration for movement from the start position of the movement backward end or forward end to the start position of pressing operation The way to conduct settings is the same as that for positioning operation 3 Push force Set a pressing torque limit current value in ...

Page 62: ... should move to the backward end if you touch B End Make operation using velocity and acceleration deceleration in the operation conditions Way back from F End to B End An actuator should move to the forward end if you touch F End Make operation using velocity and acceleration deceleration in the operation conditions Way forward from B End to F End Both forward and backward operations should activ...

Page 63: ... move backward forward should change in the order below 1 mm s 10 mm s 30 mm s 50 mm s 100 mm s 3 Inching Select Inching in radio buttons Touch Backward button and an actuator should move backward in a certain distance Regardless of the backward end setting the actuator should move backwards till the home position Touch Forward button and an actuator should move forward in a certain distance Regar...

Page 64: ...anual operation display and data transfer history display Switchover is available in any condition of Test run Jog and Inching In the data transfer history display the manual operation buttons work as B End and F End buttons for Test Run Once you switch the screen back to the manual operation display the setting should go back to the test run ...

Page 65: ...e Menu 1 screen If a system password is not 0000 the password entry screen appears Input the parameter edit password Touch ENT A parameter table is displayed The parameter edit password at delivery is set to 0000 For how to change the parameter edit password refer to 3 15 Environment Setting Parameter edit password change ...

Page 66: ...ked in radio button that you selected Descriptions Touch Descrptn button and the descriptions of the setting items will be shown in the bottom of the screen Touch Home Button once all the settings are completed A confirmation window asking Restart the controller will come up Touch Yes if you have made a change Touch No to return to the parameter screen without restarting the controller or reflecti...

Page 67: ...est run menu screen is displayed Jog inching button should appear only when an axis available for operation with wireless connection is connected Touch either one of Jog inching or I O test 1 Jog inching Touch Jog inching button Perform jog inching operation Refer to 3 9 1 Jog Inching Operation for details about how to operate 2 I O test Touch I O test button Monitoring of the input and output sig...

Page 68: ... operation When the home return operation is incomplete the display of is inactivated Touch Homing and the axis starts home return operation and the display of gets activated Brake rel For an actuator equipped with a brake touch Brake rel and the brake gets compulsorily released and the circle turns on Touch Brake rel again and the brake works and the circle turns off BACK FW When JOG operation is...

Page 69: ...e monitored You can also touch OUT00 to OUT02 to forcibly turn ON OFF the corresponding output signals Touch I O Test in the trial operation menu window to open the I O test window If it is necessary to turn on OUT00 which is currently off touch OUT00 OUT00 turns on Touch OUT00 again and it turns off ...

Page 70: ...d parameters in Simple Data Setting Window should be written in the controller Safety velocity invalid It is not for use in wireless link Monitor1 PIO movement permittion Safety velocity valid PIO movement permittion Monitoring is only available It is not available that the items and parameters in Simple Data Setting Window get written in the controller Safety velocity valid The maximum velocity s...

Page 71: ... is shown Touch Alarm list on the Menu 1 screen The controller s alarm list appears Touching Nx pg displays the list of the next screen Touching Pr pg displays the list of the previous screen Touching Clear clears all alarm details The time of occurrence of each alarm is indicated by an elapsed time from this FFF PowerUP No Error ...

Page 72: ...Controller reset on the Menu 2 screen Touch Yes Touch No to return to the Menu 2 screen without restarting the controller This window appears if the servo is on Touch Yes Touch No to return to the Menu 2 screen without restarting the controller The controller is restarted Returns to Menu 1 screen ...

Page 73: ...eset to their factory default settings initialized Touch Parameter initialization in Other setting screen to display Parameter initialization screen Touching Password displays the numerical keypad Input 5119 and touch ENT Touch Yes and the confirmation screen for controller restart appears Caution Once the parameters are initialized to their factory default settings all parameters the user has set...

Page 74: ...ted and the screen returns to the previous Caution If the controller is not restarted the parameters that have been rewritten to their factory settings do not translate to the factory set operations The factory settings will become effective once the controller is restarted or power is reconnected ...

Page 75: ... button of the feature that you would like to display such as Software version information Software version information Touch Software version information in Information screen Software version information screen opens Touch Edit Axis Name and the name of axes can be edited Refer to 3 14 1 Edit Axis Name for how to edit an axis name Production information Touch Production information button in Inf...

Page 76: ...intenance Information Screen for how to operate displayed button Connectable model Touch Connectable model information in Information screen Connectable model screen opens Note In this display controllers applicable for wired link should also be shown Refer to 4 3 Teaching Update for how to update teaching Inquiry Touch Inquiry in Information screen Inquiry screen opens ...

Page 77: ...uld show the Axis No 00 even if Axis Name Display is selected if an axis name has not been set Note The available characters for setting in TB 03 are capitalized font English characters from A to Z and numbers from 0 to 9 For full size font characters character input please use PC software Axis Name Edit Operation Touch Env set on the Menu 2 screen Set to Axis Name for the axis name display Touch ...

Page 78: ...cter select buttons are shown in the half bottom of the screen Input a name and touch ENT The number of characters available for input is 12 in half size font characters Touch ENT with nothing input and it is defined as no setting With no setting an axis number will be shown Displayed in the top right is the name of the axis Tentative setting condition Touch Yes to confirm the setting Touch No and...

Page 79: ... The environment setting screen appears Language setting Select a language to show from Japanese English EU Chinese Touch a language such as Japanese to show Touch Write the above setting The setting will not be changed when you move to another window without touching it For the operation procedures in detail to change the language refer to 3 1 Display Language Change Touch tone You can select whe...

Page 80: ...and then touch Write the above setting The setting will not be changed when you move to another window without touching it Axis Name Display Make a selection whether to show the name or number for axis display Touch Axis Name and the name will be shown Touch Axis No and the number will be shown Select either Axis Name or Axis No and touch Write the above setting The setting will not be changed whe...

Page 81: ...ppears Input a system password Touch ENT Enter the new position edit password to change to If the position edit password is not set enter 0000 Touch ENT Touch Change The new password after change will be displayed Make sure it shows the same as the password you have set Touch OK The default system password is 5119 For how to change the system password refer to System Password Change as described l...

Page 82: ...appears Input a system password Touch ENT Enter the new parameter edit password to change to If the parameter edit password is not set enter 0000 Touch ENT Touch Change The new password after change will be displayed Make sure it shows the same as the password you have set Touch OK The default system password is 5119 For how to change the system password refer to System Password Change in the next...

Page 83: ...the password entry screen appears Input the system password that is currently set Touch ENT Enter the new system password to change to If you do not set the system password enter 0000 Touch ENT Touch Change The new password after change will be displayed Make sure it shows the same as the password you have set Touch OK The default system password is 5119 ...

Page 84: ...lay setting Display setting menu screen is displayed Select Display setting menu Change the Contrast Brightness You can adjust contrast shading of liquid crystal and brightness of liquid crystal Touch Contrast Brightness Contrast adjustment Touch and under Contrast to adjust the contrast of the screen Brightness adjustment Touch and under Brightness to adjust the brightness of the screen ...

Page 85: ...4A 77 Touch panel position calibration A calibration for the position detection of the touch panel is performed Touch Touch panel position calibration Touch in the order of 1 2 3 and 4 The display returns to Display setting menu screen ...

Page 86: ...he order of color pattern white only and black only Touch LCD check Color Pattern is displayed Touch any point on the screen White Only is displayed Touch any point on the screen Black Only is displayed Touch any point on the screen The display returns to Display setting menu screen ...

Page 87: ...ect This button is not to be used for ELECYLINDER 2 Initial Screen Select at Startup Select a screen from those below for the screen shown first after the power is turned on Monitor screen Position edit screen Note 1 Parameter edit screen Test run screen Information screen Touch either one to select and touch OK Note 1 Select Position edit screen and Simple Data Setting Screen should be displayed ...

Page 88: ...e the backup It cannot be restored Data is in a CSV file Note Directories of the Stored Data The folders to store the backup data of the controller and the folder to read the data from when restoring the data to the controller are as listed below The directories to store the files cannot be changed The files existing in other directories other than the specified folders cannot be listed up in the ...

Page 89: ...rd screen opens Touch Save from controller to SD memory card Select the data type for the backup such as Position data and touch it The data type been selected will be shown in light blue Touch Save Touch Yes Touch No and the screen returns to the previous screen Numeric keys are displayed Input a file name and touch ENT The file name is to be typed with 32 characters at maximum in letters and num...

Page 90: ... which the numeric keys were shown The screen below appears if the same name is found Touch Yes If No is touched the screen goes back to the previous one to indicate the backup file name in which the numeric keys were shown Transferring data screen will be shown A message to tell the data transfer is complete pops up and the backup process is finished Touch OK and the screen returns to SD memory c...

Page 91: ...en opens Touch Transfer from SD memory card to controller Select the data type to transfer to the controller such as Position data and touch it The data type been selected will be shown in light blue Touch Transfer Touch Yes If No is touched the screen goes back to the data backup screen Touch and to select a file to transfer to the controller from the list of the backed up file names ...

Page 92: ...e select Transferring data screen will be shown A message to tell the data transfer is complete pops up and the data transfer process to the controller is finished Touch OK Touch Yes to execute restart Note The controller reboot screen will not appear if there is no difference between the data in the controller and the data that was read out ...

Page 93: ...3 Operation of ELECYLINDER ME0375 4A 85 3 17 Maintenance Parts List Information of maintenance components is displayed Touch Maintenance parts list in Menu 2 screen Maintenance parts list screen opens ...

Page 94: ...3 Operation of ELECYLINDER 86 ME0375 4A ...

Page 95: ...t EC Only After reading out the existing data in ELECYLINDER and edit positions data can be saved in a Secure Digital memory card Creating new data is not available Touch Position edit EC only button Restore file select window appears Touch the pulldown button and select a file to read out Touch Transfer button File name confirmation window appears The selected file name should be displayed Confir...

Page 96: ...pears Input a file name that you would like to save Touch Save button If there is the same name already existed the overwriting confirmation window should pop up Touch Yes button if you accept to overwrite A window stating saving complete should show up Touch OK button The display goes back to Restore file select window Touch the home button on the top of the window if you require to go back to Wi...

Page 97: ...d be conducted here for the teaching pendant How to operate the window should follow 3 15 Environment Setting 3 15 Refer to Environment Setting Touch Configuration button Environment Setting window shows up Refer to 3 15 Environment Setting to establish settings for each item ...

Page 98: ...d be conducted here for the teaching pendant How to operate the window should follow 6 2 Teaching Update 6 2 2 Refer to How to Update when Offline Touch Teaching update button Teaching update Window shows up Refer to 6 2 2 How to Update when Offline to perform updating 1 80 ...

Page 99: ...ration cancellation level errors having a disadvantage for operation 300 to 3FF Cold start level which requires re power on or reconnection The following table shows the list and countermeasures Code Message Contents occurring cases and countermeasures 112 Input data error An inadequate value was entered in the parameter setting Retype a proper value with reference to the actuator specification an...

Page 100: ...annot be read at the time of restoring 164 SDcard file format error File format is not matched Example If the content of the file which will be restored are different from the file format defined by data types 181 Controller init complete Messages to confirm the operation It is not to say any operation mistake or abnormal occurrence 184 Data transfer completed 186 Time setting completed 187 Browno...

Page 101: ... Operation should be available if connected to an AC adapter 18C Battery Error The battery cannot be charged in quick charging connected to an AC adapter It can be concerned the malfunction of the battery Battery drive is not available Operation should be available if connected to an AC adapter or CTL 18D Battery Power Drop Warning It occurs when the battery voltage gets below the warning output t...

Page 102: ...SCI Send Que overflow 306 Recieve Buffer overflow 308 Response time out 30A Packet Recieve Que overflow 30B Packet Send Que overflow 30C Not connected The axis number of the controller cannot be recognized 1 The controller may not be functioning properly Check that the RDY lamp of the controller is lighted If the lamp is not lighted the controller is broken down 2 The communication lines SGA SGB o...

Page 103: ... gets connected with wire to another tool It is because wired communication should be prioritized The display switches from Troubleshooting Window to Wireless Axes Select Window 331 Wireless Communication Response Timeout Error It occurs when an error occurred in communication between a teaching pendant and an ELECYLINDER while in wireless communication The display switches from Troubleshooting Wi...

Page 104: ...5 Error Display 96 ME0375 4A ...

Page 105: ...ame IMG_YYMMDDHHMMSS bmp e g The file name when process has started at 12h 34m 56s in August 9 2017 IMG_170809123456 bmp 751KB Domain to Save Data cannot be changed The domain that the screenshot data is saved is the folder stated below in a Secure Digital memory card TB_CON ScreenShot Caution 1 The saving process takes approximately 10 seconds at the maximum 2 During the saving process the monito...

Page 106: ...TB 02 03 update fileTB 02_ zip should be replaced by the version number in three digits and unzip it Preparation 3 Copy the unzipped update fileTB 02_ pct should be replaced by the version number in three digits to the root folder of the SD memory card Note Update cannot be conducted if there are two or more update files in the root folder Preparation 4 Take the SD memory card cover off and insert...

Page 107: ... the screen and this will be rebooted automatically TB 03 will start up in the new version Caution Do not attempt to turn off the power to TB 03 while in updating It is also available to perform by touching SD memory card Teaching update in Menu 1 window Step 1 Perform from Preparation 1 to Preparation 5 Step 2 Touch SD memory card button in Menu 1 window Step 3 Touch Teaching update button Step 4...

Page 108: ...eaching update button Step 4 Touch Start update button Step 5 The updating confirmation window shows up Touch Yes button Step 6 Start updating Touch the screen after you confirm the following messages Program Update is All Done Touch the screen and this will be rebooted automatically TB 03 will start up in the new version Caution Do not attempt to turn off the power to TB 03 while in updating ...

Page 109: ...y 1 Anything other than our product 2 Modification or repair performed by a party other than us unless we have approved such modification or repair 3 Anything that could not be easily predicted with the level of science and technology available at the time of shipment from our company 4 A natural disaster man made disaster incident or accident for which we are not liable 5 Natural fading of paint ...

Page 110: ...pertaining to maintenance or management of human life or health 2 A mechanism or mechanical equipment intended to move or transport people such as a vehicle railway facility or aviation facility 3 Important safety parts of mechanical equipment such as safety devices 4 Equipment used to handle cultural assets art or other irreplaceable items 3 Contact us at the earliest opportunity if our product i...

Page 111: ... wireless connection 3 6 2 and 3 14 Figures swapped for Maintenance Information Screen descriptions revised 3 8 Figure swapped for Parameter Edit Screen Correction made Edition 2B Data Setter changed to Touch Panel Teaching Pendant Edition 2C Models added for ELECYLINDER supported Third Edition Models added for ELECYLINDER supported 3 6 1 and 3 15 Selection of with or without ripple compensation a...

Page 112: ......

Page 113: ......

Page 114: ......

Reviews: