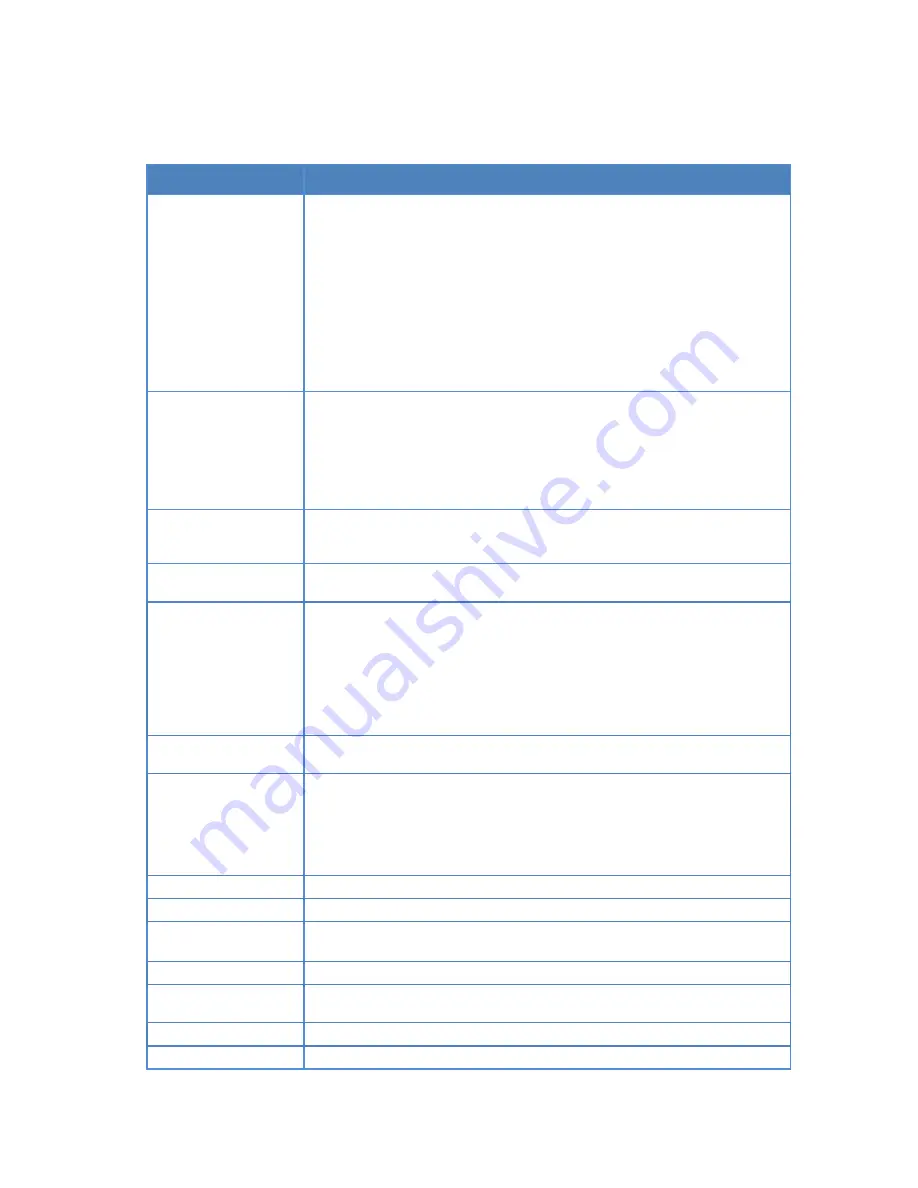
background image


i


2.


Technical


Data


2.1.


Specifications


XMP

7300


Video


format


support


POPAI


Screen


Media


Standards


S6


(MPEG

1


SIF,


3Mbps


CBR)


S7


(MPEG

1


480p,


10Mbps


CBR)


S8


(MPEG

1


720p,


15Mbps


CBR)


S9


(MPEG

2


480p,


6Mbps


CBR)


S10


(MPEG

2


720p,


12Mbps


CBR)


S11


(MPEG

4


AVC,


480p,


6Mbps


CBR)


S12


(MPEG

4


AVC,


720p,


10Mbps


CBR)


E4


(VC

1/WMV9,


MP@ML,


720p)


E7


(MPEG

4


ASP,


480p,


10Mbps


CBR)


E8


(MPEG

4


AVC,


1080p,


10Mbps


CBR)


H.265/HEVC


Image


format


support


POPAI


Screen


Media


Standards


S1


(JPEG


480p


baseline)


S2


(JPEG


720p


baseline)


S3


(JPEG


1080p


baseline)


E1


(PNG


24bpp+alpha,


480p)


E2


(PNG


24bpp+alpha,


720p)


E3


(PNG


24bpp+alpha,


1080p)


Audio


codec


support


POPAI


Screen


Media


Standards


S4


(MPEG


L2


audio)


S5


(MP3


audio,


320Kbps)


Dynamic


content


W3C


HTML5


(HTML,


CSS,


JavaScript)


W3C


SMIL


3.0


instructions


(sub

set)


Physical


I/O


connectors


HDMI


2.0


USB


2.0


x


2


RJ45


Ethernet


port


(Giga


LAN)


Wi

Fi


antenna


port


Micro


USB


for


ADB


Micro


SD


card


slot


Audio


out


(3.5mm


Analog,


S/PDIF)


LED:


Power(green)/Status(orange)


Local


storage


8


GB


on

board


flash


memory


(up


to


6


hrs


of


typical


720p


video


@


3


Mbps)


Micro


SD


card


expansion


slot


Accessories


AC


adapter


HDMI


cable


Wi

Fi


antenna


Velcro


(


2


sets


)


MicroSD


card


slot


stopper/screw


x1


DC


jack


protection


stopper/screw


x1


Power


requirement


12V


1.5A


DC


Power


consumption


7.5


W


Environmental


Top


housing:


143.60x100.66x33.65mm


(5.65x


3.96x1.32


inches)


Base:


143.60x128.13x33.65mm


(5.65x5.04x1.32


inches)


Dimensions


167x118.8x24.5


mm


(


6.57x4.67x0.96


inches)


Weight


500


g


1.10


lbs


Safety


UL/FCC/CE/CCC/C

Tick/VCCI


certified


power


supplies


Certifications


CE/FCC


Summary of Contents for XMP-7300

Page 1: ...XMP Hard P 7300 dwar U 0 User M Manua al...

Page 2: ...i Contents 1 Introduction 1 1 1 Package contents 1 1 2 Installation 1 1 3 Physical view 2 2 Technical Data 3 2 1 Specifications 3...

Page 3: ...n cribes the har contents USB mouse is on ntenna s antenna as VESA Mou 100 100mmx with dware of the required for s shown below unt The playe x100mm com AC Adapter h select powe XMP 6200 system setup w...

Page 4: ...nput p Micro USB view left to righ on to perform for USB conte en and Statu connector for port for netwo ntenna post nt card slot t ort for ADB And ht in above il m factory reset ent update an s orang...

Page 5: ...o 320Kbps Dynamic content W3C HTML5 HTML CSS JavaScript W3C SMIL 3 0 instructions sub set Physical I O connectors HDMI 2 0 USB 2 0 x 2 RJ45 Ethernet port Giga LAN Wi Fi antenna port Micro USB for ADB...

Page 6: ...i Warra Fir Fir Me anty rmwa mwar dia Pla XMP One are U re vers ayers 6200 year limited User M sion M parts labor Manu 1 2 MBR 1100 ual 0 XMP 730 00...

Page 7: ...ion EasyPlay 10 2 10 Display settings 13 2 11 Sound settings 16 2 12 System configuration Player name 17 2 13 System configuration Security 18 2 14 System configuration Time Server 18 2 15 System conf...

Page 8: ...nnect it to a monitor via an HDMI cable If it is a signboard with built in screen no monitor is required However a signboard player can still be connected to a monitor via HDMI for larger display area...

Page 9: ...on Fig 2 2 1 Basic settings Network Time zone and Content Each time the Basic settings menu is entered playback will automatically begin after 15 seconds if content services have been previously set A...

Page 10: ...on UI Fig 2 3 1 2 Click the ON OFF button as indicated below to turn ON Wireless interface network Fig 2 3 2 3 The player will scan for wireless signals nearby and available access points will be list...

Page 11: ...You can also scroll down swipe to see the rest of the menu 2 Under IP settings change DHCP to Static Fig 2 3 6 3 Fill the form and click Connect to complete the setting Scroll down swipe to see the r...

Page 12: ...on is required Fig 2 3 8 Static IP manually assign network IP address 1 Click Static IP Settings to configure static IP address Fig 2 3 9 Proxy settings 1 In Basic settings click the Advanced button a...

Page 13: ...ngs 1 In Basic settings click the Advanced button advanced configuration menu will be launched Fig 2 3 10 2 Click Network and then click Show IP Fig 2 3 13 3 This feature is to control whether the IP...

Page 14: ...7 Fig 2 3 14 4 4 Time zone settings 1 Click Time zone Fig 2 4 1 2 Choose the correct time zone from the available options Fig 2 4 2...

Page 15: ...can be canceled by clicking Checking button it will change back to Play NOTE It is highly recommended to let the player check the availability of the content URL Clicking Play button with a bad invali...

Page 16: ...tion including the Health status Firmware version and Player ID 1 Click the Advanced button advanced configuration menu will be launched Fig 2 6 1 2 Click on Information The definitions of the Health...

Page 17: ...s the p files does not on AppSt for execution Fig 2 6 1 lick on AppSta SMIL in AppS 5 2 the URL d for 3rd party on FailSa for execution advanced conf lick on FailSaf L in FailSafe d for 3rd party on E...

Page 18: ...ld selected folde layer will play rver configure card containi Fig 2 6 1 lick on EasyPl on to enable E photos and m usic from the ng the directo button as mar der is selected ers will be pla y content...

Page 19: ...nt and then c ttons marked eduled time in d s assigned in t tion Fig 2 6 1 lick on Schedu in red below n the dialogue he time slots ule to enable dis e boxes marke A E are inclus sable the Easy ed in...

Page 20: ...nd D E ia players esolution to m mputer monito advanced conf ton and then ect suitable re ct and use the e slots marked match your dis or projector figuration me click on Displ solution from e best op...

Page 21: ...nboard is ONLY displaying image on the panel Fig 2 10 4 Signboards support output to panel and external monitor at the same time to use this function please 1 Check Enable dual display in the Display...

Page 22: ...settings 1 Click the Advanced button advanced configuration menu will be launched Fig 2 6 1 2 Click the Display sound button and then click on Display The Display Settings page will be launched Fig 2...

Page 23: ...Display The Display Settings page will be launched Fig 2 10 1 3 Click on the Screen orientation marked in red below Fig 2 10 9 4 Click on the preferred angle from the menu Fig 2 10 10 4 11 Sound setti...

Page 24: ...t nced button a m and click on or the field an mes settings pa en click on OK on Playe ed so the play is required advanced conf n Player name nd click Set age will be lau K to save the n er name yer c...

Page 25: ...The feature allows user to synchronize player s time with the web server where the appStart URL hosted disabled by default When disabled player synchronize it s time with Android default time server n...

Page 26: ...4 Click on Set to save the setting Fig 2 15 1 4 16 System configuration Firmware update Firmware updates can be performed by using a USB flash drive Please read the release notes regarding the change...

Page 27: ...storage being replaced player use only the extra Micro SD card as main storage internal storage will not be used Manual Expansion 11 Power off device 12 Insert Micro SD card and then plug in power co...

Page 28: ...information and new capacity will be displayed Fig 2 17 3 Auto Expansion 16 In the Basic settings menu click the Advanced button advanced configuration menu will be launched Fig 2 6 1 17 Click on Sys...

Page 29: ...and HOLD the reset button with a pin 22 RE CONNECT the power cord 23 WAIT until the status LED flashes 24 RELEASE reset button and wait for system to initialize Using a USB mouse System reset will re...

Page 30: ...unica results across ver obsolete on Powe he player to p minutes advanced conf n Power save e mode button ng nt with 3rd party m 5 yer is the abili ML5 for digita ations protoco multiple dev er save o...

Page 31: ...appliance is designed to be interoperable with leading 3rd party management software solutions or via SMIL open standard commands Could the player display Flash or Microsoft PowerPoint presentations...

Page 32: ...rage and do not support real time video streaming over the network This delivers an optimum viewing experience free of playback quality issues such as stuttering blocking or blue screens The player is...

Page 33: ...be determined by turning the equipment off and on the user is encouraged to try to correct the interference by one or more of the following measures Reorient or relocate the receiving antenna Increase...

Reviews: