background image

  27

Using The Lawnmower

Wake-Up An Uncharged
Battery

When the lawn mower is new or has been 
stored for a long period, the battery must be 
charged before starting. Charging takes 
approximately 2 hours.

Charging information is shown on the display 
during the entire charging process.

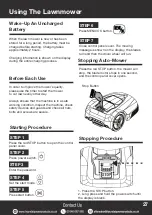
Starting Procedure

STEP 1

Press the red STOP button to open the control 
panel cover.

STEP 2

Press power switch.

STEP 3

Enter the password.

STEP 4

Set the start mode.

STEP 5

Press start button.

STEP 6

Press MENU/OK button.

STEP 7

Close control panel cover. The mowing 
message is shown on the display, the blades 
turn and then the driver wheel will run.

Stopping Auto-Mower

Press the red STOP button, the mower will 
stop, the blade motor stops in one second, 
and the control panel cover opens.

Stopping Procedure

1. Press the STOP button.
2. Long press and hold the power switch until 
the display is blank.

Before Each Use

Always ensure that the machine is in a safe 
working condition. Inspect the machine, check 
safety devices and guards and check all nuts, 
bolts and screws are secure.

Stop Button

In order to improve the mower’s quality, 
please use the timer to start the mower
to cut lawn every other day.

Summary of Contents for HYRM1000

Page 1: ...ROBOT LAWNMOWER HYRM1000 Instruction Manual...

Page 2: ...production however HYUNDAI Power Products may make modifications to the product without notification GENPOWER LTD Isaac Way London Road Pembroke Dock UNITED KINGDOM SA72 4RW T 44 0 1646 687 880 F 44...

Page 3: ...e Parts 44 Notes 45 Contact Us 46 Declaration Of Conformity 47 Important Information 4 Symbols On The Machine 5 General Safety 6 11 Understand Your Machine 6 Personal Safety 6 7 Inspect Your Machine 7...

Page 4: ...you have purchased the machine we recommend that you fill out the following If you need to contact an authorised dealer or customer service for information on servicing you may need to provide the fol...

Page 5: ...away from cutting parts READ INSTRUCTIONS Always turn engine off and read instructions before carrying out any repair or maintenance DANGER Do not ride or sit on the lawn mower RECYCLING AND DISPOSAL...

Page 6: ...be carried out by professionally trained and certified personnel Understand Your Machine Personal Safety WARNING Never allow children or people unfamiliar with these instructions to use the product Lo...

Page 7: ...tch on invites accidents If the machine should start to vibrate abnormally stop the machine and check immediately for the cause Vibration is generally a warning sign of trouble For example one of the...

Page 8: ...d parties are injured carry out the first aid measures most suitable for the situation immediately and contact the medical authorities for any necessary health care Carefully remove any debris that mi...

Page 9: ...se great care so that the terminals or battery leads are NOT allowed to touch and cause a spark ALWAYS use suitable insulated tools The robot lawnmower must never be allowed to collide with people or...

Page 10: ...vibrations These vibrations can lead to white finger Raynaud s phenomenon or carpal tunnel syndrome This condition reduces the ability of the hand to feel and regulate temperature causing numbness an...

Page 11: ...s goggles FOOT PROTECTION MUST BE WORN Non skid heavy duty footwear are highly recommended when working PROTECTIVE CLOTHING MUST BE WORN Do not wear loose clothing gloves scarfs neckties or jewellery...

Page 12: ...s a robotic lawn mower from HYUNDAI The HYRM1000 has a cutting width of 180mm 18cm and is powered by a rechargeable battery It is recommended for lawns up to 500m This depends on the condition of the...

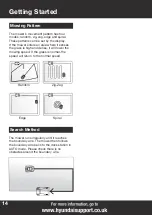
Page 13: ...start the mower again You can manage the mower s program by the control panel under the control panel cover Under the front cover there is a knob rotate clockwise to increase cutting height and count...

Page 14: ...ere it senses the grass is high and dense it will lower the mowing speed If the grass is normal the speed will return to the normal speed The mower runs irregularly until it reaches the boundary wire...

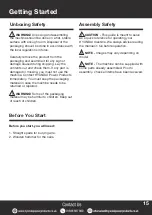
Page 15: ...enough room Disposal of the packaging should be done in accordance with the local regulations in force Carefully remove the product from the packaging and examine it for any sign of damage caused dur...

Page 16: ...ord 2 Dock Station Where your mower returns when the battery is low The dock station has three functions To send a control signal to the boundary wire To send an avoid signal around the station so the...

Page 17: ...17 Unboxing...

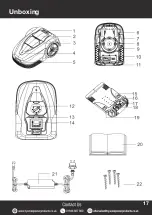
Page 18: ...wheel 10 Battery cover 11 Handle 12 Cutting height adjuster 13 LCD display 14 Keyboard 15 Charging connector 16 Indicator light 17 Power connector 18 Boundary connector 19 Dock station base 20 Operato...

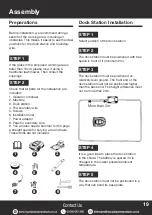
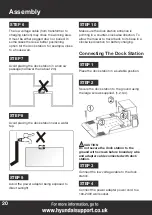
Page 19: ...ck station STEP 2 The dock station must be positioned with free space in front of it minimum 2m STEP 3 The dock station must be positioned on relatively level ground The front end of the dock station...

Page 20: ...sed to direct sunlight STEP 10 Make sure the dock station entrance is pointing in a counter clockwise direction To allow the mower to travel back to its base in a clockwise direction for battery charg...

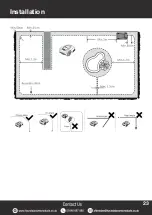
Page 21: ...er end of dock station Lay the cable from here Or from here STEP 4 The boundary wire should be laid 35cm from the area edge obstacle fence flower bed etc This will prevent the mower from colliding wit...

Page 22: ...n the distance between pegs should be approximately 100cm At corners the distance between pegs should be 30 50cm Do not let the boundary wire loop around itself If you intend to bury the boundary wire...

Page 23: ...23 Installation...

Page 24: ...protect them A big tree with roots that can be an obstacle for the mower should be protected by burying the boundary wire Make sure to lay the boundary wire tight to the ground If the boundary wire is...

Page 25: ...25 Installation...

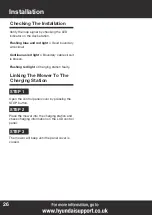
Page 26: ...t Continuous red light Boundary cable circuit is broken Flashing red light Charging station faulty Linking The Mower To The Charging Station The mower will beep until the panel cover is closed STEP 1...

Page 27: ...U OK button STEP 7 Close control panel cover The mowing message is shown on the display the blades turn and then the driver wheel will run Stopping Auto Mower Press the red STOP button the mower will...

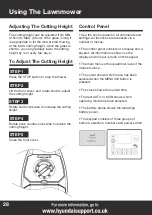
Page 28: ...TEP 4 Rotate knob counter clockwise to reduce the cutting height Control Panel Use the control panel for all commands and settings All functions are accessed via a number of menus The control panel co...

Page 29: ...and the time with the numerical buttons and confirm each selection with the MENU OK button Press the cancel button to go one step back Function Buttons Start mower Please follow up the LCD display inf...

Page 30: ...hich startpoint be active on the reservation day and set the relevent parameters of the startpoint Work Timer Work Timer A or Work Timer B Work Timer Work Day Use the arrow key to select which day the...

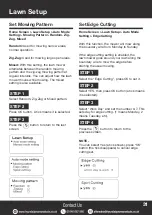
Page 31: ...ndary wire from Monday to Sunday If the edge cutting setting is enabled the lawn mower goes around your lawn along the boundary wire to mow the edge before starting the usual mowing NOTE You can selec...

Page 32: ...o press the STOP button before performing the following procedure Operating In Manual Mode When turning the lawn mower you must enter the PIN STEP 1 Enter the PIN using the number buttons Press the OK...

Page 33: ...an is displayed on the home screen go to step 3 If the auto is displayed on the home screen press the HOME button and select Man by arrow button then press OK STEP 3 Press start button then press OK b...

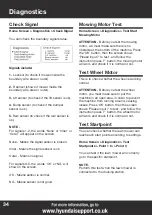
Page 34: ...you test the mowing motor we must make sure there is no obstacle at the bottom of the machine Press the OK button then the screen shows Please input 7 to test and follow the instruction press 7 button...

Page 35: ...s the return button to return to the previous screen STEP 1 Press OK to enter password setting menu STEP 2 Enter old password press OK button STEP 3 Enter new password input new password again press O...

Page 36: ...36 Full Menu Diagram...

Page 37: ...from charging station STEP 2 Angle of startpoint The angle is counted by counter clockwise rotation based on forward direction 37 Mowing Startpoints You can set the mowing startpoints for each day of...

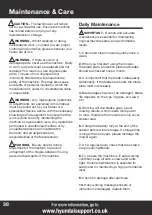
Page 38: ...re the machine has cooled before carrying out any maintenance or storage WARNING Whilst cleaning or doing maintenance work you need to wear proper clothing and protective gloves whenever your hands ar...

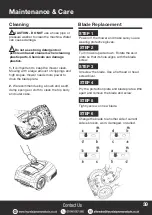
Page 39: ...placement Do not use strong detergents or petroleum based cleaners when cleaning plastic parts Chemicals can damage plastics STEP 1 Power off the mower and make sure you are wearing protective gloves...

Page 40: ...correct 2 Check whether the blades need to be changed 3 Check whether the blades and blades plate turn easily If not please contact the service centre for help 4 Store the machine in a safe place out...

Page 41: ...Motor Speed 3200 3500rpm Wheel Motor Brushless DC Motor Bump Sensor Yes Rain Sensor Yes Lift Sensor Yes Emergency Switch Yes Measured Noise Level 65dB A Guaranteed Noise Level 65dB A Mowing System Fou...

Page 42: ...take it to your local Civic Amenity Site For further information please contact your local Authority for disposal advice You MUST make sure that all unused oil and fuel is disposed of correctly either...

Page 43: ...gers And Heavy Duty Trenchers Compactor Plates Petrol Compactor Plates Cement Mixers Portable Electric Cement Mixers Mini Dumpers 4 Wheel Drive Mini Dumper Power Barrow Yard Sweeper Self Propelled Yar...

Page 44: ...never necessary Our latest manuals are also placed online All our manuals can be downloaded at www hyundaipowerproducts co uk Returning Your Product If you are returning your product please contact th...

Page 45: ...45 Notes...

Page 46: ...7880 open Monday Friday 8 30am 5pm Email aftersales hyundaipowerproducts co uk Online Live Chat Go to www hyundaipowerproducts co uk Live chat is open Monday Friday from 8 30am 5pm Post Genpower Limit...

Page 47: ...015 863 EC RoHS And is in conformity with the applicable requirements of the following documents EN50636 2 107 2015 A1 2018 EN 60335 2 107B EN 62233 2008 EN 55014 1 2017 EN55014 2 2015 EN61000 3 2 201...

Page 48: ...mbroke Dock UNITED KINGDOM SA72 4RW T 44 0 1646 687 880 F 44 0 1646 686 198 E info hyundaipowerproducts co uk www hyundaipowerproducts co uk Imported Distributed by Genpower Ltd for The United Kingdom...

Reviews: