background image

5

Installation Procedure

1.  Install the 

bracke

t in a location where you can 

operate the radio conveniently. 

2.  Connect accessories such as the 

antenna

 and 

power cord

 to the radio. 

3.  Slide the 

radio

 into the properly mounted bracket 

and secure it using the locking knobs. 

4.  Install the 

microphone hanger

 in a location where 

it can be reached easily. 

5.  Plug the 

palm microphone

 into the radio, but at 

first align the triangle index on the palm microphone 
with the microphone installation index. Place the 
palm microphone on the hanger when you do not 
use it. 

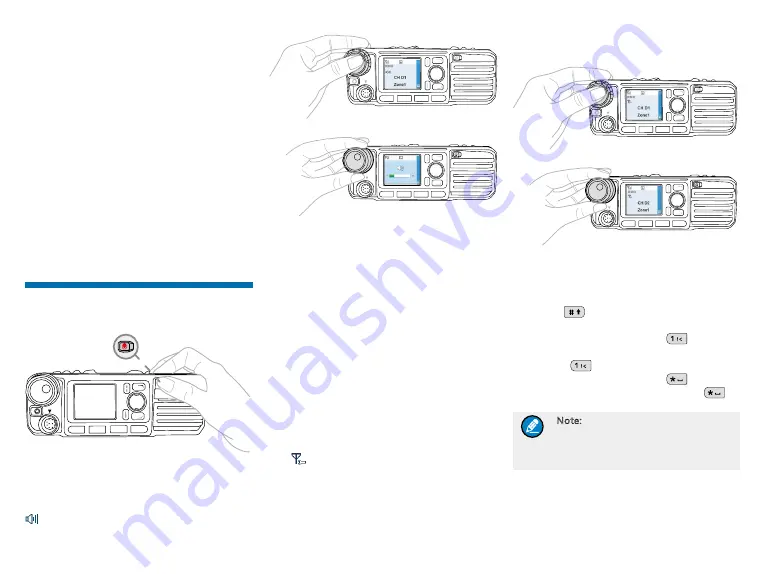
Basic Operations

Turning the Radio On/Off

P1

P2

P3

P4

ON长 按     
OFF短 按     

Adjusting the Volume

You can press the 

Volume Control/Channel Selector 

Knob

 to switch it to volume adjustment mode (the icon 

 appears) and rotate the knob to adjust the volume. 

P1

P2

P3

P4

P1

P2

P3

P4

P1

P2

P3

P4

Selecting a Zone

A zone is a group of channels with the same property, 
which can facilitate convenient management over the 
channels. The radio supports 64 zones, each of which 
consists of up to 16 channels. Your dealer can program 
the zone for your specific needs. You can select a zone 
through any of the following ways: 


Menu: Go to “Menu -> Zone”, press the 

Up/Down


key to select an appropriate zone, and then press 
the OK key to switch to the selected zone. 


Shortcut key: You can toggle to the appropriate 
zone by pressing the programmed 

Zone Up

 or 

Zone Down

 key preset by your dealer. 

Selecting a Channel 

You can press the 

Volume Control/Channel Selector 

Knob

 to switch it to channel selection mode (the 

icon 

 appears) and rotate the knob to select an 

appropriate channel. You can also switch to the preset 
channel by pressing the programmed 

Preset Channel 

key preset by your dealer. 
If the Channel Notify feature is enabled by your dealer, 

the radio will announce the channel number upon 
channel switching. 

P1

P2

P3

P4

P1

P2

P3

P4

P1

P2

P3

P4

Inputting via Keypad

You can input alias, call numbers and messages using 
a palm microphone with keypad (optional accessory). In 
the editing mode, you may do as follows: 


Press 

 to switch the text input methods 

between alphabetic mode and numeric mode


In the alphabetic mode, press 

 to input the 

special characters. But in the numeric mode, 
pressing 

 will input the numeric digit 1 


In the alphabetic mode, press 

 to input the 

space. But in the numeric mode, pressing 

 will 

input the special characters 

Note:  Unless otherwise specified, the 
keypad mentioned in this manual 
indicates that of the palm microphone 
with keypad. 

Managing the Contact

Contact management allows you to view, edit, delete or 
add contacts. 

Long press Power On/Off key 
to turn the radio on and off

.

Summary of Contents for MD785

Page 1: ... 0 0 6 0 0 H05658 D03207 2015 深圳市南山区北环大道9108号 Hytera Communications Corporation Limited Hytera Communications Corporation Limited 是海能达通信股份有限公司的注册商标或商标 2015 海能达通信股份有限公司 版权所有 MD785 G Digital Mobile Radio OWNERS MANUAL ...

Page 2: ...d operations please refer to the Feature Description and Operation Manual along with the product To avoid body injury or property loss caused by misoperation please read the Safety Information Booklet carefully before use This manual is applicable to the following product MD78X MD78XG Digital Mobile Radio X may represent 2 5 6 or 8 English ...

Page 3: ...ensure user health experts from relevant industries including science engineering medicine and health work with international organizations to develop standards for safe exposure to RF radiation These standards consist of United States Federal Communications Commission Code of Federal Regulations 47CFR part 2 sub part J American National Standards Institute ANSI Institute of Electrical and Electro...

Page 4: ...art 4 Installation Procedure 5 Basic Operations 5 Turning the Radio On Off 5 Adjusting the Volume 5 Selecting a Zone 5 Selecting a Channel 5 Inputting via Keypad 5 Managing the Contact 5 Call Services 6 Private Call 6 Group Call 7 Call on Analog Channel Without Signaling 7 Emergency Call 7 Message Services 7 Available Features 8 Troubleshooting 9 Care and Cleaning 10 Optional Accessories 10 ...

Page 5: ...XG mobile radios The descriptions related to the GPS feature in this manual are applicable to MD78XG mobile radios only The frequency band is marked on the label of antenna if not please refer to the label on the radio for frequency band information Product Overview Front Panel No Part Name No Part Name 1 Volume Control Channel Selector Knob 7 Up Key 2 LED Indicator 8 Down Key 3 LCD Display 9 Spea...

Page 6: ...re new work orders are received DM Operation Mode Icon Direct Mode Under this mode radios communicate with each other directly RM Repeater Mode Under this mode radios communicate with each other via a repeater Monitor Icon The Monitor feature is active Emergency Icon The radio is in emergency state except for silent emergency type or an emergency call is received Roam Icon The radio is roaming Scr...

Page 7: ...k how long the screws will extend from the bottom surface of the radio before installation Drill the mounting hole cautiously to avoid damage to the vehicle wiring and other parts Install the radio with mounting bracket supplied by the Company to avoid radio looseness in case of accidents The loose radio may cause bodily injury Connect the antenna and power cord to the radio before you install it ...

Page 8: ...appropriate zone and then press the OK key to switch to the selected zone Shortcut key You can toggle to the appropriate zone by pressing the programmed Zone Up or Zone Down key preset by your dealer Selecting a Channel You can press the Volume Control Channel Selector Knob to switch it to channel selection mode the icon appears and rotate the knob to select an appropriate channel You can also swi...

Page 9: ...ntact list Call Services After the radio is powered on you can make and receive calls To ensure optimal volume of the receiving radio keep the microphone about 2 5 to 5 centimeters away from your mouth when transmitting 2 5 5 0CM Private Call Initiating a Private Call When you initiate a private call the radio will display the icon You can make a private call through any of the following ways Pres...

Page 10: ... Please refer to the Feature Description and Operation Manual along with the product for details Message Services Message Services allow you to edit and send a new message to directly send a quick text message and to forward the messages saved in the InBox OutBox and Drafts Text Message Step 1 Go to Menu Message New Msg to enter the relevant screen Step 2 Type the text and press the OK key You can...

Page 11: ...ervices New Msg Quick Text InBox OutBox Drafts Control Services Alert Call Radio Check Remote Monitor Radio Enable Radio Disable Priority Interrupt Time out Timer TOT Personal Security Services Emergency Alarm Lone Worker Horn Lights Encrypt Network Talk Around Roam Other Features Pseudo Trunking Analog Features Voice Services Call without Signaling Call with Signaling Phone Call Control Services ...

Page 12: ...may be interrupted by radios using the same frequency Adjust the squelch level The radio may be set with no signaling Set your radio with signaling to avoid interference at the same frequency and make sure that all members share the same signaling The noise is too loud You may be too far away from other members Move towards other members and restart the radio to try again You may locate in an unfa...

Page 13: ...t your local dealer for more other accessories Caution Use the accessories specified by the Company only If not the Company shall not be liable for any loss or damage arising out of use of unauthorized accessories Type Model Name Power Supply PS16001 Power Supply of Base Station Cabinet PS22002 Power Supply for Mobile Radio 220W Backup Power Supply applicable Audio Accessories SM09D1 External Spea...

Page 14: ...ons please refer to the Feature Description and Operation Manual along with the product To avoid body injury or property loss caused by misoperation please read the Safety Information Booklet carefully before use This manual is applicable to the following product MD78X MD78XG Digital Trunking Mobile Radio X may represent 2 5 6 or 8 Trunking English ...

Page 15: ... international organizations to develop standards for safe exposure to RF radiation These standards consist of United States Federal Communications Commission Code of Federal Regulations 47CFR part 2 sub part J American National Standards Institute ANSI Institute of Electrical and Electronic Engineers IEEE C95 1 1992 Institute of Electrical and Electronic Engineers IEEE C95 1 1999 International Co...

Page 16: ...4 Installation Procedure 4 Basic Operations 5 Turning the Radio On Off 5 Initial Registration 5 Adjusting the Volume 5 Selecting a Subgroup 5 Selecting a Group Contact 5 Inputting via Keypad 5 Managing the Contact 5 Call Services 6 Private Call 6 Group Call 7 Emergency Call 8 Contents Message Services 8 Available Features 9 Troubleshooting 10 Care and Cleaning 11 Optional Accessories 11 ...

Page 17: ... antenna if not please refer to the label on the radio for frequency band information Power Cord Documentation Kit Radio Keypad Microphone Microphone Hanger and Screws Mounting Bracket Kit Fuse GPS Antenna Product Overview Front Panel No Part Name No Part Name 1 Volume Control Group Call Selector Knob 8 Up Key 2 LED Indicator 9 Down Key 3 LCD Display 10 Speaker 4 OK Menu Key 11 Answer Redial Call ...

Page 18: ...tive Message Icon N e w m e s s a g e u n r e a d message Inbox is full RSSI Icon No signal More bars indicate stronger signal strength Knob Operation Mode Icon The knob is used for selecting the group currently The knob is used for adjusting the volume currently Speaker Icon The speaker is unmuted LQO Icon The LQO feature is active Call Contact Icon Indicates a private call in progress Indicates ...

Page 19: ...use with the same specification for DC power cord upon replacement If there are any other device in the vicinity of this radio the distance between the antenna of this radio and the antenna of such RF device shall be no less than 10 meters Installation Tools Electric Drill Cross head screwdriver Hex socket sleeve for 4 8 20mm self tapping screws Installation Parts No Part Name No Part Name 1 Radio...

Page 20: ...ontrol Group Call Selector Knob to switch it to volume adjustment mode the icon appears in the upper left corner on the LCD and rotate the knob to adjust the volume P1 P2 P3 P4 P1 P2 P3 P4 P1 P2 P3 P4 Selecting a Subgroup You can include the group contacts into a subgroup for efficient management You can go to the menu Subgroup via the Menu or Subgroup key then use the Up Down key to select your w...

Page 21: ...n empty group by rotating the Volume Control Group Call Selector Knob the radio cannot make any call Private Call Private call is a call made to a private contact There are two ways to answer the private call Full Off Air Call Set Up FOACSU and Off Air Call Set Up OACSU The specific way is decided by the settings made for the called radio via the network management application FOACSU The called pa...

Page 22: ...gnal is lost Either of the parties selects an empty group via the Group Call Selector Knob during the call A pre emptive call or an emergency call occupies the channel Group Call The Group Call includes group call and broadcast group call In a group call both the calling party and the called party can talk However in a broadcast group call only the calling party can talk while the called party can...

Page 23: ...ing situations occurs No group member holds down the PTT key to talk before the preset time period expires except in the broadcast group call The call duration exceeds the time preset by the dealer The calling party ends the in progress call if the called party ends the call he she will exit this group call but can rejoin via Late Entry feature The base station signal is lost A pre emptive call or...

Page 24: ...OutBox If not sent successfully the message will be saved into the Drafts and the OutBox Available Features Available features of this radio are listed below Please refer to the Feature Description and Operation Manual for detailed feature descriptions Feature Type Detailed Feature Basic Setting Password Language Indication Backlight Brightness LED Tone Audio Mic AGC Treble Boost LQO Operation Mod...

Page 25: ...the radio and reattach the antenna The speaker may be blocked or damaged Clean the surface of the speaker You cannot communicate with other members The signal may be poor Make sure you and the talk party ies are within the communication range The voice is unclear Signal may be lost due to connecting cable damage Check whether the damage is serious Replace the cable when necessary The signal may be...

Page 26: ... local dealer for more other accessories Caution Use the accessories specified by the Company only If not the Company shall not be liable for any losses or damages arising out of use of unauthorized accessories Type Model Name Power Supply PS16001 Power Supply of Base Station Cabinet PS22002 Power Supply for Mobile Radio 220W Backup Power Supply applicable Audio Accessories SM09D1 External Speaker...

Page 27: ...用说明书 8 1 1 MD7 8 0 0 0 6 0 0 H05658 D03207 2015 深圳市南山区北环大道9108号 Hytera Communications Corporation Limited Hytera Communications Corporation Limited 是海能达通信股份有限公司的注册商标或商标 2015 海能达通信股份有限公司 版权所有 DIGITAL MOBILE RADIO DIGITAL TRUNKING MOBILE RADIO 数字车载终端 ...

Reviews: