background image

Battery (Item 5)

WARNING

Disconnect the ground cable at the bat-
tery before performing any work on the
electrical system.

Check the electrical system for broken or loose wires
and terminals. Check the battery case for cracks.
Keep the battery and cable terminals clean. Check
them electrolyte level. Keep the electrolyte level above
the plates. Use distilled water. Do not fill the battery
past the bottom of the internal filler neck.

Cooling System (Item 6)

Check the hoses for cracks or leaks. Make sure that
all the clamps are tight. Keep the coolant level in the
radiator to the full mark on the coolant recovery tank.
Fill the radiator with a solution of anti-freeze (Ethyl-
ene-Glycol type) and water. Periodic adding of cool-
ant must be done at the coolant recovery tank ONLY.
Whenever the radiator is to be drained and refilled,
fill through radiator until full, replace cap, then fill cool-
ant recovery tank to Full mark.

WARNING

Do not remove the cap from the radiator
or coolant recovery tank when the engine
is hot. Steam and boiling coolant can be
released when the cap is removed caus-
ing severe burns.

CAUTION

Never add cold water to an overheated
engine. Cool the engine by allowing it to
idle as coolant is added to the radiator.
Continue this procedure until the gauge
indicates a normal operating temperature.

Drive Belts (Item 7)

Check the tension on the drive belt for the water pump
and the alternator. Push with approximately a l l kg
(25 lb) force in the middle of the longest distance be-
tween pulleys. When the tension is correct, the fan
belt will move to l 3- l 7 mm ( 1/2 to 5/8 inch). Adjust
the alternator support bracket to adjust the belt ten-
sion. Move the alternator to give the correct belt ten-
sion and tighten the capscrew (diesel). Adjust the idler
pulley to give the correct tension of the fan belt (gas
engine).

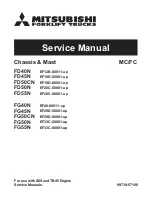
FIGURE 4. MAINTENANCE POINTS

(GAS ENGINE)

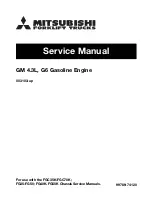
FIGURE 3. MANTENANCE POINTS

Summary of Contents for F003

Page 1: ...Hyster F003 H2 00J H2 50J H3 00JS Europe Forklift...

Page 2: ...and lubrication The schedule usesthe operatinghoursonthe hour meter The table for the Maintenance Schedule has two schedules the hour schedule and the period sched ule Ifthelifttruckisoperatedmoretha...

Page 3: ...MAINTENANCE SCHEDULE...

Page 4: ......

Page 5: ...ore information Please click here Then get the complete manual NOTE If there is no response to click on the link above please download the PDF document first and then click on it Have any questions pl...

Page 6: ...an damage the hydraulic pump Check the hydraulic oil level with the carriage low ered and the engine OFF Make sure the oil is at op eratingtemperature Thedipstickhasthreemarks see Figure2 Addoilonlyas...

Page 7: ...toruntilfull replacecap thenfillcool ant recovery tank to Full mark WARNING Do not remove the cap from the radiator or coolantrecoverytankwhenthe engine is hot Steam and boiling coolant can be release...

Page 8: ...tires before removing them from the lift truck Check the tires for damage Check the tread and re move any objects that will cause damage Check for bent or damaged rims Check for loose or missing hard...

Page 9: ...pecting the upright or attempting any repairs Forks Item 9 A Check that the tips are aligned within 13 mm 0 5 inch of each other I WARNING Do not try to correct the alignment by bending the forks or a...

Page 10: ...cracks Make sure that all nuts and bolts are tight B Check that the rollers and carriage move freely in theuprightchannels C Checkhydraulicattachmentsforleaksordamage FIGURE 9 CHECKING THE CHAINS Load...

Page 11: ...NING Loss of fluid from the master cylinder indicates leakage Repair before using Keep the brake fluid clean Replace all fluid in the system if there is dirt water or oil in the system B Check the ope...

Page 12: ...rate the lift truck until the prob lems are corrected TABLE 1 INSTRUMENT PANEL See Figure 10 CAUTION If any of the instruments do not operate as described in the following chart re port the problems i...

Page 13: ...prightshouldtiltsmoothlyandboth tiltcylindersshouldstopevenly Excessivemovement ofthetiltcylinderswhenthetiltleverisinNEUTRAL mayindicatealeakinthesystem Attachments Hydraulic attachments should opera...

Page 14: ...HE MASTER CYLINDER for repair EVERY 350 HOURS OR TWO MONTHS instructions WARNING Do not permit water oil or dirt to enter the brake fluid Replace all the fluid in the brake system if there is oil wate...

Page 15: ...ling surfaces of the load roll ers Lubricant on the load rollers can hold dirt and prevent the load rollers from turning Flat areas will wearontheloadrollerswhentheydonotturnfreely B Lubricatethelatch...

Page 16: ...r of thefilter C Lower the bottom of the filter and remove the fil terelement Discardthefilterelement D Cleanthe topandbottomcovers Installnew gas kets Installanewfilterelementandtightenthebolt E Remo...

Page 17: ...ne or more of the followingconditions 1 Roughidle 2 Oil in the air cleaner duct 3 Oil leaks 4 Engineoilwillbecomedirtymorequickly thannormal A Loosen vent screw A at the fuel injector pump B Loosen ve...

Page 18: ...riods 3 Engine operates at cool temperatures for short periods and does not reach operating temperature PCV VALVE DIESEL ENGINE Item 24 Clean or change the PCV valve Remove the PCV valve from the engi...

Page 19: ...wuntilthepedalheight iscorrect Tightenthelocknut When the clutch pedal height is correct adjust the clutch release linkage The pedal must move freely 13mm 0 5inch fromitsstoptothepointwherethe release...

Page 20: ...hedrainplug Fill the tank as described in CHECKING THE HY DRAULIC OIL CHANGING THE GASOLINE FUEL FILTER Replace the filter element for gasoline every 2000 hours See Figure 3 CHANGING THE FUEL FILTER F...

Page 21: ...DRIVE TIRES Two types of rims used on the Hyster lift trucks are showninFigure22 Theproceduresfordisassembly andassemblyofthetiresontherimsaresimilar WHEELS AND TIRES FIGURE 22 RIM ASSEMBLY...

Reviews: