background image

32 | 

P a g e


1.


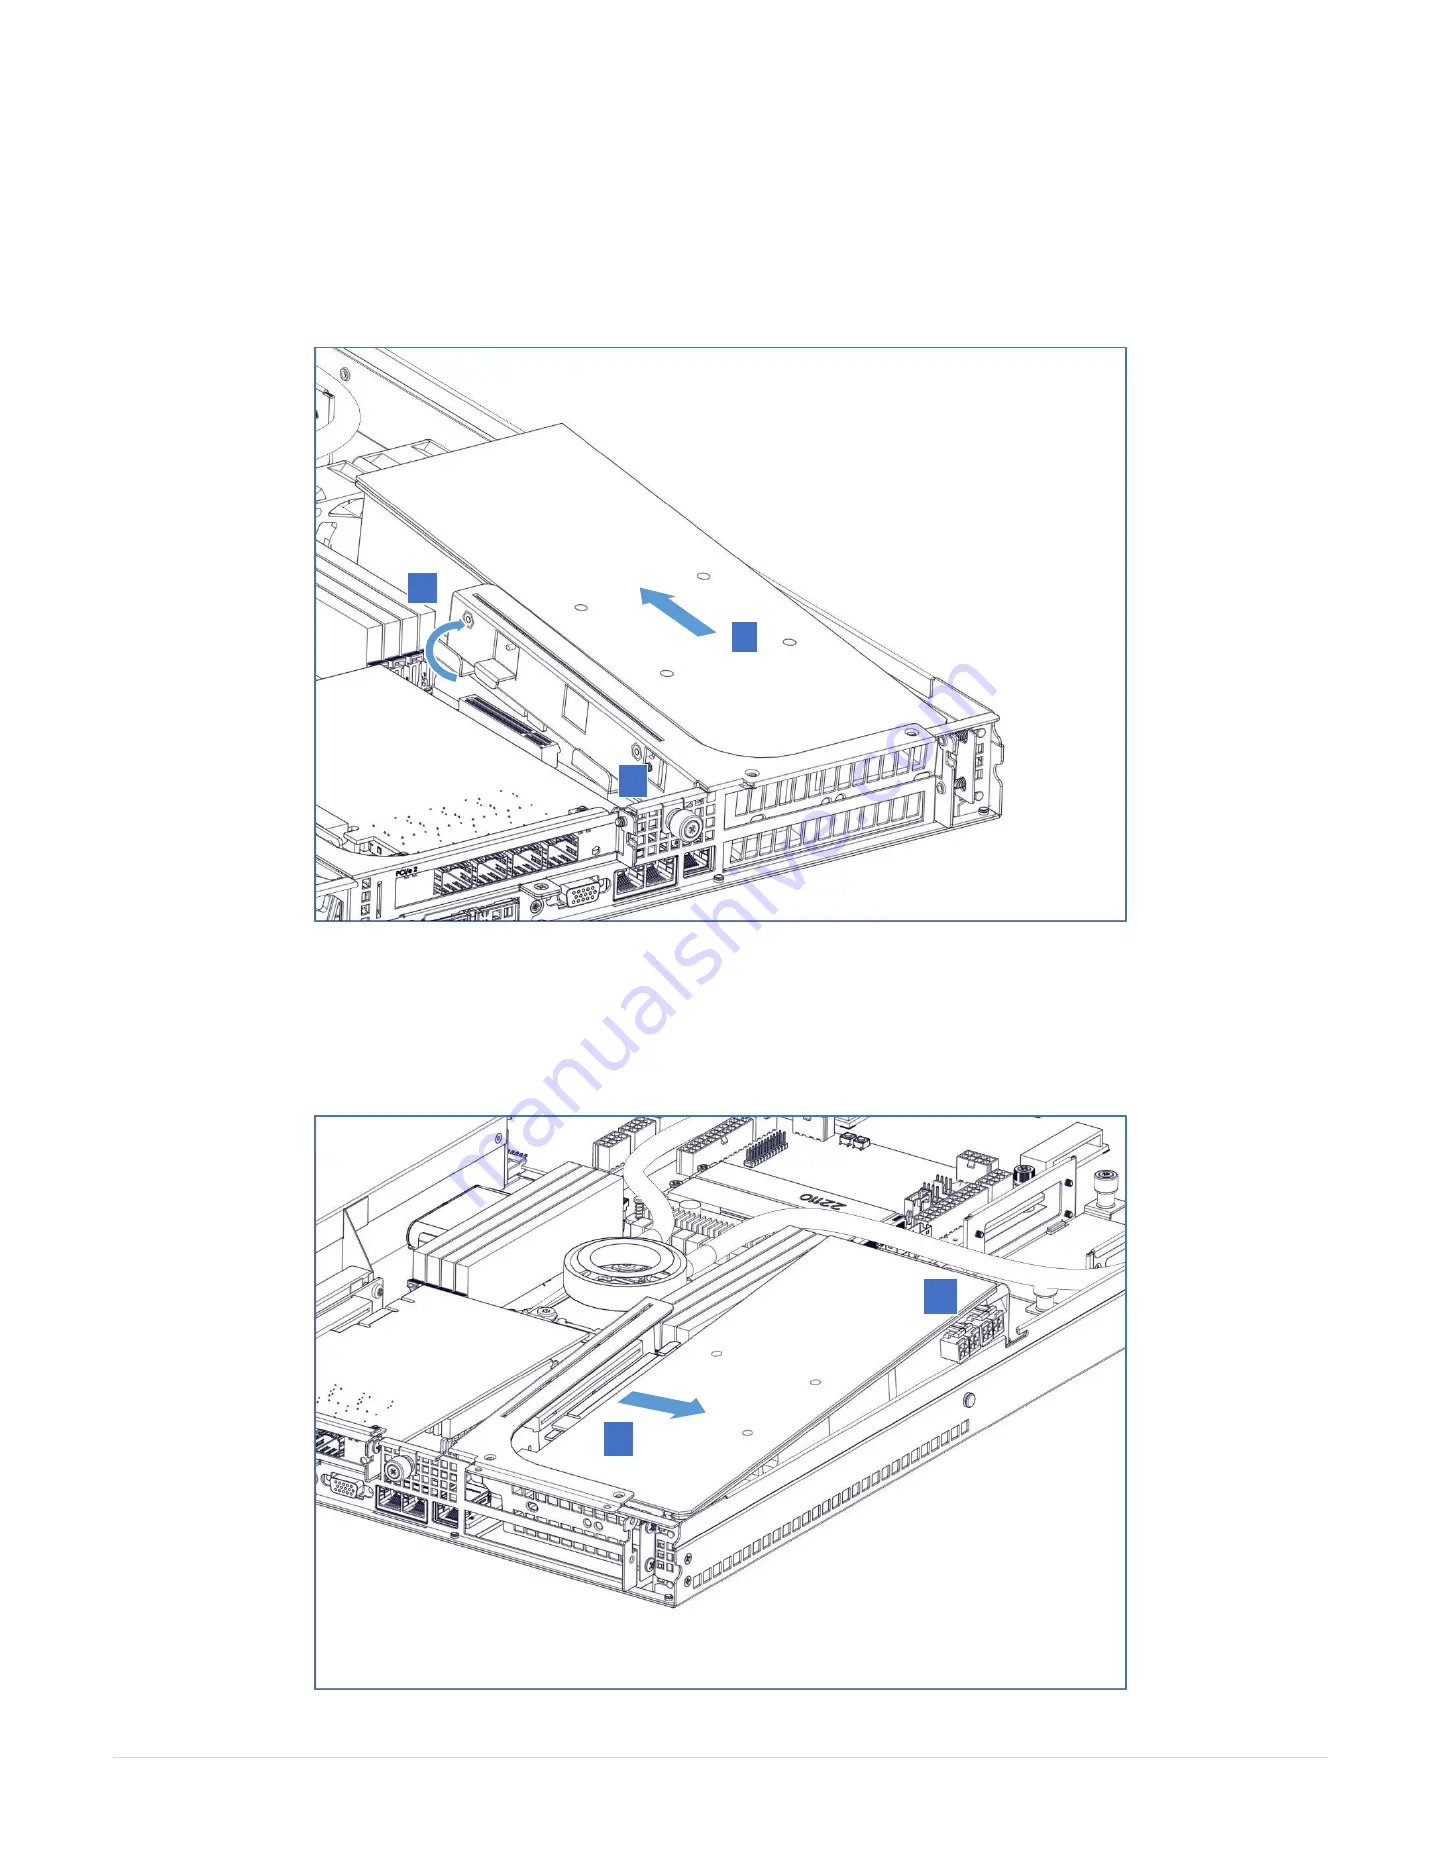
Step 3:

 Carefully lift the riser card bracket by tilting it, and slide the riser card bracket out of the rear panel.  Please ensure that the cables connected to the 

motherboard are not disconnected. 


Step 4:

  Once the GPU cable connectors are out, proceed to slowly slide out the GPU. 


Summary of Contents for CIARA ORION HF310-G4

Page 1: ...ORION HF310 G4 User Manual...

Page 2: ...orking inside the server 1 Ensure that you follow the Safety Instruction 2 Ensure that your work surface is flat and clean to prevent the server cover from being scratched 3 Turn off your server 4 Dis...

Page 3: ...the Chassis Cover 20 13 How to clear the CMOS with jumper and battery 21 This section provides information on how to clear the CMOS by jumper and battery 21 Clear CMOS by Jumper 21 Clear CMOS by Batt...

Page 4: ...ption 69 29 18 System Event Log 70 29 19 Platform Event 71 29 20 Trap Settings 72 29 21 Email Settings 73 29 21 1 SMTP 73 29 22 Serial Over LAN 74 29 23 vKVM vMedia 75 29 24 Launching Java KVM Viewer...

Page 5: ...Series Validated FPGA Adapters Xilinx Vintex Kintex Series Nallatech 385A Series ExaBlaze ExaNIC V5P V9P Series Intel Arria 10 Series I O Ports 1 VGA 2 USB 3 0 2 1GbE RJ45 LAN 1 1GbE RJ45 Management L...

Page 6: ...5 P a g e 2 Chassis Overview The following illustrations are the Orion HF310 G4 chassis Front Back and Side views...

Page 7: ...6 P a g e 3 Front Panel Components ITEM DESCRIPTION 1 Q code 2 VGA 3 2X Drive Bays 4 2x USB 2 0 5 HDD LED 6 Power Button 7 Reset 8 Power LED 8 7 6 5 4 2 1 3...

Page 8: ...g e 4 Back Panel Components ITEM DESCRIPTION 1 2x USB 3 0 2 OCP x8 3 VGA 4 2 x 1G LAN 5 Management LAN BMC 6 Low profile PCIe slot Possible with our request 7 PCIe x 16 FH FL DW 8 PCie x 16 1 3 4 5 2...

Page 9: ...Rails The Orion HF310 G4 server includes 2 accessory boxes Accessory Box 1 with GPU Cables and Brackets Accessory Box 2 with 2 Power Cables The rails and both accessory boxes are placed as shown below...

Page 10: ...9 P a g e 6 Labelling This section provides information on the different labels found on the server 6 1 Power supplies cage 6 2 Serial Number and Model Number Labels on Mylar 6 3 HDD trays...

Page 11: ...10 P a g e 6 4 Support and Certification Labels...

Page 12: ...11 P a g e 7 Chassis Layout The following illusration shows inside of the ORION HF310 G4 system PSU PDB FRONT REAR Liquid Cooling System...

Page 13: ...ECC Up to 64GB 8 x 8GB DDR4 3600 MHz non ECC LAN Dual GbE LAN Intel I350 1 x Management LAN 10 100 1G VGA VRAM Integrated in BMC with DDR4 128MB VRAM 1920x1200 60Hz 32bpp BMC ASPEED AST2500 Expansion...

Page 14: ...DER 15 FRONT PANEL HEADER 16 RESET BUTTON 17 POWER BUTTON 18 SYSTEM FAN HEADER 19 PMBUS HEADER 20 CPU FAN HEADER 21 M 2 PORT 1 LED ACTIVITY 22 M 2 PORT 1 23 U 2 PORTS 24 M 2 PORT 2 LED ACTIVITY 25 M 2...

Page 15: ...rs Layout All the jumpers except the Clear CMOS Jumoper are located next to the PCIe 3 0 x16 Slot 1 The following illustration shows the jumpers The Clear CMOS Jumper is located near the PCIe 3 0 x16...

Page 16: ...15 P a g e...

Page 17: ...ED Off Normal Solid Red Error 38 Memory Error LED Off Normal Solid Red Error 7 2 Jumpers Buttons Functionality Item Jumper Button Description 7 Clear CMOS Clear CMOS Jumper See Page 16 How to clear th...

Page 18: ...7 3 Connector Functionality Item Connector Description 1 COM 1 COM1 connector 2 OCP PCIe 3 0 x8 Network or RAID OCP card connector 4 PCIE_2 PCIe 3 0 x16 Network or Mega RAID card connector 5 TPM Trust...

Page 19: ...18 P a g e Skylake X Block Diagram Slimline 2 x U 2 Slimline 2 x M 2 110mm...

Page 20: ...ection provides information on how to remove the chassis cover from the system Step 1 Turn the Knob anti clockwise by using Philips screwdriver type 2 Step 2 Press the button and slide the cover towar...

Page 21: ...is Cover This section provides information on how to install the Chassis cover in the system Step 1 Slide the cover towards the front of the system to close the cover Step 2 Turn the Knob clockwise by...

Page 22: ...k in g Turn system ON h Allow system to go through a complete power cycle in order to initialize all components i NOTE ALL BIOS settings will be erased after clearing CMOS Customer will need to re upl...

Page 23: ...ystem c Remove CMOS battery connector from motherboard Battery is held onto motherboard by sticky tape d Gently pull battery off motherboard and replace with new battery new battery should have come w...

Page 24: ...e 15 Replacing PCIE 1 Card This section provides information on how to replace the PCIE 1 card Step 1 Unfasten the screws below using Philips screwdriver type 2 Step 2 Remove this plate as illustrate...

Page 25: ...24 P a g e Step 3 Remove card from the riser and replace the card Step 4 Hold and press plate and card bracket together Then fasten with the screws 1 2...

Page 26: ...e 16 Replacing PCIE 2 Card This section provides information on how to replace the PCIE 2 card Step 1 Unfasten the two screws using Philips screwdriver type 2 Step 2 Remove the riser card from the mot...

Page 27: ...26 P a g e Step 3 Unfasten the screw that secures the card to the bracket and slide the card out of the riser 1 2...

Page 28: ...g the middle of memory module or mettalic contacts Removing Memory Module Step 1 Identify the memory module socket Step 2 Press the Memory Module Ejectors 2 on both ends of the memory module socket as...

Page 29: ...odule Step 1 Identify the memory module socket Step 2 Make sure that the Memory Module Ejectors on both ends are released Step 3 Vertically press the memory module with your thumbs until the memory si...

Page 30: ...2 5 inch SSD in the Orion HF310 G4 system Step 1 Remove the SATA and power cables Then turn thumbscrews anticlockwise to unscrew with Philips screwdriver type 2 Step 2 Unscrew these screws as illustr...

Page 31: ...30 P a g e Step 3 Replace the hard drive s...

Page 32: ...This section provides information on how to replace the GPU in the Orion HF310 G4 system in the PCIE 1 expansion slot Step 1 Remove the power cables and then unscrew the four screws as illustrated be...

Page 33: ...bracket by tilting it and slide the riser card bracket out of the rear panel Please ensure that the cables connected to the motherboard are not disconnected Step 4 Once the GPU cable connectors are o...

Page 34: ...cket on the new GPU and replace with the custom bracket supplied in the accessory box Step 6 Slide the new GPU into the riser card Set the GPU front end carefully inside the chassis ensuring that the...

Page 35: ...34 P a g e Step 7 Align the riser card and PCIe1 slot and slide it in Step 8 Screw the top screws and push the plate and screw in the side screws...

Page 36: ...the rack rails Step 1 Install rails into the rack Step 2 Pull the middle fully extended member in lock position ensure that the ball bearing retainer is located at the front of the middle member Hori...

Page 37: ...36 P a g e Step 3 When it hits a stop please pull push the blue release tab on the inner member...

Page 38: ...37 P a g e 21 Plugging the Power Cords The following illustration shows how to connect the power cords to the back of the system...

Page 39: ...38 P a g e 22 Turning on the System The following illustration indicates where the power button is located on the front of the server...

Page 40: ..._SMM_INIT 0x36 PEI_MEM_NB_INIT 0x37 PEI_MEM_SB_INIT 0x3B PEI_DXE_IPL_STARTED 0x4F PEI_RECOVERY_AUTO 0xF0 PEI_RECOVERY_USER 0xF1 PEI_RECOVERY_STARTED 0xF2 PEI_RECOVERY_CAPSULE_FOUND 0xF3 PEI_RECOVERY_C...

Page 41: ...DXE_NB_INIT 0x69 DXE_NB_SMM_INIT 0x6A DXE_SB_INIT 0x70 DXE_SB_SMM_INIT 0x71 DXE_SB_DEVICES_INIT 0x72 DXE_ACPI_INIT 0x78 DXE_CSM_INIT 0x79 DXE_BDS_STARTED 0x90 DXE_BDS_CONNECT_DRIVERS 0x91 DXE_PCI_BUS_...

Page 42: ...D 0xB1 DXE_LEGACY_OPROM_INIT 0xB2 DXE_RESET_SYSTEM 0xB3 DXE_USB_HOTPLUG 0xB4 DXE_PCI_BUS_HOTPLUG 0xB5 DXE_NVRAM_CLEANUP 0xB6 DXE_CONFIGURATION_RESET 0xB7 DXE_CPU_ERROR 0xD0 DXE_NB_ERROR 0xD1 DXE_SB_ER...

Page 43: ...IO_EARLY_INIT_ENTRY 0xE0 IIO early init entry define STS_EARLY_PRELINK_TRAINING 0xE1 Early Pre link training setting define STS_GEN3_EQ_PROGRAMMING 0xE2 IIO Gen3 EQ programming define STS_LINK_TRAININ...

Page 44: ...fine STS_PPM_CSR_PROGRAMMING 0xD1 CPU PM CSR programming define STS_PPM_MSR_PROGRAMMING 0xD2 CPU PM MSR programming define STS_PPM_PSTATE_TRANSITION 0xD3 CPU PM PSTATE transition define STS_PPM_EXIT 0...

Page 45: ...to the system s BIOS Step 1 Turn on the system and press the DEL button on the keyboard immediately after you see the following windows to enter in to the Bios Step 2 When prompted for the password an...

Page 46: ...45 P a g e Step 4 Select the SETUP and press Enter Step 4 In the main Menu in the BIOS You can use either the keyboard arrow keys or mouse cursor to navigate...

Page 47: ...MC IP address settings for remote management Step 1 Go in to the BIOS In the Setup menu under the Server Mgmt menu select BMC network configuration and note down the Station IP address Step 2 Launch t...

Page 48: ...47 P a g e Step 3 When main menu of BMC appears then click on the Settings Step 4 Select the Network Settings...

Page 49: ...48 P a g e Step 5 Select the Network IP Settings Step 6 Uncheck the Enable IPv4 DHCP then enter the IPv4 Address IPv4 Subnet and IPv4 Gateway and then click on Save...

Page 50: ...49 P a g e Step 7 Click on OK and close the browser tab or browser Launch the browser or new tab with the new BMC IP Address to verify if the changes has been successful...

Page 51: ...50 P a g e 27 Configuring Management Console Network In order to configure the Management Console Turn ON the system and note down the BMC IP as seen below...

Page 52: ...hould support four concurrent connections The Web user interface GUI is used to configure monitor and administer the Orion HF310 G4 systems This Web based GUI is supported on the following web browser...

Page 53: ...og box prompts you to enter Username and Password 3 Enter the following values Username ADMIN Password ADMIN OR Username admin Password password Note When you log in using the root user name and passw...

Page 54: ...ng the Management Console After you successfully log into your Management Console the Remote Management Console GUI appears 29 1 Properties The Properties page displays the platform and firmware versi...

Page 55: ...29 2 2 Shared Mode When set to Shared Mode you can configure the BMC related settings through the NIC2 port Shared NIC Mode NOTE Function available on selected models 29 2 3 Failover Mode When set to...

Page 56: ...network security settings on this screen Check the IP Blocking Enabled box and input the desire value of IP Blocking Fail Count IP Blocking Fail Window and IP Blocking Penalty Time After you finish th...

Page 57: ...56 P a g e 29 4 Security The Security page shows the current certificate status To generate a new certificate click Generate Certificate To upload a certificate click Upload Certificate...

Page 58: ...e Users ID To display new user information click Refresh NOTE BMC convention for enabling an anonymous login is to configure the entry for User ID 1 with a null username all zero s and a null password...

Page 59: ...he Services page you can configure the web server parameters such as HTTP Port Number HTTPS Port Number and Timeout on a remote computer By default the timeout is 1800 seconds When you finish the conf...

Page 60: ...he following table shows the Channel Privilege Level Users This may be considered the lowest privilege level Operator All BMC commands are allowed except for configuration commands that can change the...

Page 61: ...ted Mode or Daemon Mode in this parameter In Requested Mode you can request an immediate clock synchronization with the NTP server request will be sent when click the Sync Time Now button The Daemon M...

Page 62: ...61 P a g e 29 9 Language This page allow users to choose preferred language when using the WebUI When you finish the configuration click Apply Change...

Page 63: ...ion This page displays information on Active Sessions Additionally the trashcan icon provides the delete function for privileged users Click Session log to view the session log Click Refresh to refres...

Page 64: ...oad user list of LDAP server then create Management Console user account from this list directly Check the box below to enable LDAP authentication and enter the required information to access the LDAP...

Page 65: ...e Updates page the firmware can be updated remotely To update firmware follow the instruction below 1 Select Update Type 2 Select the file on your local system by using Browse Click Upload to update t...

Page 66: ...ocal system using Browse and click Update 4 To backup configuration click on Backup under the Backup Configuration 5 To restore configuration select the file by clicking Choose File and then click on...

Page 67: ...66 P a g e 29 14 Fan Profiles The Fan Profiles page provides viewing and configuring the Fan Profiles You can Import Export the fan profiles as well...

Page 68: ...g e 29 15 Sensor Monitor The Sensor monitor page provides general configuration for related system hardware monitoring To view the Probe list click Show Graph and click Refresh to update current prob...

Page 69: ...Power Control allows you to power on off cycle Hard Reset NMI Soft off System the remote host system Additionally you can see the remote power status To perform the power control operation select the...

Page 70: ...69 P a g e 29 17 Power Consumption This section allows user to configure the power policies for the system...

Page 71: ...a g e 29 18 System Event Log It records the event when sensor has an abnormal state When the log matches the pre defined alert the system sends out the notification automatically if it is pre configu...

Page 72: ...urs For each PEF you can choose the action to be taken when a platform event occurs You can also choose to generate and send an alert when a platform event occurs In the Platform Events screen you can...

Page 73: ...tely separate protocols IPv6 is not backwards compatible with IPv4 and IPv4 hosts and routers will not be able to deal directly with IPv6 traffic IPv6 has a significantly larger address space than IPv...

Page 74: ...ter you finish the configuration click Apply Change to save the settings 29 21 1 SMTP Set E mail SMTP server IP address for sending alert notification to user Check the SMTP Authentication Enabled box...

Page 75: ...onfigure the Serial Over LAN settings on this screen Check the Enable Serial Over LAN box and select the Baud Rate and Channel Privilege Limit from the drop down list After you finish the configuratio...

Page 76: ...75 P a g e 29 23 vKVM vMedia This screen allows you to start a Remote Console session with the host system...

Page 77: ...76 P a g e 29 24 Launching Java KVM Viewer Click Launch HTML5 vKVM Viewer to launch the redirection console and manage the server remotely After clicking the button a console appears as below...

Page 78: ...e Virtual KVM Configuration Enabled box or Virtual Media Configuration Enabled box and select the Max Sessions Remote Port Video Encryption Enabled and Preference Client from the drop down list After...

Page 79: ...78 P a g e 29 26 CPU Processor Information This CPU page displays the technical specifications of the installed processor...

Page 80: ...79 P a g e 29 27 Memory This Memory page displays the technical specifications of the installed memory Click Refresh to refresh current installed memory information...

Page 81: ...80 P a g e 29 28 Storage This page displays the connected hard disk drive and hardware health information Click Refresh to view connected hard disk drive hardware health status...

Page 82: ...29 29 PSU Power Supply Unit This PSU page displays the connected Power Supply unit s information like Manufacturer Serial number Firmware version etc Click Refresh to view connected power Supply unit...

Page 83: ...82 P a g e 29 30 System NIC This System NIC page displays the connected network cards information Click Refresh to view the onboard LAN device related information...

Page 84: ...83 P a g e 29 31 PCIE Peripheral Component Interconnect Express This PCIE page displays the on Board and Add in PCIE cards information Click Refresh to view the PCIE devices information...

Page 85: ...ion provides information on how to update the BIOS and ME through the BMC port Step 1 Insert the network cable in the dedicated BMC IPMI Lan port Step 2 Turn ON the machine Step 3 Note down the BMC IP...

Page 86: ...ine Step 5 Go to you computer and open a browser IE or Chrome and then put the BMC IP address on the address bar ex https 172 2 2 54 and press enter Step 6 If the web page does not open you need to EN...

Page 87: ...86 P a g e Step 8 Click Proceed to unsafe Step 9 Put Username ADMIN and Password ADMIN...

Page 88: ...87 P a g e Step 10 Go to Update Step 11 Select BIOS ME...

Page 89: ...88 P a g e Step 12 Click on Choose file Step 13 Select the file Image RBU from your PC and press Upload...

Page 90: ...89 P a g e Step 14 Press Update and wait until is done 100...

Page 91: ...90 P a g e 32 Profile Loading in BIOS This section provides information on how to upload the profile in the BIOS Step 1 There is no password to enter the BIOS you will just have to hit Enter...

Page 92: ...91 P a g e Step 2 In the Setup menu select the OC Config menu and go to Save user profiles...

Page 93: ...92 P a g e Step 3 Choose the desired profile You should have a 48_18 and a 50_10 profiles Restore it and then press F10...

Page 94: ...M5vKVM Viewer 2 Click on Activate Vmedia 3 Select Removable Disk and click Manage 4 Click on browse to select the profile image HF310 G4 F05 xxxx xx img 5 Click on Map Drive to mount the removable med...

Page 95: ...94 P a g e 8 Type fs3 which is the number of Removable Media in this example 9 Type update nsh profile_name and press Enter 10 Reboot the system the profile will be applied and saved into the BIOS...

Page 96: ...sandtoolsareavailableontheCiara swebsite https ciaratech com support center 34 1 Verifying CPU Frequency for Linux ForUBUNTUandDEBIAN youcaninstalli7z availableinmostLINUXDistributionTree ForRHELandCe...

Page 97: ...96 P a g e 34 2 Verifying CPU Frequency for Windows The Hwinfo utility for Windows available on website https www hwinfo com download WINDOWSHwinfo64...

Reviews: