ENGINE 3-26
Standard
0.045~0.075 mm
(0.0018~0.0030 in)
Service limit
0.120 mm
(0.0047 in)
Piston-to-cylin-
der clearance
◉
PISTON-TO-CYLINDER CLEARANCE
To determine the piston-to-cylinder clearance, calculate
the difference between the cylinder bore and outside
diameter of the piston.
◉
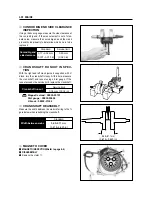
PISTON RING FREE END GAP
INSPECTION
Before installing piston rings, measure the free end gap
of each ring using vernier calipers. If the gap is less than
the service limit, replace the ring.
◉
PISTON PIN DIAMETER INSPECTION
Using a micrometer, measure the piston pin outside
diameter at three position, both the ends and the center.
If any of the measurements is founds less than the ser-
vice limit, replace the pin.
Piston pin hole bore
Service limit
20.030 mm (0.7886 in)
Piston pin diameter
Service limit
19.980 mm(0.7866 in)
Piston ring free end gap
Standard
Approx 9.9 mm (0.390 in)
Approx 10.5 mm (0.413 in)
1st
2nd
Dial calipers : 09900-20605
◉
PISTON PIN HOLE BORE
Using a dial calipers, measure the piston pin hole bore
both in the vertical and horizontal directions.
If the measurement exceeds the service limit, replace
the piston.
Micrometer(0~25 mm) : 09900-20201
Vernier calipers : 09900-20101
Piston ring free end gap
Service limit
7.9 mm (0.311 in)
8.4 mm (0.330 in)
1st
2nd
Summary of Contents for GT 650
Page 5: ...NOTE Difference between photographs and actual motorcycles depends on the markets ...
Page 13: ...1 7 GENERAL INFORMATION EXTERIOR ILLUSTRATION ...
Page 102: ...CARBURETOR 4 3 FUEL SYSTEM ...
Page 138: ...LAMP HEADLAMP TURN SIGNAL LAMP TAIL BRAKE LAMP ELECTRICAL SYSTEM 6 16 ...
Page 158: ...7 15 CHASSIS FRONT FORK ...


