background image

9

  FAMILIARIZE YOURSELF WITH

        THE MOTORCYCLE

 KNOW YOUR LIMITS

  BE EXTRA SAFETY CONSCIOUS

        ON BAD WEATHER DAYS

     WARNING

     WARNING

     WARNING

Your  riding  skill  and  mechanical 
knowledge from the foundation for safe 
riding practices.
We suggest that you practice riding 
your  motorcycle  in  a  non-traffic 
situation  until  you  are  thoroughly 
familiar  with  your  machine  and  its 
controls.
Remember practice makes perfect.

Ride within the boundaries of your own 
skill at all times. Knowing these limits 
and staying within them will help you to 
avoid accidents.

Riding on bad weather days, especially 
wet ones, requires extra caution.
Braking distances double on a rainy 
day. Stay off of the painted surface 
marks, manhole covers and greasy 
appearing  areas  as  they  can  be 
especially slippery. 
Use  extreme  caution  at  railway 
crossings and on metal gratings and 
bridges. 
Whenever you have a doubt about road 
condition, slow down!

Summary of Contents for GD250

Page 1: ...1 This owner s manual contains important safety information Please read it carefully WARNING ...

Page 2: ...rt of the motorcycle and should remain with the motorcycle when resold or otherwise transferred to a new owner or operator The manual contains important safety information and instructions which should be read carefully before operating the motorcycle ...

Page 3: ... Fill the electrolyte to the battery Leave the battery for 30 minutes C harge the battery by standard charging This is necessary for reliability of the battery Install the battery to the motorcycle STANDARD CHARGING TIME 1 0 A for 10 hours CAUTION Do not use the battery without the battery initial charging Otherwise the battery service life may be shortened CAUTION Use only the genuine Hyosung bat...

Page 4: ... features than shown in this manual Ⓒ COPYRIGHT S T Motors Co Ltd FOREWORD THANK YOU for choosing a Hyosung motorcycle We at Hyosung have designed tested and produced this motorcycle using the most modern technology available to provide you with much happy enjoyable safe riding Motorcycling is one of the most exhilarating sports and to ensure your riding enjoyment you should become thoroughly fami...

Page 5: ...y important that you avoid operating the engine in a manner which could expose the engine parts to excessive heat Please refer to the BREAK IN section for specific break in recommendations WARNING CAUTION NOTE Please read this manual and follow its instructions carefully To emphasize special information the words WARNING CAUTION and NOTE have special meanings Information following these signal wor...

Page 6: ... its any sale or delivery to the ultimate purchaser or while it is in use and b Th e use of the vehicle after such device or element of design has been removed or rendered inoperative by any person MAINTENANCE The exhaust system of this motorcycle requires no periodic maintenance Th e engine should be adjusted to the manufacture s specifications and the spark plug should be kept in good condition ...

Page 7: ...enger These precautions are CONSUMER INFORMATION SAFE RIDING RECOMMENDATION FOR MOTORCYCLE RIDERS Before each use perform daily inspections with the rider Specific items to check are listed in the INSPECTION BEFORE RIDING section on page 55 of this owner s manual Make sure the rider wears a helmet eye protection and protective clothing gloves leather or heavy cloth pants long sleeved shirt or jack...

Page 8: ...t all times when riding Removing your hands from the handgrips reduces your ability to control the motorcycle and could result in an accident Do not run the engine indoors or where there is little or no ventilation Exhaust gases contain carbon monoxide a potentially lethal gas that is colorless and odorless Never leave the motorcycle running while unattended even for a short time WARNING CAUTION T...

Page 9: ...ble eye protection Do not turn the ignition switch to its OFF or LOCK position or the engine stop switch to its position while riding the motorcycle Loose clothing can be uncomfortable and unsafe when riding a motorcycle Use good quality motorcycle riding apparel when riding your motorcycle Review thoroughly the instructions in the INSPECTION BEFORE RIDING section of this manual Do not forget to p...

Page 10: ...hine and its controls Remember practice makes perfect Ride within the boundaries of your own skill at all times Knowing these limits and staying within them will help you to avoid accidents Riding on bad weather days especially wet ones requires extra caution Braking distances double on a rainy day Stay off of the painted surface marks manhole covers and greasy appearing areas as they can be espec...

Page 11: ...arance and bank angle An improperly mounted load could critically reduce these two safety factors Also determine that the load does not interfere with the operation of the suspension steering or other control operations 3 A ccessories fitted to the handlebars or the front fork area can create serious stability problems This extra weight will cause the motorcycle to be less responsive to your steer...

Page 12: ...e existing electrical system Severe overloads may damage the wiring harness or create a dangerous situation due to the loss of electrical power during the operation of the motorcycle When carrying a load on the motorcycle mount it as low as possible and as close as possible to the machine An improperly mounted load can create a high center of gravity which is very dangerous and makes the motorcycl...

Page 13: ...ENT PANEL LEFT HANDLE SWITCHES RIGHT HANDLE SWITCHES FRONT BRAKE LEVER ADJUSTMENT REAR BRAKE PEDAL GEARSHIFT LEVER FOOTRESTS SIDE STAND SEAT LOCK TRUNK REAR SHOCK ABSORBER 5 SUPPLY OF GASOLINE ENGINE OILAND ENGINE COOLANT 40 GASOLINE ENGINE OIL ENGINE COOLANT 6 RIDING TIPS 47 STARTING THE ENGINE STARTING OFF USING THE TRANSMISSION RIDING ON HILLS STOPPING AND PARKING 7 BREAK IN 52 TABLE OF CONTENT...

Page 14: ...OR HOSE RUBBER CAP OF CABLES EXHAUST PIPE AND MUFFLER FRONTAND REAR SUSPENSIONS REAR VIEW MIRROR REFLECTOR BATTERY AIR CLEANER SPARK PLUG IDLING ADJUSTMENT THROTTLE CABLE PLAYADJUSTMENT CLUTCH CABLE ADJUSTMENT DRIVE CHAIN BRAKES TIRE BULBS 11 TROUBLESHOOTING 85 12 TRANSPORT 87 13 CLEANING PROCEDURE 88 14 STORAGE PROCEDURE 90 15 LABEL 91 16 SPECIFICATIONS 94 ...

Page 15: ... assembly Please write down the numbers in the box provided below for your future reference The frame and or engine serial numbers are used to register the motorcycle They are also to assist your dealer in terms of ordering parts or referring to special service information The frame number is also known as the VIN or Vehicle Identification Number SERIAL NUMBER LOCATION GD250 000010 ...

Page 16: ...the following chart FUEL ENGINE OIL AND ENGINE COOLANT RECOMMENDATION When refueling always shut the engine off and turn the ignition key to the OFF position Never refuel near the flames sparks and heat sources Do not overfill the fuel tank Do not fill gasoline above the fuel tank entrance lower end Use the chart to select a viscosity rating based on temperature range in your area In very cold wea...

Page 17: ...llowed or inhaled Do not drink anti freeze or coolant solution If swallowed do induce vomiting Immediately contact a poison control center or a physician Avoid inhaling mist or hot vapors if inhaled remove to fresh air If coolant gets in eyes flush eyes with water and seek medical attention Wash thoroughly after handling Solution can be poisonous to animals Keep out of the reach of children and an...

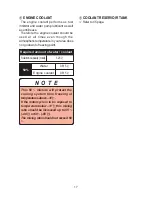
Page 18: ...s not go down to freezing point 50 Water Engine coolant 0 615 ℓ 0 615 ℓ Required amount of water coolant Solution capacity total 1 23 ℓ COOLANT RESERVOIR TANK Refer to 45 page N O T E This 50 mixture will protect the cooling system from freezing at temperatures above 31 If the motorcycle is to be exposed to temperature below 31 this mixing ratio should be increased up to 55 40 or 60 55 The mixing ...

Page 19: ...18 NAMES OF EACH PARTS Clutch lever Rear view mirror Left handle switches Instrument panel Front brake fluid reservoir Right handle switches Front brake lever Throttle grip Ignition switch Fuel tank cap ...

Page 20: ...nt seat mounting bolt Front seat Rear seat lock Rear seat Brake Tail lamp Rear turn signal lamp License plate lamp Passenger footrests Drive chain Footrests Gearshift lever Side stand Engine oil drain plug ECU Engine Control Unit Ignition coil N O T E means the invisable parts ...

Page 21: ...t brake lamp switch Radiator cover Radiator Coolant reserve tank Cooling fan and motor Water pump Engine oil filter Engine oil level lens Engine oil filler plug Muffler Rear brake pedal Rear brake lamp switch Rear brake fluid reservoir N O T E means the invisable parts ...

Page 22: ...he key cannot be removed from the ignition switch in this position OFF POSITION In this position the ignition circuit is interrupted a running engine stops and a non running engine will not start The key can be removed STEERING LOCK KEY STEERING LOCK In this position the ignition circuit is interrupted and the steering locked The key can be removed LOCK POSITION ...

Page 23: ...n be hazardous Moving the motorcycle while the steering is locked can be hazardous You could lose your balance and fall or you could drop the motorcycle Stop the motorcycle and place it on the side stand if equipped before locking the steering Never attempt to move the motorcycle when the steering is locked This motorcycle come equipped with two ignition keys Keep the spare key in a safe place IGN...

Page 24: ...lways keep both hands on the handlebars while riding CAUTION When the ignition switch is turned to the ON position the meter lamp and display of the instrument panel will come on CAUTION To adjust brightness of the instrument panel display push the switch in the Normal mode for 0 6 1 seconds while you want to change Brightness of instrument panel display 100 75 50 25 ...

Page 25: ...he engine speed in revolutions per minutes rpm CAUTION Riding the motorcycle with the FI check lamp lit after starting the engine can damage the engine and transmission Whenever the FI check lamp is lit while riding have your authorized Hyosung dealer or a qualified mechanic inspect the electric fuel injection system as soon as possible F I Fuel Injection CHECK LAMP The FI check lamp comes on and ...

Page 26: ...peed low vehicle speeds or heavy load can i n c r e a s e e n g i n e c o o l a n t temperature Decrease engine speed reduce load and select an appropriate transmission gear to lower the temperature Debris or mud in front of the engine or packed between the radiator fins can reduce cooling ability Remove any debris or mud preventing air flow to the engine NEUTRAL INDICATOR LAMP The green neutral i...

Page 27: ...r They can register two kinds of distance at the same time For instance trip meter A can register the trip distance and trip meter B can register the distance between fuel stops To change the display push the switch in the Normal mode for 0 6 1 seconds while the display indicates the odometer trip meter A trip meter B or clock you want to change To reset the trip meter to zero push the switch in t...

Page 28: ...6 1 seconds CLOCK ADJUSTMENT Mode Switch Push it for Adjustment Normal Select 2 seconds Normal mode in Clock display Hour reset mode Hour reset mode Reset 0 6 1 seconds Increase the Hour of clock Select 0 6 1 seconds Hour reset mode Minutes reset mode Minutes reset mode Reset 0 6 1 seconds Increase the Minutes of clock Select 2 seconds Minutes reset mode Normal mode Clock display 4 Adjust the minu...

Page 29: ...tes the coolant temperature The coolant temperature meter displays all 9 segments when the coolant temperature is hot The H Hot mark indicates the coolant temperature is hot When the coolant temperature is higher than 113 235 4 the H Hot mark Ⓑ blinks The C Cool mark indicates the coolant temperature is cool CAUTION Running the engine with high engine coolant temperature can cause serious engine d...

Page 30: ...r 5 second Obey the speed limit and traffic regulation at all times N O T E High engine speed low vehicle speeds or heavy load can i n c r e a s e e n g i n e c o o l a n t temperature Decrease engine speed reduce load and select an appropriate transmission gear to lower the temperature Debris or mud in front of the engine or packed between the radiator fins can reduce cooling ability Remove any d...

Page 31: ...ay Push it for Adjustment 0 6 1 seconds Odometer Trip meter Trip meter Clock Odometer 2 seconds Normal mode in Clock display Hour reset mode 5 seconds Change unit of the speedometer display Refer to the speedometer B A RESET SWITCH Use this switch to adjust the following in the Normal mode in the Hour reset mode in the Minutes reset mode Push it for Adjustment 0 6 1 seconds Increase the Hour of cl...

Page 32: ...h beam LEFT HANDLE SWITCHES TURN SIGNAL SWITCH Using when left right turn or change direction Position Flash the left turn signal lamp Position Flash the right turn signal lamp OFF P u s h i n g t h e position will stop the turn signal lamp to operate Set the dimmer switch when other vehicle is running in front or against HORN SWITCH Press the switch to operate the horn CAUTION Use the clutch corr...

Page 33: ...y or when motorcycle has fallen over to stop engine quickly The ignition circuit is off The engine cannot start or run Position The ignition circuit is on and the engine can start and run Keep in this position for normal engine operation RIGHT HANDLE SWITCHES FRONT BRAKE LEVER The front brake is applied by squeezing the brake lever gently toward the throttle grip The front brake is a powerful disk...

Page 34: ...tion Push the starter switch after all the segments of the tachometer turn off CAUTION Do not attempt the start the engine until all the segments of the tachometer turn on and then turn off again otherwise the engine will start badly If the engine does not start or runs badly turn the ignition switch to the OFF position After 8 seconds turn the ignition switch on allow all the segments of the tach...

Page 35: ...ke lever forward and turn the adjuster Ⓐ to the desired position mark of the front brake lever holder When changing the brake lever position always be sure the adjuster stops in the proper position a projection of the brake lever holder should fit into the depression of the adjuster Ⓐ These motorcycles are delivered from the factory with its adjuster set on position 6 Position 1 provides the wides...

Page 36: ...t and 2nd gear It is not possible to upshift or downshift more than one gear at a time When shifting from first to 2nd gear or 2nd gear to low neutral will be automatically skipped GEARSHIFT LEVER Reduce the motorcycle speed before down shifting When down shifting the engine speed should be increased before the clutch is engaged This will prevent unnecessary wear on the drive train components and ...

Page 37: ...d install the bolts by using the hexagon spanner 8 mm WARNING TIGHTEN TORQUE When adjusting the footrest position the M10 mounting bolts be torqued to the proper specification If they are not the footrest can come off unexpectedly The is delivered from the factory on position Ⓐ Footrest mounting bolt 4 0 5 0 kgf m 40 50 N m FOOTRESTS POSITION Ⓐ POSITION Ⓑ F L F L ...

Page 38: ...nts the motorcycle from being started with the side stand down SIDE STAND On or Up Off or Down GD250 000010 No Neutral switch Clutch lever Side stand Engine start 1 Possible 2 Possible 3 Impossible 4 Impossible 5 Impossible GEARSHIFT LINK ROD When the footrests in position Ⓑ exchange the gearshift link rod for appropriate riding position Position Ⓐ Install the gearshift link rod Position Ⓑ Install...

Page 39: ... rear seat lock and turn it clockwise To reinstall the rear seat slide the seat hook into the seat hook retainer and push down firmly until the seat snaps into the locked position To remove the front seat remove the two front seat mounting bolts located the front side of the front seat right and left To reinstall the front seat slide the seat hook into the seat hook retainer and install the two fr...

Page 40: ...ength of the short spring provides the stiff spring preload REAR SHOCK ABSORBER F L A small and light article such as maintenance manual Owner s manual or tool kit can be placed under the rear seat TRUNK N O T E Loading limit of trunk 2 kg 4 4 lbs CAUTION The trunk could be heated Don t keep anything that doesn t endure heat Don t keep the fragile Check if it is locked The unlocking of rear seat c...

Page 41: ...vapors Keep children and pets away during refueling To open the fuel tank cap insert the ignition key into the cap lock and turn it clockwise With the key inserted pull back the fuel tank cap To close the fuel tank cap push down the fuel tank cap until the locking pin click into position The key must be in the cap lock before installing the cap GASOLINE Do not overfill the fuel tank Stop adding fu...

Page 42: ...stem become very hot and remain hot for some time after the engine has been stopped Before handling these components wear insulating gloves or wait until the engine and the exhaust system have cooled down Position the motorcycle on firm and flat ground Engine oil expands and oil level increases when the engine oil is hot Check and adjust engine oil level when the engine oil is not hot CAUTION Be s...

Page 43: ...ngine oil level lens Never fill the engine oil above the Upper line mark F Engine oil level being most suitable about 1 mm under the Upper line mark F of the engine oil level lens In case of the engine oil pouring excessively the engine output being made insufficient Be careful not to pour the engine oil excessively CAUTION More frequent servicing may be performed on motorcycles that are used unde...

Page 44: ...il If oil contacts your skin wash thoroughly with soap and water Launder any clothing or rags if wet with oil Recycle or properly dispose of used oil and filters 4 Drain the engine oil by removing the drain plug located on the left downside of the engine The engine oil temperature may be high enough to burn you when the drain plug is loosened Wait until the drain plug is cool enough to touch with ...

Page 45: ...over filled the engine output will be reduced Be careful not to over fill the engine oil 8 Smear a little engine oil around the rubber gasket of the new engine oil filter When replacing the engine oil filter it is highly recommended that you use a genuine HYOSUNG oil filter designed for your motorcycle as other filters may have different design and thread specifications which could cause engine da...

Page 46: ... plug 13 Check the engine oil level according to Engine Oil Level Check procedure WARNING Wait for the engine to cool down before checking or topping up coolant level CAUTION Failure to use the correct oil can damage your motorcycle Engine damage may occur if you use the engine oil that does not meet Hyosung s specifications Be sure to use the engine oil specified in the FUEL ENGINE OIL AND ENGINE...

Page 47: ... water will dilute the engine coolant and reduce its effectiveness Add 50 50 mixture of engine coolant and water About 1 23 ℓof coolant will required when filling the radiator and reservoir tank Refer to the FUEL ENGINE OIL AND ENGINE COOLANT RECOMMENDATION section 16 page CAUTION Never top up beyond the F line or coolant will leak out when the engine is running CAUTION If coolant level drops too ...

Page 48: ...ly WARNING The is equipped with the side stand ignition interlock system If the transmission is in neutral or the side stand up you can only start the engine by squeezing in the clutch lever This side stand ignition interlock system prevents the motorcycle from being started with the side stand down Make sure that the side stand ignition interlock system is working properly before riding CAUTION T...

Page 49: ... This allows the ISC Idling Speed Control solenoid to be initialized CAUTION If the FI check lamp does not come on when the ignition switch is set to ON position with the engine stopped or fail to go out after the engine start contact an authorized Hyosung dealer CAUTION The FI check lamp comes on and remains lit when the ignition switch is set to ON position with the engine stopped as a test of i...

Page 50: ...of losing control of the motorcycle This may result in an accident Always ride within the limit s of your skills your motorcycle and the riding conditions Removing your hands from the handlebars or feet from the footrests during operation can be hazardous If you remove even one hand or foot from the motorcycle you can reduce your ability to control the motorcycle Always keep both hands on the hand...

Page 51: ...e motorcycle The transmission is provided to keep the engine operating smoothly in its normal operating speed range The gear ratios have been carefully chosen to meet the characteristics of the engine The rider should always select the most suitable gear for the prevailing conditions USING THE TRANSMISSION Downshifting when engine speed is too high can cause the rear wheel to skid and lose tractio...

Page 52: ...gh the gears as road speed decreases 4 Select neutral with the clutch lever squeezed towards the grip disengaged position just before the motorcycle stops Neutral position can be confirmed by observing the neutral indicator lamp Inexperienced riders tend to underutilize the front brake This can cause excessive stopping distance and lead to a collision Using only the front or rear brake can cause s...

Page 53: ... position come up again and turn it to the LOCK position 8 Remove the ignition key This section explains how important proper break in is to achieve maximum life and performance from your new Hyosung The following guidelines explain proper break in procedures Less than 3 4 throttle Less than 1 2 throttle Upto1 600km 1 000miles Initial 800 km 500 miles M AXIMUM THROTTLE OPENING RECOMMENDATIONS The ...

Page 54: ...ol This aids the mating process of the parts It is essential that some stress be placed on the engine components during break in to ensure this mating process Do not though apply excessive load on the engine WARNING Failure to perform break in of the tires could cause tire slip and loss of control Use extra care when riding on new tire Perform proper break in of the tire as described in this secti...

Page 55: ...ill be tightened and the dirty engine oil and engine oil filter will be replaced Timely performance of the 1 000 km 600 miles service will ensure optimum service life and performance from the engine CAUTION Service should may be peformed before 1 000 km 600 miles on motorcycle that are used under severe conditions CAUTION The 1 000 km 600 miles service should be performed as outlined in the INSPEC...

Page 56: ...manual Always maintain proper tire pressure as described in the INSPECTION AND MAINTENANCE section Operating this motorcycle with improper modifications can be hazardous Improper installation of accessories or modification of this motorcycle may cause changes in handling In some situations this could lead to an accident Never modify this motorcycle through improper installation or use of accessori...

Page 57: ... r r e c t p l a y i n t h e throttle cable Smooth operation and positive return of the throttle grip to the closed position Correct lever play Smooth and progressive action Proper operation Fluid level in the reservoir to be above LOWER line Correct pedal and lever play No sponginess No fluid leakage Brake pads not to be worn down to the limit line Smooth movement E n o u g h f u e l f o r t h e ...

Page 58: ...tions and schedules in this owner s manual Ask your Hyosung dealer or a qualified mechanic to do the maintenance items marked with a pentagram You may perform the unmarked maintenance items by referring to the instructions in this section if you have mechanical experience If you are not sure how to do any of the jobs have your Hyosung dealer or a qualified mechanic do them Running the engine indoo...

Page 59: ...motorcycle and also for safe riding It is a good practice to lubricate the motorcycle after a long rough ride or after it gets wet in the rain or after washing it Major lubrication points are indicated as follows CAUTION Lubricating switches can damage the switches Do not apply grease and oil to the switches ...

Page 60: ...tch cable Footrests pivot Passenger footrests pivot Drive chain Side stand pivot and spring hook Speedo sensor Front brake lever holder Throttle cable Rear brake pedal pivot O Motor oil Grease N O T E means the invisable parts G ...

Page 61: ... plug Fuel hose Engine oil Engine oil filter Throttle cable Idle speed Clutch Engine coolant Radiator hose First 1 000 km Every 4 000 km Every 8 000 km Interval Item Clean and lubricate every 1 000 km Inspect Inspect Inspect Inspect Replace every 4 years Inspect Inspect Replace every 2 years Inspect Inspect Inspect Inspect Inspect Inspect Tighten Tighten Lubricate Lubricate CHASSIS Drive chain Bra...

Page 62: ...r the rear seat The tool kit consists of the following items INSPECTION AND MAINTENANCE TOOL ENGINE OIL Inspect the fuel hoses for damage and fuel leakage If any defect are found the fuel hoses must be replaced Replace the fuel hoses every 4 years FUEL HOSE No NAME Tool bag 10 12 mm open end spanner 14 17 mm open end spanner Spark plug wrench Combination screw driver Screw driver handle Pliers Hex...

Page 63: ...s are found replace the radiator hoses with new ones Replace the radiator hoses every 4 years RADIATOR HOSE Wipe them up with a cloth or towel when washing Always check the status of the cable s rubber cap assembly and must be assembled in the correct position Check the location of the cable s rubber cap after adjusting the throttle cable play RUBBER CAP OF CABLES Inspection part Rubber cap Inspec...

Page 64: ...ork The fork should compress in a smooth movement and must show no traces of oil on the legs Inspect the rear shock absorber for oil leakage and spring condition Ensure that all components are properly tightened and check the front and rear suspension articulated joints for correct operation Inspect whether the steering stem is well assembled while moving front fork up downwards and or foreward ba...

Page 65: ...when it is dusty or rusted 1 Set the ignition switch OFF position 2 Remove the front seat 3 Check the battery lead wire and terminal 4 If necessary disconnect the negative battery wire first then disconnect the positive battery wire Remove the battery 5 Clean the terminal If there is white dust clean it with warm water 6 Connect the battery wires and grease the terminal lightly When reinstalling t...

Page 66: ...olluted it will result in starting difficulty engine output reduced combustion efficiency decline and sooty smoke black smoke At this time inspect and clean the air cleaner element and confirm CAUTION Keep the battery away from fires When disconnecting the battery wire be sure to remove the negative battery wire first with the ignition switch OFF position then remove the positive battery wire When...

Page 67: ... element must be replaced Be sure to install the element snugly and correctly so that no incoming air will bypass it Remember rapid wear of the piston rings and cylinder bore is often caused by a defective or poorly fitted element CAUTION When the air cleaner element is not installed correctly dust can go inside and severely damage the engine Be careful not to allow water to go into the element wh...

Page 68: ...off any carbon deposits or replace as required To remove and clean the spark plug SPARK PLUG Before carrying out the following operations let the engine and the muffler cool down to ambient temperature in order to avoid burns 1 Disconnect spark plug cap 2 Remove all the dirt from the base of the spark plug then unscrew it and extract it from its seat taking care that neither dust nor other substan...

Page 69: ...8 0 032 in TIGHTENING TORQUE SPARK PLUG 15 20 N m 1 5 2 0 kgf m PLUG REPLACEMENT GUIDE Hotter type Standard type Colder type CR7E CR8E CR9E 8 Fit the spark plug cap properly to prevent it coming off due to engine vibration getting into the engine Change the spark plug if it shows cracks on the insulating material corroded electrodes or excessive deposits CAUTION The spark plug must be tightened fi...

Page 70: ...play again Refit the protection There should be 0 5 1 0 mm 0 02 0 04 in free play in the throttle cable If this is not the case proceed as follows THROTTLE CABLE PLAY ADJUSTMENT Inadequate throttle cable play can cause engine speed to rise suddenly when you turn the throttle grip This can lead to loss of rider control Adjust the throttle cable play so that engine idle speed does not rise due to th...

Page 71: ...UTCH CABLE PLAY ADJUSTMENT A basis adjustment be allowed by the clutch lever adjuster Uncover the rubber boot Loosen the lock nut counter clockwise Turn the clutch lever adjuster in or out to acquire the specified play After end of adjustment tighten the lock nut clockwise fully and cover the rubber boot If not adjust by the clutch lever adjuster adjust by the clutch cable adjuster Loosen the clut...

Page 72: ...rong with the drive chain condition or adjustment correct the problem if you know how If necessary consult your authorized Hyosung dealer Damage to the drive chain means that the sprockets may also be damaged Inspect the sprockets for the following Excessively worn teeth Broken or damaged teeth Loose sprocket mounting nuts The chain may require more frequent adjustment that it is with periodic mai...

Page 73: ...val must be shortened Kerosene is a petroleum product and will provide some lubrication as well as cleaning action Kerosene can be hazardous Kerosene is flammable Children or pets may be harmed from contact with kerosene Keep flames and smoking materials away from kerosene Keep children and pets away from kerosene If swallowed do induce vomiting Call a physician immediately Dispose of used kerosen...

Page 74: ...rake systems can be hazardous Improper maintenance of the brakes increases your chances of having an accident Be sure to inspect the brakes before each use of the motorcycle according to the INSPECTION BEFORE RIDING section Always maintain your brakes according to the MAINTENANCE SCHEDULE CAUTION Cleaning the chain with gasoline or commercial cleaning solvents can damage O rings and ruin the chain...

Page 75: ... with the proper brake fluid that meets Hyosung s requirements Operating the motorcycle in harsh condition can be hazardous if you do not inspect brake wear often Operating in mud water sand or other extreme conditions can cause accelerated brake wear This could lead to an accident If you operate your motorcycle under these conditions the brakes must be i n s p e c t e d m o r e o f t e n t h a n ...

Page 76: ...ed limit line If a pad is worn to the grooved limit line it must be replaced with a new one by your authorized Hyosung dealer or qualified service mechanic The rate at which brake pads will wear depends on motorcycle usage riding style and road surface condition Front Brake Rear Brake CAUTION This motorcycle uses glycol based brake fluid Do not use or mix different types of brake fluid otherwise s...

Page 77: ...rate metal to metal contact with the brake disk would lead to noise and the brake caliper sparking this would result in loss of braking and brake disk damage cousing a dangerous riding condition Replacing only one of the two brake pads can be hazardous Replacing only one brake pads can result in uneven braking action Replace both pads together CAUTION The front and rear brake system requires the b...

Page 78: ...luid DOT4 BRAKE DISK INSPECTION Check the brake disk for damage or cracks FRONT BRAKE FLUID SUPPLY 1 Place the motorcycle on a level surface and keep the handlebars straight 2 Clean the front brake fluid reservior around not to allow dust to get inside of it 3 Loosen the screw and open the cap 4 Replenish with brake fluid to the upper line The recommended brake fluid DOT4 5 Fasten the cap 5 Fasten...

Page 79: ...djust the pressure with the pressure gauge Failure to follow these warnings may result in an accident due to tire failure The tires on your motorcycle form the crucial link between your motorcycle and the road Follow these instructions Check tire condition and pressure and adjust pressure before each ride Avoid overloading your motorcycle Replace a tire when worn to the specified limit or if you f...

Page 80: ...ing stability and can lead to loss of control Inspect storage of tire thread s depth by the tire wear indicator Replace the front and rear tires at once when appear the tire wear indicator TIRE TREAD CONDITION REAR AXLE NUT Inspect the rear axle shaft and jointing nut for loosening Tire wear indicator Tire wear indicator mark T W I TW I T W I TWI CRACKS AND CUTS Check if 1 there are visible cracks...

Page 81: ...the four front axle pinch bolts right and left 3 Loosen the front axle nut 2 Loosen the rear axle nut 3 Carefully position a jack or block under engine and raise until the rear wheel is slightly off the ground 4 Draw out the rear axle 5 Pull the rear wheel assembly rear ward 6 To reinstall the rear wheel assembly reverse the complete sequence listed Ahot muffler can burn you The muffler will be ho...

Page 82: ...Check if the turn signal lamp work well when the turn signal switch was operated Check if the head lamp tail lamp turn signal lamp and brake lamp are dusty or damaged CAUTION Before changing a bulb set the ignition switch to position OFF and allow a few minutes for the bulb to cool down Wear clean gloves or use a clean dry cloth to handle the new bulb Do not put your fingerprints on the bulb as th...

Page 83: ... and license plate lamp on this motorcycle always comes on when the ignition switch is turned to the ON position The head lamp is always lit when starting the engine LED Light Emitting Diode CAUTION Using a lamp bulb with the wrong wattage rating can cause electrical system damage or shorten bulb life Always use the specified lamp bulb 6 To reinstall the head lamp reverse the above sequence 2 Remo...

Page 84: ...L LAMP S BULB REPLACEMENT The s brake tail lamp are LED Light Emitting Diode type If any abnormal condition are found replace the brake tail lamp assembly LICENSE PLATE LAMP S BULB REPLACEMENT 1 Remove the lamp housing by unscrewing the screw 2 Pull out the socket from the lamp housing 3 Pull out the bulb at the socket 4 Replace the new bulb 5 To reinstall the license plate lamp reverse the above ...

Page 85: ...d lamp low beam and instrument panel circuits 10A HEAD H fuse protects the head lamp high beam circuits 10A S STAND STARTER CLUTCH fuse protects the side stand switch starter switch and clutch lever switch circuits 10A POSITION TAIL LICEN FAN fuse protects the position lamp tail lamp licence plate lamp and cooling fan circuits 10A TURN STOP HORN S SENS fuse protects the turn signal lamp brake lamp...

Page 86: ...ine stop switch in the position and the ignition switch in the ON position Holding the spark plug base firmly against the engine the transmission in neutral the side stand up the clutch disengaged and push the electric starter switch If the ignition system is operating properly a blue spark should jump across the spark plug gap When the ignition switch is set to ON position with the engine stopped...

Page 87: ...rocedure Do not perform this check if you are not familiar with the procedure Keep the spark plug away from the spark plug hole during this test Do not this test if you have a heart condition or wear a pacemaker ENGINE STALLING 1 Check the fuel supply in the fuel tank 2 Check the ignition system for intermittent spark 3 Check the idle speed CAUTION When occur any trouble the best way is to consult...

Page 88: ...health Ensure the area is well ventilated before proceeding Do not inhale fuel vapours Do not smoke nor use naked flames D RAINING THE FUEL TANK TRANSPORT WARNING Place the motorcycle on firm and level ground Stop the engine and wait until it has cooled down Prepare a container large enough to hold the fuel in the tank and place it on the floor on the left side of the motorcycle Remove the fuel ta...

Page 89: ...ycle It may cause rust corrosion and increase wear Do not use high pressure washers to clean your motorcycle N O T E Use a garden hose at low pressure to remove the majority of dirt or other debris Wash your motorcycle by hand with a mild soap or detergent and water Try to thoroughly remove all dirt and debris without excessive water pressure Cloth rags washing mitts or cleaning brushes can be use...

Page 90: ...section to check your motorcycle for any problems that may have arisen during your last ride Operating the motorcycle with wet brakes can be hazardous Wet brakes may not provide as much stopping power as dry brakes This could lead to an accident Test your brakes after washing motorcycle riding at slow speed If necessary apply brakes several times to let friction dry out the pads I NSPECTION AFTER ...

Page 91: ... any corrosion from the terminals and wiring harness connections 3 Store the battery in a room above freezing TIRES Inflate the tires to the normal pressure EXTERNAL Spray all vinyl and rubber parts with rubber protectant Spray the unpainted surfaces with rust preventative Coat the painted surfaces with car wax MAINTENANCE DURING STORAGE Once a month recharge the battery The s battery standard cha...

Page 92: ...91 L A B E L NOTE means the invisable parts ...

Page 93: ...92 ...

Page 94: ...93 ...

Page 95: ...ber of cylinder Bore Stroke Piston displacement Fuel system Starter system 1 cylinder 73 0 mm 2 87 in 59 6 mm 2 35 in 249 5 cm3 15 2 in3 Electric fuel injection ELECTRIC STARTER Four stroke DOHC Liquid cooled Clutch Reduction ratio Drive chain Transmission Wet multi plate type 2 95 RK520STX 110 Links 1st 2 46 2nd 1 56 3rd 1 19 4th 1 00 5th 0 88 6th 0 80 TRANSMISSION ENGINE DIMENSIONS AND DRY MASS ...

Page 96: ...110 70 R17 54S 150 60 R17 66S Disk Disk Ignition type Ignition timing Spark plug Battery Fuse Head lamp Brake Tail lamp Tum signal lamp License plate lamp ECU 13 B T D C at 2 000 rpm 30 B T D C at 6 000 rpm CR8E 12V 10Ah MF Refer to page 84 LED type 12V RY10W 4 12V W5W 1 Fuel tank Engine oil 11 0 ℓ 1 100 mℓ Oil change 1 300 mℓ Oil and filter change 1 500 mℓ Engine overhaul HI LO 12V H4 60 55W 1 Po...

Page 97: ...Prepared by 1st Ed OCT 2013 Printed in KOREA ...

Page 98: ...2 1st Ed Part No 99011HC8110 OCT 2013 Printed in KOREA ...

Reviews: