ORBIT
®
SPRINKLER SySTEm DESIGNER™
InstallatIon GuIde
12. Install tHe tIMeR (Cont'd)
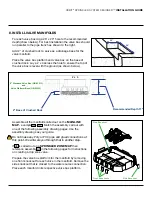
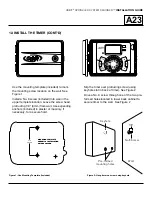
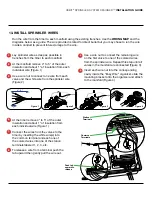
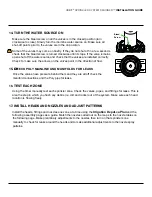
Use the mounting template (included) to mark
the mounting screw location on the wall. See
Figure 1
Install a no. 8 screw (included) into wall in the
upper template location. leave the screw head
protruding 1/8" (3mm) from wall. Use expanding
anchors (included) in plaster or masonry, if
necessary, for a secure hold.
Slip the timer over protruding screw (using
keyhole slot in back of timer). See Figure 2
Drive a no. 8 screw through one of the two pre-
formed holes located in lower back cabinet to
secure timer to the wall. See Figure 2
Keyhole
Pre-formed
mounting holes
No. 8 Screw
Wall
1/8"
MOUNTING TEMPLATE
GABARIT D`INSTALLATION
GUIA DE COLGAR
4.17”
(106 mm)
p 801 295 9820
f 801 951 5815
www.fl uid-studio.net
1065 South 500 West
Bountiful, Utah 84010
proof no:
3
date:
10.05.07
des:
SM
spck:
SM
job no:
07WTM005259
client:
Orbit
sku:
57880
upc:
? ????? ????? ?
fi le name:
07WTM005259
57880-04 rA.indd
software:
Illustrator CS2
colors
additional instructions:
·
·
crop color
non printing
PMS
????
PMS
????
color
non printing
PMS
????
Registration
K
Printers are responsible for
meeting print production
requirements. Any changes
must be approved by the
client and Fluid Studio.
printed piece must meet
designated specifi cations
on this form
.
dimensions:
fl at: w:
9"
h:
7"
fi nished: w
9"
d:
0"
h
7"
© 2007 Fluid Studio. This
work is the property of Fluid
Studio, and cannot be used,
reproduced or distributed
in any way without their
express permission.
figure 1: use Mounting template (included)
Figure 2: Hang timer on screw using keyhole
RESET
PROGRAM
RAIN DELAY
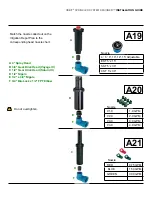
A23


