background image

The table below shows the coding system for the fitting connections.  

Each fitting has a unique “keyed” socket on the manifold. Each 

fitting also has a graphic symbol molded into the elbow with a 

corresponding symbol on the manifold.

Connector Symbol

Connection

Tubing Color

`

Feed-Inlet

Natural

Concentrate

Black

*

Product 

Blue

WARNING:

 Be sure to lubricate the manifold ports with silicone 

lubricant, prior to inserting the fittings into manifold.

WARNING:

 Do not turn the incoming water valve on until the 

locking bar is in place.

When all of the connections have been made, use the locking bar to 

hold the fittings in position. Match the symbols on the locking bar to 

the corresponding symbols on the manifold (Figure 12).


Step 6:  System Startup

Inspect all connections.

1. 

Position manifold horizontal with openings facing up. 

2. 

Remove new membrane elements from plastic packaging. The 

3. 

blue and green tape surrounding the membrane are an important 

part of the membrane element and should not be removed.

CAUTION: 

  Elements contain a foodgrade preservative. The use of 

sterile/latex gloves is recommended.

Lubricate all O-ring seats in the manifold that come in contact 

4. 

with the sump and element O-rings. Refer to "Connection 

Lubrication" on page 8.

NOTE: To properly lubricate the O-ring contact area, a film of clean 

silicone grease is applied. The film should cover all of the 

surface area that the O-ring will slide over and seal with. Do 

not use grease containing petroleum products.

Securely insert O-ring end of membrane elements into manifold. 

5. 

Push the membrane straight down into the hole in the manifold. 

Do not twist or rock the membrane when intsalling, as this may 

damage the o-rings.

Remove pre-filter from packaging. Check that gaskets are in 

6. 

place.

Place pre-filter in manifold.

7. 

Replace sumps and tighten until it bottoms out. (DO NOT 

8. 

OVERTIGHTEN)

Pressure Test System

To check for leaks, the system must be filled with water and brought 

up to operating pressure.

Open cold water feed valve slowly. Run at 1/2 open for a minute, 

1. 

then open fully.

Make sure included shut off valve installed on the blue purified 

2. 

water line is in the open position.

Check for leaks.

3. 

NOTE: When the system is initially turned on, water may temporarily 

sputter all the air is purged. Allow 1 to 3 hours for any trapped 

air noise in the system to subside.

Purge the system. Run the water through the RO system allowing 

4. 

all water to go to drain for two to eight hours to stabilize the pH 

and PPM’s of the purified water

NOTE: A minimum of a 2 hour flush is required to remove the food 

grade preservative. After 8 hours performance will reach its 

stable maximum performance.

The RO system is now ready for use.

Symbols

INSTALLATION cont.


Figure 6 

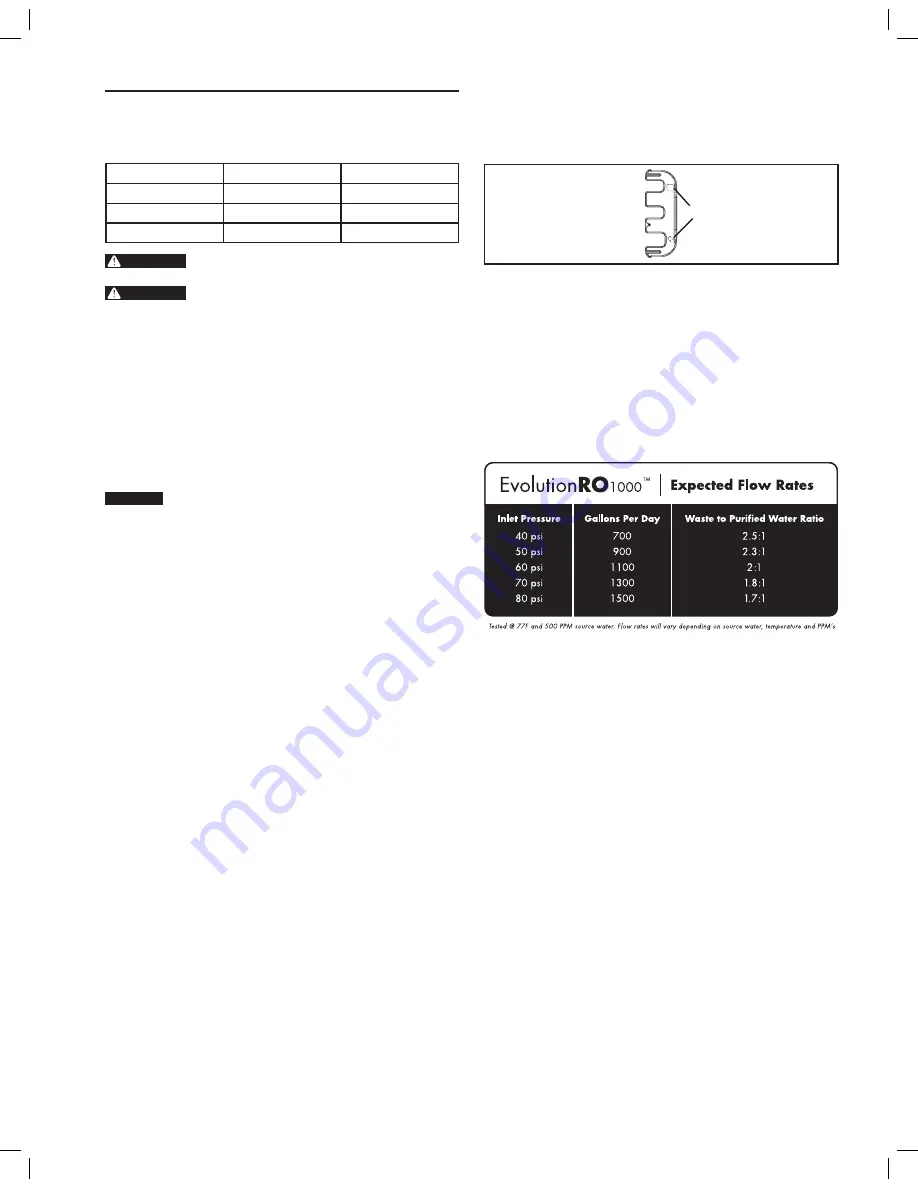
NOTE: The flow ratre of purified water will vary depending on 3 

factors: 


- Inlet water pressure 

- Inlet water temperature 

- Inlet water PPM

9

Summary of Contents for EVOLUTION-RO1000

Page 1: ...Installation Maintenance Manual ...

Page 2: ...______________ ___________________________________________ ___________________________________________ ___________________________________________ ___________________________________________ ___________________________________________ ___________________________________________ ___________________________________________ ___________________________________________ _________________________________...

Page 3: ...se out the preservative The preservative is not harmful but makes the product water taste objectionable Rinsing the membrane also acts as a performance conditioner All new membranes will reach their stable maximum performance after 8 hours of rinsing THE BASIC REVERSE OSMOSIS SYSTEM Your Reverse Osmosis System is a water treatment unit It uses water pressure to reverse a natural physical process c...

Page 4: ... 8 BLACK TUBING 10 ft PN 25045 3 8 BLUE TUBING 10 ft PN 25050 1 2 WHITE TUBING 6 ft PN 25006 SILICONE LUBRICANT FEED INLET DISCONNECT ELBOW WHITE PN 23075 1 pc PURIFIED WATER DISCONNECT ELBOW BLUE PN 23100 1 pc SILICONE LUBRICANT PACK PN 23110 6 pcs O RINGS FOR MEMBRANE STEM PN 23095 4 pcs CARBON PRE FILTER PN 22043 1 pc GARDEN HOSE INLET FITTING PN 12015 1 pc INLINE SHUT OFF VALVE PN 14265 1 pc N...

Page 5: ...hookup to a variety of feed sources The feed water valve should be located as close to the manifold assembly as possible USE A POTABLE COLD WATER SUPPLY ONLY Softened water is preferred as it will extend the life of the RO membrane elements Other forms of pre filtration may be necessary depending on quality of incoming water THE BASIC REVERSE OSMOSIS SYSTEM cont Drain Point A suitable drain point ...

Page 6: ... 1 2 White Drain 3 8 Black Purified Water 3 8 Blue Feed Water Valve Cold Water Line Only Feed Pressure Gauge Optional Pre Evolution Pre Filter Pure Water Storage Tank To Point of Use Optional 3 8 Float Valve Typical Light Commercial Installation with Storage Tank 5 ...

Page 7: ...The installer will determine type of valve that will be used Install a valve on the cold water supply pipe to adapt 1 2 inch OD tubing If threaded fittings are used be sure to use pipe joint compound or Teflon tape on outside threads Turn the valve off Step 2 Direct black drain line to an appropriate drain location or install optional drain adapter The optional 3 8 quick connect drain adapter must...

Page 8: ...r proper system performance the inlet feed pressure must be between 40 psi 2 76 bar and 80 psi 5 52 bar when the system is in operation Insert the short length of tubing into the white elbow connector Then install pressure gauge w T fitting Then install long length of white tubing to other end of pressure gauge T fitting Inline Shut off Valve The supplied 3 8 inline shut off valve is designed to b...

Page 9: ... O ring contact surfaces in the 3 manifold ports and 2 RO membrane locations Figure 10 Follow Figure 11 and lubricate the filter seat and the flat surface below the threads for the 3 sump locations Use a complete packet of silicone for each sump location NOTE To properly lubricate the O ring contact area a film of clean silicone grease is applied The film should cover all of the surface area that ...

Page 10: ...ied The film should cover all of the surface area that the O ring will slide over and seal with Do not use grease containing petroleum products Securely insert O ring end of membrane elements into manifold 5 Push the membrane straight down into the hole in the manifold Do not twist or rock the membrane when intsalling as this may damage the o rings Remove pre filter from packaging Check that gaske...

Page 11: ...nded for optimal system performance and RO membrane element life REPLACEMENT OF THE PRE FILTER AND RO MEMBRANE ELEMENTS Turn off the water supply to the RO System 1 Reduce system water pressure by opening the included shut off 2 valve or optional float valve CAUTION Even with the water supply turned off the membrane and pre filter sumps will contain a considerable amount of water By positioning th...

Page 12: ...fold Lubricate sump O ring with silicone lubricant b With the pre filter element in place screw the sump into c the connection Tighten until it bottoms out Re connect the fittings to the manifold and lock in position with 10 locking bar Re position the assembly and turn the water supply on Check the 11 system for any leaks CAUTION Water may sputter from the air gap until the trapped air is purged ...

Page 13: ... 78 C Inlet TDS 50 mg L 2 000 mg L Inlet Hardness 0 mg L 0 grain 171 mg L 10 grain Inlet Chlorine 0 mg L 1 0 mg L Inlet Iron 0 mg L 0 1 mg L Inlet Manganese 0 mg L 0 05 mg L Inlet pH 4 10 Inlet Turbidity 0 1 NTU 243 9 9 6 242 5 9 55 89 8 3 53 383 5 15 10 508 9 20 03 268 2 10 56 261 10 27 140 5 51 84 3 3 32 130 4 5 13 59 4 2 34 114 3 4 50 50 8 2 0 25 4 1 0 Figure 9 Dimensions 12 ...

Page 14: ...ns Leak in product line Find and repair leak Install pressure gauge in product line to help identify a product pressure leak Poor product water quality Water sample taken during system flush Take sample after three minutes of continuous operation Low driving pressure Increase feed pressure Consider pump for low pressure locations Use short tubing runs to decrease flow restriction Increase tubing d...

Page 15: ...______________ ___________________________________________ ___________________________________________ ___________________________________________ ___________________________________________ ___________________________________________ ___________________________________________ ___________________________________________ ___________________________________________ _________________________________...

Page 16: ...GL4000442 RevA ...

Reviews: