10
−
5
125
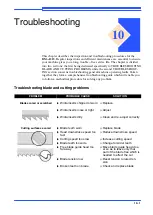
Troubleshooting
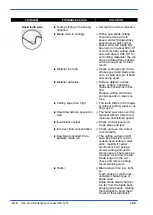
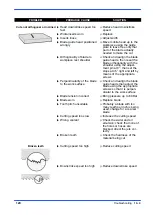
SOLUTION
PROBABLE CAUSE
PROBLEM
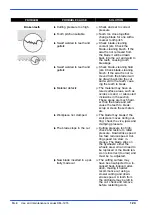
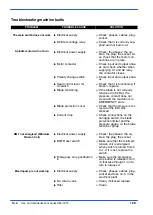
Broken teeth
Widia inserts positioned in-
correctly
Adjust the position of the in-
serts, especially the width,
since blade thicknesses can
exceed the manufacturer’s
declared tolerance ratings
Widia blade steady buttons
Two widia blade steady but-
tons are located in the top of
the blade guide heads which
press on the back of the
blade to transmit cutting
pressure. If these buttons are
too far from the blade, the
blade may be prone to an up
and down undulating action
or abnormal vibrations, liable
to cause the teeth to break:
adjust the position of the
heads by rotating them
downwards so as to bring the
blade steady buttons up
against the back of the blade
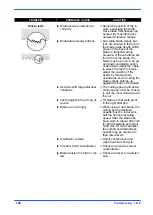
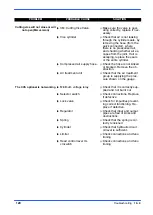
Sections with large thickness
variations
The cutting speed and down-
stroke speed must be chosen
to suit the most critical part of
the cut
Teeth angled in the wrong di-
rection
Fit blade so that teeth point
in the right direction
Blade run in wrongly
When using a new blade, the
cutting and downstroke
speeds must be reduced to
half the normal operating
speed. After the blade has
been worn in (about 300 cm2
for hard materials and about
1000 cm2 for soft materials)
the cutting and downstroke
speeds may be returned to
their rated levels
Insufficient coolant
Check coolant level and
clean fluid lines and jets
Incorrect fluid concentration
Check and use the correct
concentration
Blade tension too high or too
low
Check and reset to rated ten-
sion
Summary of Contents for DM-1215
Page 1: ...USE AND MAINTENANCE MANUAL YEAR OF MANUFACTURE ______________ DM 1215 EN ...
Page 2: ......
Page 4: ......
Page 34: ......
Page 53: ...6 7 52 Diagrams exploded views and replace Standardised Wiring Diagrams ...
Page 54: ...6 8 53 Use and maintenance manual DM 1215 ...
Page 55: ...6 9 54 Diagrams exploded views and replace ...
Page 56: ...6 10 55 Use and maintenance manual DM 1215 F6 F7 F8 F3 F4 F5 RT4 ...
Page 57: ...6 11 56 Diagrams exploded views and replace F1 F2 F9 ...
Page 58: ...6 12 57 Use and maintenance manual DM 1215 S4 KSTO S8 S4 K01 ...
Page 59: ...6 13 58 Diagrams exploded views and replace KSTO KSTO RT4 ...
Page 61: ...6 15 60 Diagrams exploded views and replace ...
Page 62: ...6 16 61 Use and maintenance manual DM 1215 ...
Page 63: ...6 17 62 Diagrams exploded views and replace ...
Page 64: ...6 18 63 Use and maintenance manual DM 1215 ...
Page 65: ...6 19 64 Diagrams exploded views and replace ...
Page 66: ...6 20 65 Use and maintenance manual DM 1215 ...
Page 67: ...6 21 66 Diagrams exploded views and replace ...
Page 68: ...6 22 67 Use and maintenance manual DM 1215 ...
Page 69: ...6 23 68 Diagrams exploded views and replace ...
Page 70: ...6 24 69 Use and maintenance manual DM 1215 ...
Page 71: ...6 25 70 Front flywheel assembly ...
Page 74: ...6 28 73 Use and maintenance manual DM 1215 Motor flywheel assembly ...
Page 77: ...6 31 76 Cutting head cover ...
Page 79: ...6 33 78 Vice assembly ...
Page 81: ...6 35 80 Base assembly ...
Page 83: ...6 37 82 Control panel ...
Page 85: ...6 39 84 Fixed work table and turntable ...
Page 88: ...6 42 87 Use and maintenance manual DM 1215 Cylinder unit ...
Page 90: ...6 44 89 Use and maintenance manual DM 1215 Laser and lamp group ...
Page 92: ......
Page 132: ......
Page 136: ......

