background image

20

Installation Instructions

Before You Start

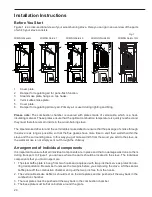
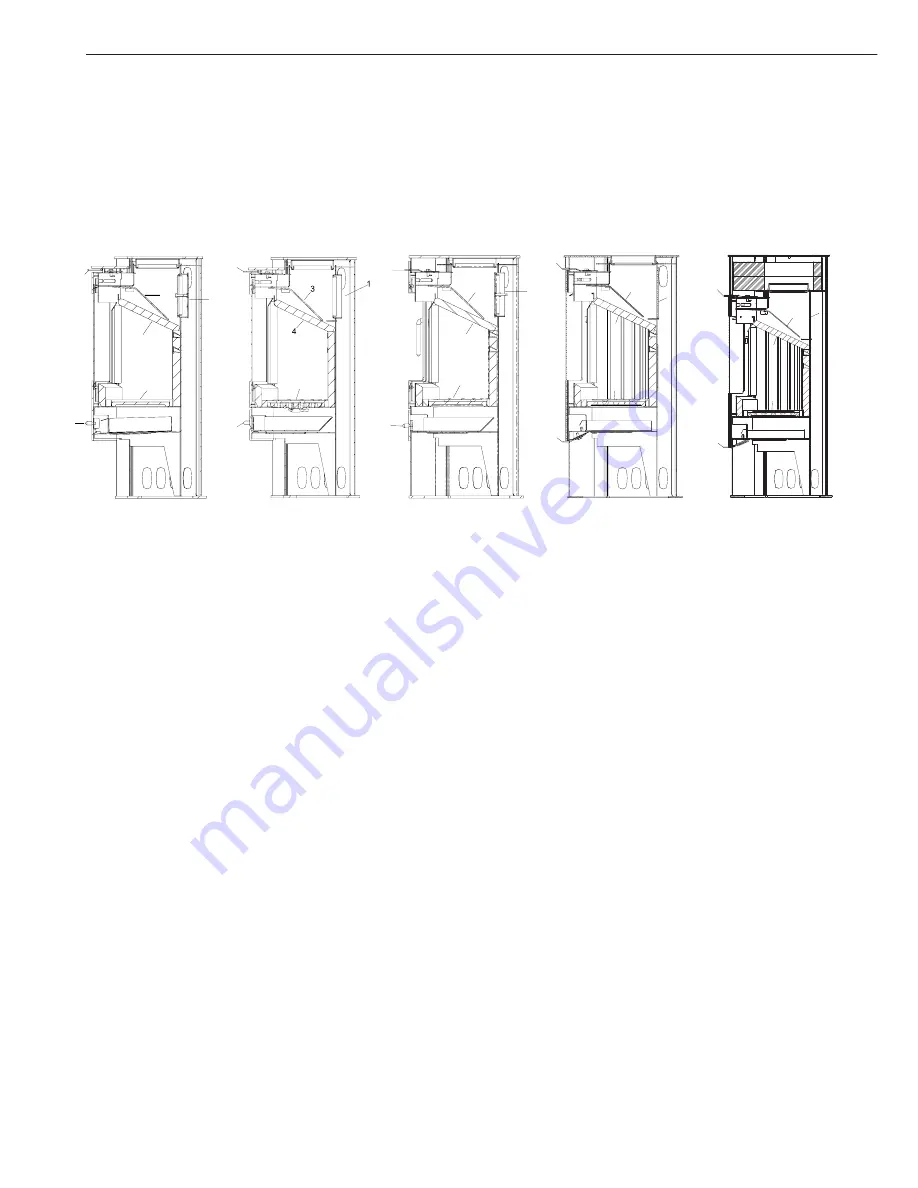
Figure 1 is a cross-sectional view of your wood-burning stove. Here you can gain an overview of the parts 

of which your stove consists. 

WIKING Scandic 

WIKING Nordic 7 

WIKING Nordic 9 

WIKING Nordic 9G 

WIKING Nordic 10G

1. 

Cover plate.

2. 

Damper for regulating air for pane-flush function.

3. 

Steel smoke plate, hangs on two hooks.

4. 

Vermiculite smoke plate.

5. 

Cover plate.

6. 

Damper for regulating primary air. Primary air is used during lighting and firing.

Please note:

 The combustion chamber is covered with plates made of vermiculite, which is a heat-

insulating material. These plates ensure that the optimal combustion temperature is quickly reached, and 
they must therefore remain inside in the wood-burning stove.

The steel smoke deflector and the vermiculite smoke deflector ensure that the passage of smoke through 
the stove is as long as possible, so that the flue gasses have more time to emit their warmth within the 

stove and the surrounding area. In this way you get more warmth from the wood you add to the stove, as 

the warm smoke is not simply sent out through the chimney. 

Arrangement of individual components

It is important to ensure that all individual components are in place and that no damage was done to them 
during transport. In Figure 1 you can see where the parts should be located in the stove. The individual 
components that you must inspect are:
1. 

The steel baffle plate is hung from two hooks and equipped with two pins that serve as protection du

-

ring transportation. Remember to remove the two pins before you start using the stove. Lift the skamol 

baffle plate off the combustion chamber and pull the two pins free from the hooks. 

2. 

The vermiculite smoke deflector should rest on the side plates and be pushed all the way back in the 

combustion chamber.

3.  The rear plates must be pushed all the way back in the combustion chamber.
4. 

The base plate must lie flat on bottom around the grate.

Fig. 1

5

6

2

6

6

5

5

4

4

2

2

3

3

1

1

1

3

2

4

5

6

1

3

2

4

5

6

Summary of Contents for Wiking Nordic 10G

Page 1: ...WIKING Scandic WIKING Nordic 7 WIKING Nordic 9 WIKING Nordic 9G WIKING Nordic 10G 13 09 2011 97 9556 Installations und Bedienungsanleitung 2 Installation and User s Manual 18 DE GB ...

Page 2: ...dem ersten Anheizen 7 Zum Thema Brennstoff 7 Der Luftzufuhrregler 8 Tipps für das Befeuern 8 Anheizen und Nachlegen 9 Zum Thema Rauchrohr 10 Zum Thema Schornstein 11 Reinigung und Wartung 12 Fehlersuche und behebung 14 Konformitätserklärung 15 Bedingungen für Garantie und Reklamationen 16 Typenschild 34 Garantieschein 40 Deutsch ...

Page 3: ...chriften der Normen EN 13240 EU und NS 3058 und NS 3059 norwegische Normen bezüglich Partikelemission Sie können also sicher sein dass Ihr neuer Ofen alle europäischen Anforderungen an Sicherheit Qualität und Umweltfreundlichkeit erfüllt WIKING gewährt 5 Jahre Garantie auf den Kaminofen Die Pluspunkte Ihres Kaminofens Durch seine runden Formen wirkt das WIKING Modell einfach perfekt bis ins kleins...

Page 4: ...kplatten dienen dazu den Weg des heißen Rauchgases durch den Ofen zu verlängern sodass möglichst viel Wärme abgegeben wird Weil die Hitze nicht durch den Schornstein entweicht wird der Brennwert des Holzes optimal genutzt Überprüfung loser Teile Die nicht fest mit dem Ofen verbundenen Teile sind auf Unversehrtheit und richtigen Sitz zu überprüfen Die Abb 1 gibt Auskunft über die zu kontrollierende...

Page 5: ...kunft über die Mindestabstände zu Wänden aus brennbarem bzw nicht brennbarem Material Abstand vom Kaminofen zur WIKING Scandic WIKING Nordic 7 WIKING Nordic 9 WIKING Nordic 9G WIKING Nordic 10G Mauer hinter dem Ofen 100 mm Mauer neben dem Ofen 100 mm brennbaren Wand hinter dem Ofen 150 mm brennbaren Wand neben dem Ofen 350 mm Es ist darauf zu achten dass Glas nicht unbedingt hitzefest sein muss Da...

Page 6: ...ren Achtung Lassen Sie die Schrauben nicht hinter die festgeschweißte Rück wand fallen 4 Zur Demontage des Rauchrings die 3 Schrauben entfernen oben am Kaminofen 5 Die Abdeckplatte mit den 3 Schrauben oben auf den Feuerraum schrauben Torx Bit Nr 30 6 Den Rauchring vor dem Rauchabgang an der Rückseite des Kaminofens mit den 3 Schrauben befestigen 7 Die Deckplatte des Kaminofens wieder an ihren Plat...

Page 7: ...toffe Folgende Brennstoffe dürfen nicht verfeuert werden Bedrucktes Papier Kunststoffe Brennbare Flüs sigkeiten Spanplatten Gummi Lackiertes bemaltes oder imprägniertes Holz Abfälle wie Milch packungen o Ä Eine Verfeuerung dieser Materialien ist unzulässig weil sich dabei gesundheits und umweltschädliche Stoffe bilden Da hierbei auch Kaminofen und Schornstein Schaden nehmen können entfällt die Gar...

Page 8: ...befin det sich ganz links der andere ganz rechts Die Luftzufuhr zum Anheizen ist geschlossen nicht jedoch die Luft für Scheibenspülung Durch sukzessives Verschieben nach links wird die Luftzufuhr gedrosselt wodurch die Tempe ratur sinkt Diese Einstellung ist die richtige wenn das Holz gut angebrannt ist gleichmäßige Verbrennung So wird der Brennwert des Hol zes am besten genutzt Beide Hebel befind...

Page 9: ...den Gase und Partikel Geschieht das nicht führt das entweder zu einer Versottung des Schornsteins mit der Gefahr eines Schornsteinbrandes oder zu einer umweltschädlichen Emission Durchheizen sollte unterbleiben Vor dem Zubettgehen sollte man kein Brennholz mehr auflegen und die Luftzufuhr drosseln um bis zum Morgen durchzuheizen In diesem Fall käme es nämlich zu einer starken Entwicklung von gesun...

Page 10: ... vorhanden ist kann Brenn stoff nachgelegt werden 1 Öffnen Sie die Tür so vorsichtig dass keine Glut herausfallen kann 2 Nun sind 2 bis 4 Holzscheite ca 2 kg auf die Glut zu legen 3 Schließen Sie die Tür und öffnen Sie die gesamte Luftzufuhr durch Verschieben beider Hebel nach rechts 4 Nach kurzer Zeit flammt das Feuer wieder auf Wenn das Holz gut brennt wird der Hebel für Primärluft ganz nach lin...

Page 11: ...schornstein An Tagen mit widrigen Wind und Witterungsverhältnissen und entsprechend geringem Zug im Schornstein ist es unerlässlich für eine möglichst schnelle Erwärmung zu sorgen Um das durch schnell auflodernde Flammen zu erreichen werden feines Anmachholz und ein zusätzlicher Kaminanzünder empfohlen Zur richtigen Bemessung des Schornsteins hilft Ihnen nachstehende Tabelle mit Leistungsangaben W...

Page 12: ...schen des Feuers kann sich noch Glut in der Asche befinden Am einfachsten lässt sich der Aschenkasten entleeren wenn man einen Abfallbeutel darüber zieht ihn auf den Kopf stellt und danach vorsichtig aus dem Beutel herauszieht Reinigung des Feuerraums Im Interesse einer langen Lebensdauer sollte der Kamin ofen jährlich einer gründlichen Inspektion unter zogen werden Zunächst ist der Feuerraum von ...

Page 13: ...Reinigungsklappe vorzusehen Inspektion Damit Sie lange Jahre Freude an Ihrem Kaminofen haben empfehlen wir eine jährliche Inspektion durch einen Fachmann Dabei sollten nur Original Ersatzteile zur Anwendung kommen Zu einer solchen Inspektion gehören folgende Leistungen Gründliche Ofenreinigung Einstellung von Handgriff und Tür Schmieren der Scharniere mit Kupferfett Überprüfung der wärmedämmenden ...

Page 14: ...e nächste Punkt Temperatur im Ofen ist zu nie drig Mehr Holz nachlegen und beide Hebel ganz nach rechts schieben Wenn die Tür geöffnet wird dringt Rauch ins Zimmer Die Klappe im Schornstein ist geschlossen Öffnen Sie die Regulierklappe Unzureichender Zug im Schornstein Überprüfen Sie ob Rauchrohr oder Schornstein verstopft ist Stimmt die Höhe des Schornsteins unter den herrschenden Verhältnissen E...

Page 15: ... 106 EWG Richtlinie über Bauprodukte Dazu gehören auch folgende angeglichenen Normen Nr Titel Ausgabe EN 13240 Raumheizer für feste Brennstoffe 2001 EN 13240 A2 Raumheizer für feste Brennstoffe Anforderungen und Prüfung 2004 sowie folgende Normen und oder technische Vorgaben Nr Titel Ausgabe Teil NS 3058 Geschlossene holzbefeuerte Feuerstätten Rauchemissionen NS 3059 Geschlossene holzbefeuerte Feu...

Page 16: ...lamationsrecht wird dem ersten Käufer des Produkts gewährt und kann nicht übertragen werden außer bei einem Zwischenverkauf Das Reklamationsrecht gilt nur in dem Land in dem das Produkt ursprünglich geliefert wurde Frachtkosten die durch Einsendung des Ofens oder Teile hiervon zur Reparatur oder Austausch von Teilen entstehen werden von HWAM A S nicht übernommen Einschränkungen Verlust des Gewährl...

Page 17: ...culit Rauchwendeplatten Glas Kacheln und Speckstein Gusseisenteile wie z B der Feuerrost Dichtungen Alle beweglichen Teile Inspektion und Pflege Es wird empfohlen den Kaminofen regelmäßig zu pflegen und ihn gemäß den Anweisungen in der Bedi enungsanleitung nachsehen zu lassen Dies trägt zu einwandfreier Funktion bei Reklamationen Bei Reklamationen wenden Sie sich bitte an den Fachhändler bei dem d...

Page 18: ...g the Air Damper 24 Some Things Worth Knowing about Firing 24 Lighting and Firing Your WIKING Wood Burning Stove 25 Some Things Worth Knowing about the Smoke Pipe 26 Some Things Worth Knowing about the Chimney 27 Cleaning and Maintaining your Wood Burning Stove 28 Trouble Shooting 30 Declaration of Conformity 31 Guarantee and Claim Conditions 32 Type plate 34 Guarantee Certificate 40 English ...

Page 19: ...European Stan dard and NS 3058 and NS 3059 Norwegian standards for particle emissions This is your guarantee that your wood burning stove fulfils all European norms and requirements pertaining to safety quality and environmentally sound combustion WIKING provides a five year guarantee on your wood burning stove Advantages of your new wood burning stove The simple and round shapes of your WIKING wo...

Page 20: ...e gasses have more time to emit their warmth within the stove and the surrounding area In this way you get more warmth from the wood you add to the stove as the warm smoke is not simply sent out through the chimney Arrangement of individual components It is important to ensure that all individual components are in place and that no damage was done to them during transport In Figure 1 you can see w...

Page 21: ...r valve air grate must not be blocked In the table below you can see the minimum distance to the closest combustible and non combustible walls Distance from the wood burning stove to WIKING Scandic WIKING Nordic 7 WIKING Nordic 9 WIKING Nordic 9G WIKING Nordic 10G the brick wall behind the unit 100 mm the brick wall to the side of the unit 100 mm combustible wall behind the unit 150 mm the combust...

Page 22: ... rear plate so there is room for the smoke outlet 3 Remove the cover plate on the back of the stove by removing the three screws Torx Bit no 30 Be careful not to lose the screws behind the welded rear plate 4 Remove the three screws Lift the flue ring off the top of the stove 5 Mount the cover plate on the top of the combustion chamber using the three screws Torx bit no 30 6 Insert the flue ring i...

Page 23: ...ue but in the wood s weight per cubic meter As beech weighs more per cubic meter of wood than common spruce e g more common spruce must be added to provide the same amount of warmth the beech provides Prohibited fuel types Firing with the following is prohibited Printed matter Plastic Rubber Chipboards Liquid fuels Waste such as milk cartons and the like Lacquered painted or impregnated wood Fossi...

Page 24: ...lushing air is opened up This setting is always to be used when lighting a cold stove and firing new wood The lighting lever is set to the left while the other lever is still set to the right Primary air is closed while pane flushing air is still completely open By gradually adjusting the lever to the left the amount of air is lowered and the temperature is thereby reduced This setting is to be us...

Page 25: ...ere is the Right Amount of Air in the Combustion Chamber You should also make sure that there is an ample amount of air especially in the beginning so that the temperature inside the wood burning stove quickly rises Gases and particles released during burning are then more easily burned off Otherwise they gather as soot in the chimney which increases the risk of chimney fire or are emitted unburne...

Page 26: ...to the left while slightly adjusting the secondary damper to get an even and steady combustion Warning The door may only be kept open when lighting adding firewood or cleaning the wood burning stove otherwise combustion becomes too powerful which in turn increases the risk of the stove be coming overheated Firing adding firewood When there are no more visible flames and only a solid layer of ember...

Page 27: ... draft is created by the difference in temperature between the inside and outside of the chimney The higher the temperature inside the chimney the better the chimney draft It is therefore very important that the chimney is thoroughly heated before you close the primary damper and limit combustion inside the stove see the section on lighting and firing your WIKING wood burning stove on page 26 Plea...

Page 28: ...accumulates on the pane it can be cleaned by wiping the glass with a moist paper towel dipped in ash Afterwards dry with a clean paper towel You should also ensure that air gaps in the door frame are free of ash and soot particles Also ensure that the seals on the stove are soft and fully intact if they are not false air can enter the stove which makes it more difficult to control combustion and c...

Page 29: ...urchased from your local wood burning stove dealer Chimney sweeping In order to prevent against the risk of chimney fires the chimney must be cleaned once a year The smoke pipe and smoke chamber above the steel smoke deflector must be cleaned at the same time as the chim ney If the chimney s height makes cleaning from above impossible a cleaning hatch must be installed Service inspection WIKING re...

Page 30: ... the primary damper just a bit if necessary or see below The temperature inside the stove is too low Add more firewood to the wood burning stove and push both dampers all the way to the right Smoke enters the room when I open the door The damper in the chimney is closed Open the damper Poor chimney draft Ensure that the smoke pipe or chimney is not blocked Ensure that the chimney height is correct...

Page 31: ...isions of the following directive Reference no Title 89 106 EEC Construction Products CPD and the following harmonised standards No Title Udgave EN 13240 Roomheaters fired by solid fuel 2001 EN 13240 A2 Roomheaters fired by solid fuel 2004 and other standards and or technical specifications No Title Udgave Part NS 3058 Enclosed wood heaters Smoke emission NS 3059 Enclosed wood heaters Smoke emissi...

Page 32: ...he product and cannot be transferred except in connection with resale The complaint entitlement is only valid in the country to which the product was originally delivered Shipping and handling expenses incurred when sending the stove or individual parts for replacement or repair will not be covered by HWAM A S Limitations loss of guarantee Certain things are not covered by the guarantee and the ri...

Page 33: ... parts Damage to wearing parts will only be covered by the guarantee if the buyer can show that the damage was present when the stove was delivered Service and Maintenance We recommend that you maintain the wood burning stove and comply with the recommended inspections called for in the user instruction manual This will help to ensure that the product functions problem free Claims All claims must ...

Page 34: ...34 ...

Page 35: ...35 ...

Page 36: ...36 ...

Page 37: ......

Page 38: ......

Page 39: ......

Page 40: ... vorgenommen werden verantwortlich ist Warranty service It is important that you record your dealers name address and telephone number on this section as he is responsible for any ajustment which may be required during the warranty period Modell Typ Model type Kaufsdatum Date of purchase Händler Dealer Adresse Adress Tel HWAM A S DK 8362 HØRNING www wiking com ...

Reviews: