background image


4


 – 


English


WHA


T IS 


WHA


T?


What is what on the po


wer cutter - K 3000?


1


Rear handle

2

Guard for the blade 14”

3

Cutting blade

4

Locking the axle

5

Front handle

6

Inspection covers

7

Power switch lock

8

Switch

9

Type plate

10 Brush retainer

11 Carbon brushes

12 Guard for the blade 12” (Model version)

13 Connection for vacuum cleaner

14 Combination spanner

15 Operator’s manual

Summary of Contents for K 3000 Cut-n-Break

Page 1: ...E E E En n n ng g g gl l l li i i is s s sh h h h K 3000 K 3000 Wet Operator s manual Please read the operator s manual carefully and make sure you understand the instructions before using the machine ...

Page 2: ...g the machine Environmental marking Symbols on the product or its packaging indicate that this product cannot be handled as domestic waste It must instead be submitted to an appropriate recycling station for the recovery of electrical and electronic equipment By ensuring that this product is taken care of correctly you can help to counteract the potential negative impact on the environment and peo...

Page 3: ...ine s safety equipment 7 SAFETY INSTRUCTIONS General safety warnings 9 Cutting blades 11 General working instructions 13 ASSEMBLY Assembly 15 Fitting the cutting blade 15 Guard for the blade 15 STARTING AND STOPPING Before starting 16 Starting 16 Stopping 16 MAINTENANCE General 17 Cleaning 17 Electrical Feed 17 Replacing the carbon brushes 18 Bevel gear 18 Checking the drive shaft and flange washe...

Page 4: ...rd for the blade 14 3 Cutting blade 4 Locking the axle 5 Front handle 6 Inspection covers 7 Power switch lock 8 Switch 9 Type plate 10 Brush retainer 11 Carbon brushes 12 Guard for the blade 12 Model version 13 Connection for vacuum cleaner 14 Combination spanner 15 Operator s manual ...

Page 5: ... blade 3 Water kit 4 Cutting blade 5 Locking the axle 6 Front handle 7 Inspection covers 8 Power switch lock 9 Switch 10 Water tap 11 Water connection with flow limiter 12 Type plate 13 Brush retainer 14 Carbon brushes 15 Ground fault circuit interrupter 16 Combination spanner 17 Operator s manual ...

Page 6: ...hing that permits full freedom of movement Use leg guards recommended for the material to be cut Boots with steel toe caps and non slip sole Always have a first aid kit nearby WARNING Under no circumstances should you modify the original design of the machine without approval from the manufacturer Always use original spare parts Unauthorized modifications and or accessories may lead to serious inj...

Page 7: ...s in the power switch lock and make sure it returns to its original position when you release it Check that the power switch and power switch lock move freely and that the return springs work properly Start the machine release the power switch and check that the engine and the cutting blade stop Gradual start and overload protection The machine is equipped with electronically controlled gradual st...

Page 8: ...interrupter is on and that the machine can be switched on If the LED is not on push the RESET button green Check the ground fault circuit interrupter Connect the machine to the socket Push the RESET button green and the red LED lights up Start the machine Push the TEST button blue The ground fault circuit interrupter should trip and the machine switch off instantly If not contact your dealer Reset...

Page 9: ... will increase the risk of electric shock Do not abuse the cord Never use the cord for carrying pulling or unplugging the power tool Keep cord away from heat oli charp edges or moving parts Damaged or entangled cords increase the risk of electric shock When operating a power tool outdoors use an extension cord suitable for outdoor use Use of cord suitable for outdoor use reduces the risk of electr...

Page 10: ...e power tool before making any adjustments changing accessories or storing power tools Such preventive safety measures reduce the risk of starting the power tool accidentally Store idle power tools out of the reach of children and do not allow persons unfamiliar with the power tool or these instructions to operate the power tool Power tools are dangerous in the hands of untrained users Maintain po...

Page 11: ...sive feed pressure is used A lower feed pressure can stop the vibration Otherwise replace the blade The blade must be of the recommended type for the material to be cut Abrasive blades The cutting material on abrasive blades consists of grit bonded using an organic binder Reinforced blades are made up of a fabric or fibre base that prevents total breakage at maximum working speed if the blade shou...

Page 12: ...cutting concrete cools the blade and increases its service life while also reducing the formation of dust Water connection with flow limiter K 3000 Wet There is a flow limiter in the water connector that gives a constant flow irrespective of the water pressure Le limiteur de débit ne peut être démonté Transport and storage Do not store or transport the power cutter with the cutting blade fitted Al...

Page 13: ...a small contact area between the blade and the material to be cut This reduces the temperature of the blade and ensures effective cutting The guard for the cutting equipment should be adjusted so that the rear section is flush with the work piece Spatter and sparks from the material being cut are then collected up by the guard and led away from the user Feed down the machine in line with the blade...

Page 14: ...oulder height Be alert to movement of the work piece or anything else that can occur which could cause the cut to close and pinch the blade Pull in Pull in occurs when the disc s lower section suddenly stops or when the cut closes To avoid see the heading Basic rules and Jamming rotation here below Pinching rotation If the cut is pressed together this can lead to jamming The machine can be pulled ...

Page 15: ...ade will rotate in the direction indicated by the arrow on the blade There is an arrow on the machine that indicates the axleís direction of rotation that the blade is mounted on When the blade is replaced with a new one check the flange washers and the drive axle See instructions under the heading Checking the drive axle and flange washers Checking the drive shaft and flange washers Check that th...

Page 16: ...rear handle with your right hand Press in the power switch lock with your right hand thumb and press in the power switch Run the machine unloaded and in a safe manner for at least 30 seconds Stopping Stop the motor by releasing the power switch WARNING Note the following before starting The machine should be connected to an earthed outlet socket Check that the mains voltage corresponds with that s...

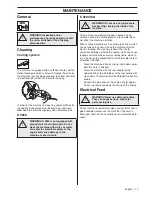
Page 17: ...und fault circuit interrupter to turn off without intention Clean the machine daily by rinsing it with clean water after the work is finished Place the machine with the rear handle facing upwards Rinse the air intakes at the rear handle with clean water The water will run out through the front air outlets Connect the plug and run the engine dry for approx 30 sec in order to speed up the drying of ...

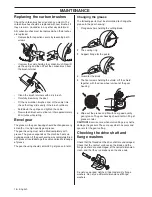
Page 18: ...ne heats up during operation If the gear housing was completely filled with grease it could damage the seals and lead to leakage of grease The gear housing should contain 90 g of grease in total Changing the grease The following parts must be dismantled to change the grease in the gear housing 1 Flange washers holding the cutting blade 2 The sealing ring 3 Support flange for the guard 4 Guard for ...

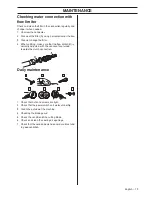
Page 19: ...4 When refitting make sure that the flow limiter B is correctly adjusted with the concave face turned towards the clutch connection Daily maintenance 1 Check that nuts and screws are tight 2 Check that the power switch unit works smoothly 3 Clean the outside of the machine 4 Checking the blade guard 5 Check the condition of the cutting blade 6 Check and clean the cooling air openings 7 Check that ...

Page 20: ...110 USA Canada Japan 100 120 100 120 Australia 230 230 Rated output W Europe 2700 12 A 2700 12 A Great Britain 2200 20 A 2200 20 A USA Canada Japan 15 A 50 60 Hz 15 A 50 60 Hz Australia 2300 10 A 2300 10 A Weight Machine without blade and cable package kg 7 6 8 2 Water cooling Water cooling of blade No Yes Connecting nipple Type Gardena Type Gardena Water pressure max bar 8 ...

Page 21: ... equipment Max blade speed rpm 4500 Recommended cable dimensions Cutting blade mm inches Max peripheral speed m s ft s 300 12 80 350 14 100 Cable area 1 5 mm2 2 5 mm2 Input voltage 100 120 V 20 m 40 m Input voltage 220 240 V 30 m 50 m ...

Page 22: ... z UBG 5R z UBG 5R ...

Page 23: ......

Page 24: ...1153343 95 z UBG 5R z UBG 5R 2009 12 29 Original instructions ...

Reviews: