8:4
BASIC DESIGN POSITIONING
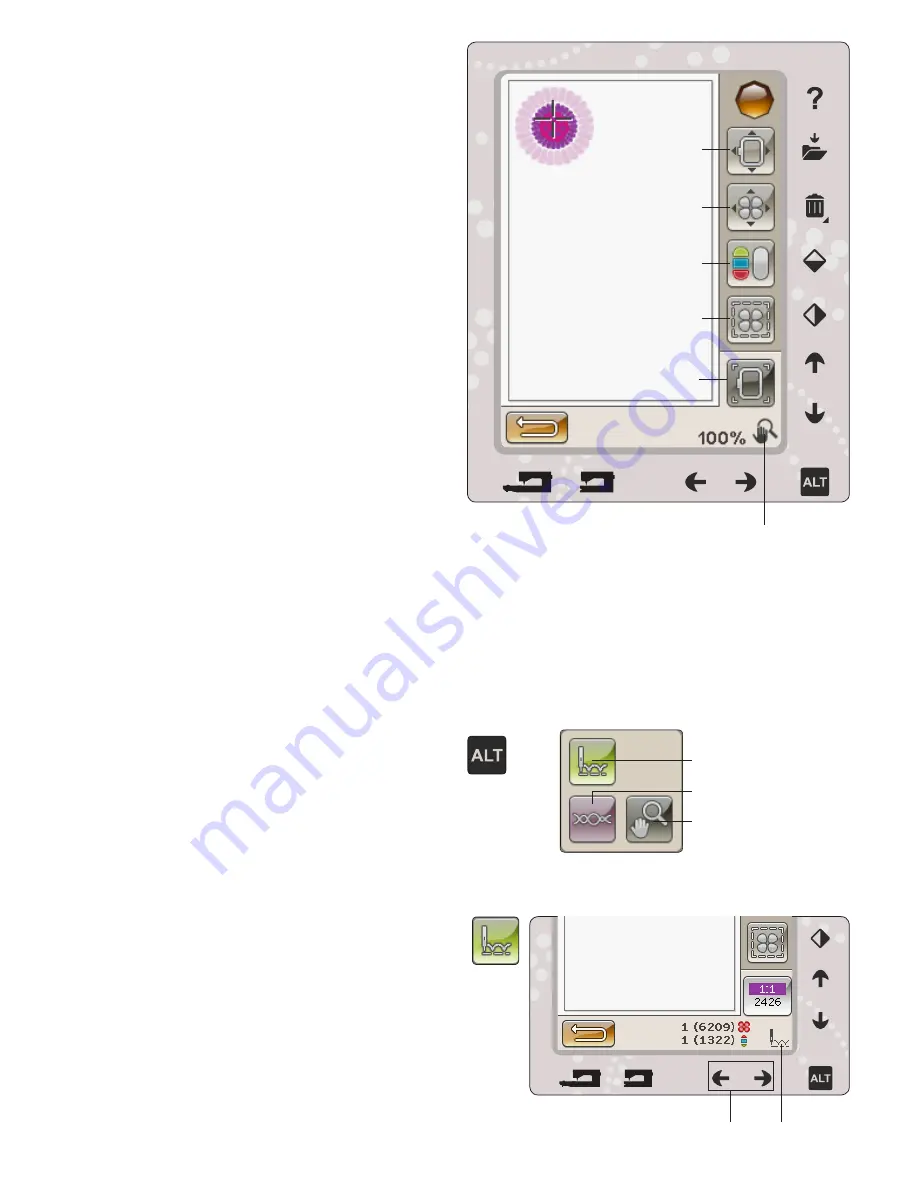
Basic Design Positioning allows you to place a design on an
exact spot on your fabric. It is also used when you want to
embroider a design next to a previously embroidered design.
Use zoom options/pan to be sure that you are placing the
design exactly where you want it. Fine tune with the arrows.
Read more about how to use the Basic Design Positioning on
page 8:6.
MONOCHROME
Touch the icon to activate monochrome embroidery. All
designs are shown in a grey color and the machine does not
stop for color block changes. To deactivate monochrome
embroidery, touch the icon again.
Note: If the Automatic Jump Stitch Trim function is selected in the
SET Menu it will still be active between the color blocks.
Note: You can also touch the STOP button on your machine to activate
Monochrome.
BASTE
Basting enables you to secure your fabric to a hooped
stabilizer. It is especially useful when the fabric to be
embroidered cannot be hooped. Basting provides support for
stretchy fabrics.
When selecting Baste the machine will baste around the
design, outlining the area where the design will be placed on
the fabric.
Note: Color list cannot be opened when basting around design.
Note: Touch the FIX button on your machine to activate or deactivate
basting.
ALT IN STITCH-OUT MODE
There are three different options when touching the ALT
icon in Embroidery Stitch-Out: Step Stitch-by-Stitch, Thread
Tension and Zoom/Pan.
The selected ALT function is indicated with an icon in the
lower right corner of the screen.
STEP STITCH-BY-STITCH CONTROL
Touch the left and right arrows to move forward and
backward in your design. Use the left arrow to move
backwards a few stitches after the needle thread breaks or
runs out. Touch & Hold to move through the stitches more
quickly. The
cursor on the screen will follow the stitches in the
embroidery field.
Baste
Zoom to hoop
Monochrome
Basic Design Positioning
Move Hoop
Step Stitch-by-Stitch
Thread Tension
Zoom/Pan
Step Stitch-by-Stitch
Selected ALT function


