background image

Load a Design

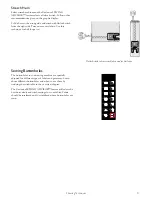
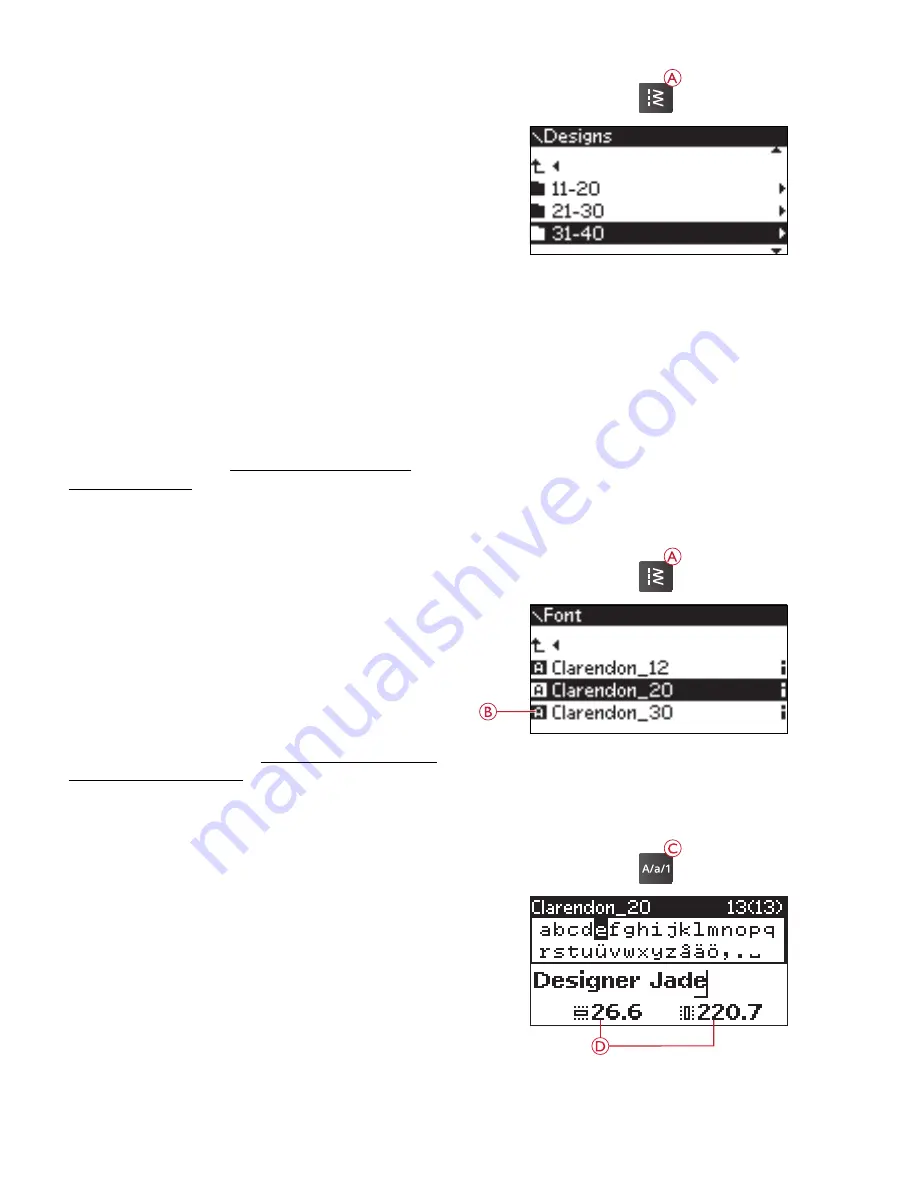
To load a design press the stitch menu button (A) with the
USB embroidery stick connected. Your machine can load .
vp3 embroidery files and .vf3 embroidery font files.

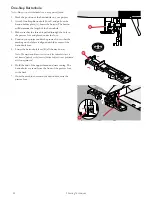
Select a design from the files and folders shown in the menu.
Use the arrow up/down buttons to select a folder and then
press the OK button to open it. To go back to the previous
folder, press the left arrow button or select the top line and
press the OK button.

Select the design you want to load and press OK to confirm.
It will be loaded into the embroidery area.

Note: If you have already loaded a design into the embroidery area, the
next design you load will automatically replace the first one.

Note: When saving designs on the USB embroidery stick, make sure
not to create too many levels of subfolders as this may create a file path
that is too long. Also make sure to keep the file name short. When
trying to open a file/folder that has too long of a name or too many
subfolders, an alarm will sound and the file/folder will not open.

Tip: Convert your designs between different embroidery formats using
the downloadable software. See Complimentary Embroidery Intro
Software (PC), page 24.

Load a Font

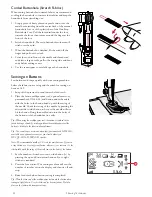
One font is stored on the USB embroidery stick upon
delivery. To load a font press the stitch menu button (A) with
the USB embroidery stick connected. Font files are marked
with an icon (B) in the list. You can select between three
different files with different sizes of the included font, 12
mm, 20 mm and 30 mm. Select the font file you want to load
and press OK to confirm. A text editor opens.

Create additional embroidery fonts from fonts available on
your PC computer with the HUSQVARNA VIKING®
QuickFont software, which is available for download at
www.husqvarnaviking.com (see Complimentary Embroidery
Intro Software (PC), page 24).

Add a Letter

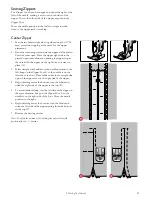
When loading a font the upper case alphabet is shown in the
text editor. Use the arrow buttons to select a letter and press
OK to add the letter to the program. To switch to lower case
alphabet or numbers press the shift button (C).

If you wish to add a letter at another position move the
cursor in the program by pressing the left/right arrow
buttons. The letter will be inserted to the right of the cursor.

Note: Press the arrow down button to activate the cursor in the program
instead of in the alphabet.

The height and width of the program are also shown on the
graphic display (D).

7 Embroidery Mode

65

Summary of Contents for Designer Jade 35

Page 1: ...User s Guide KEEPING THE WORLD SEWING ...

Page 2: ...ed cord or plug if it is not working properly if it has been dropped or damaged or dropped into water Return the sewing machine to the nearest authorized dealer or service center for examination repair electrical or mechanical adjustment Never operate the sewing machine with any air openings blocked Keep ventilation openings of the sewing machine and foot control free from the accumulation of lint...

Page 3: ...ust only be used with foot control of type C 9002 manufactured by CHIEN HUNG TAIWAN Ltd FOR OUTSIDE EUROPE This sewing machine is not intended for use by persons including children with reduced physical sensory or mental capabilities or lack of experience and knowledge unless they have been given supervision or instruction concerning use of the sewing machine by a person responsible for their safe...

Page 4: ...o Update Your Machine 24 Updating Instructions 24 Function Buttons 25 Needle Stop Up Down With Indicator Trim Position 25 STOP Function Monochrome 25 FIX Function Baste 26 Cut Function 26 Speed and 26 Start Stop 26 Reverse 26 Stitch Selection Buttons 26 Delete 26 Stitch Length Density Elongation and Design Height 26 Stitch Width Needle Position and Design Width 26 Alternate View ALT 27 Step Stitch...

Page 5: ...Crazy Quilt Stitching 57 Hand Look Quilting 57 Free Motion Quilting 58 6 Embroidery Preparations 59 Embroidery Unit 59 Embroidery Hoop Overview 59 Designs 59 DESIGNER JADE 35 Sampler Book 59 Download Backup Designs 60 Connect the Embroidery Unit 60 Remove the Embroidery Unit 60 Attaching the Embroidery Darning Foot U 61 To Hoop the Fabric 61 Slide on off the Hoop 62 Getting Started Embroidering 62...

Page 6: ...ter 8 LED lights 9 Needle plate 10 Bobbin cover 11 Free arm 12 Thread guide for auxiliary spool 13 Bobbin winder thread guide and tension disc 14 Spool pin 15 Thread cutter for bobbin thread 16 Bobbin spindle bobbin stop 17 Hole for auxiliary spool pin 18 Thread guide for bobbin winding through the needle 19 Handwheel 20 USB port 21 ON OFF switch sockets for power cord and foot control 6 1 Introdu...

Page 7: ...ery unit connection socket 3 Drop feed teeth switch Storage Box The storage box is for storing the foot control power cord and any accessories For instructions on how to remove the storage box from the machine see Unpacking page 13 Accessory Tray Store the accessories in the tray so they are easily accessible Keep the accessory tray on the machine to provide a larger flat work surface 1 Introducti...

Page 8: ...r 8 Brush Use the sharp edge of the brush to clean the area around the feed teeth 9 Screwdriver for needle plate 10 Spool cap small 11 Spool cap large 12 USB embroidery stick with embroidery designs and HUSQVARNAVIKING DESIGNER JADE 35 sampler book 13 Long needle clamp screw for free motion sewing with over 4mm stitch width and for optional accessories that rest on the needle clamp screw when moun...

Page 9: ...king it easy to sew close to both sides of the zipper teeth Move needle position to the right or left to sew closer to the zipper teeth or for covering large cording Edging Foot J This foot is used for overcasting and seam overcasting Stitches form over the pin which prevents puckering at the edge of the fabric Embroidery Darning Foot U Used for hoop embroidery free motion embroidery free motion q...

Page 10: ...m later For medium and heavy stretch fabrics 9 Automatic button sewing For sewing on buttons 10 A B Two step zigzag For joining two pieces of lace and for elastic shirring 11 A Reinforced zigzag For joining fabric edge to edge or overlapping in leather For decorative sewing 12 A B Basting stitch For temporary seams The long stitches and reduced tension make the seams easy to unravel 13 A B Double ...

Page 11: ...forced buttonhole For medium and heavy fabrics 26 One Step Buttonhole Foot C Heirloom buttonhole For hand look on fine and delicate fabrics Tip For jeans buttonholes increase length and width of the buttonhole Use thicker thread 27 One Step Buttonhole Foot C Keyhole buttonhole Square end for tailored jackets coats etc 28 One Step Buttonhole Foot C Heavy duty buttonhole With reinforced bartacks 29 ...

Page 12: ...Alphabets Block Cyrillic Russian alphabet See the font on the graphic display of your sewing machine 12 1 Introduction ...

Page 13: ...fore sewing embroidering to prevent discoloration of your machine Connect the Power Cord and Foot Control Among the accessories you will find the power cord and the foot control Note Consult a qualified electrician if you are in doubt about how to connect the machine to the power source Unplug the power cord when the machine is not in use For this sewing machine foot control model C 9002 manufactu...

Page 14: ...locking device to lock the box in place LED Lights Your machine has LED lights which distribute the light evenly over the sewing area and eliminate shadows Free Arm To use the free arm slide off the accessory tray Remove the tray by sliding it to the left Use the free arm to facilitate sewing pant legs and sleeve hems To replace the accessory tray slide it onto the machine until it fits in place M...

Page 15: ...e thread turn the spool so that the thread reels off in the opposite direction or place the thread in the vertical position Depending on the size of thread spool reverse the direction of the spool cap B Use the small cap when you use cross wound thread C Set the thread net over the spool if thread reels off too easily D Vertical Position Raise the spool pin to the vertical position Place a felt pa...

Page 16: ... to thread the needle automatically The needle must be in its highest position to use the built in needle threader Press the needle up down button to make sure the needle is fully raised We also recommend lowering the presser foot 1 Use the handle A to pull the needle threader all the way down Metal flanges encase the needle and a small hook will pass through the needle eye 2 Place the thread from...

Page 17: ...ad on the spool pin 4 Bring thread to the left and pull thread into the thread guide A from back to front 5 Thread the second thread the same way as the first 6 Make sure that one thread is inside the needle thread guide and the other one outside 7 Thread needle eye by hand from front to back Note The weight and irregular surface of specialty threads like metallics can cause increased tension on t...

Page 18: ...he tension disc for correct thread tension 4 Thread through the hole in the empty bobbin G from the inside to the outside 5 Place the bobbin on the bobbin winder spindle 6 Push the bobbin spindle to the right to wind A pop up appears on the screen to inform you that bobbin winding is active Press the foot control or the start stop button to start winding the bobbin Hold the end of the thread firml...

Page 19: ...the arrow markings into the needle plate thread guide from D to E To cut off excess thread pull thread to the right over the blade E 4 Replace the bobbin cover Thread Tension Correct tension For the best stitch appearance and durability make sure the needle thread tension is correctly adjusted i e for general sewing the threads evenly meet between the two fabric layers Your sewing machine electron...

Page 20: ...g on very light or heavy fabric adjusting the pressure can improve the result For very light fabrics turn the dial to a lower number For heavy fabric turn the dial to a higher number Presser Foot Lift The presser foot is lowered or raised with the presser foot lift A If you are sewing on heavy fabric or several layers of fabric the presser foot can be raised higher B to make it easier to place the...

Page 21: ... Place underneath fabric for decorative stitching or hoop with the fabric when embroidering Tear away excess stabilizer after stitching Iron on tear away Iron on tear away is a totally stable stabilizer that has a slick side for ironing on to fabric It is recommended for knits and all unstable fabrics Fuse it to the wrong side of the fabric before decorative stitching or hooping Tear away excess s...

Page 22: ... scarf a slightly rounded point and a slightly larger eye to avoid damage to thread and materials Use with metallic and other specialty threads for embroidery and decorative sewing Denim Needle Denim needle marked blue Denim needles have a sharp point to penetrate tightly woven fabrics without deflecting the needle For canvas denim microfibers Wing Needle Wing needle The wing needle has wide wings...

Page 23: ...ARNAVIKING DESIGNER JADE 35 sampler book Use the stick to store designs and embroidery fonts or to move files between the computer and sewing machine Connect to and Remove From USB Port Insert the USB embroidery stick in the port with logo facing you The USB embroidery stick can only be inserted one way do not force it into the port To remove carefully pull the USB embroidery stick out straight Do...

Page 24: ...usqvarnaviking com and look for support and download the software More information and detailed installation instructions are available on a separate PDF file on the USB embroidery stick A printed product code sheet with your unique product activation code is packed with your machine Please store your printed product code sheet and the sales receipt for your machine together they are your proof of...

Page 25: ...needle In embroidery mode If no hoop is attached the embroidery unit will move the embroidery arm to park position when you select needle stop up down If a hoop is attached the machine will move the hoop forward towards you for easy thread trimming see Park Position Trim Position page 70 STOP Function Monochrome In sewing mode STOP is used to conclude a stitch or to sew just one unit of the stitch...

Page 26: ...on the graphic display You cannot select a higher speed than the max speed for the selected stitch When sewing with metallic threads or when sewing on delicate fabrics lower the speed for optimal results In embroidery mode Each stitch type in a design has a pre set maximum speed at which it can be sewn To reduce the speed when using specialty threads or embroidering on delicate fabrics press speed...

Page 27: ...ion pressing this icon will move the needle from the left to the right symmetrically across the center position If pressed in sewing mode for stitch programs the whole stitch program is mirrored The change is visible on the graphic display and an icon is shown indicating that mirror side to side is selected In embroidery mode press to mirror the loaded design side to side An icon is shown indicati...

Page 28: ...y sets the best stitch stitch length stitch width thread tension and sewing speed for your project The stitch is displayed on the graphic display with presser foot needle and presser foot pressure recommendations Press the symbols for the fabric you are using and the sewing technique you wish to sew see Exclusive SEWING ADVISOR page 35 28 2 Preparations ...

Page 29: ...cally set the best thread tension for the selected stitch and fabric Use the left right arrow buttons if you need to adjust the thread tension In sewing mode the changes only affect the selected stitch If another stitch is selected or the same stitch is selected again the value is reset to the default value In embroidery mode the value is reset to the default value when a new design is loaded The ...

Page 30: ...nnot set the twin needle size if the stitch width safety is on or turn on the stitch width safety if the machine is set for twin needle Stitch Width Safety SET menu sewing mode Use the OK button to turn on the stitch width safety when using a straight stitch needle plate or a straight stitch presser foot The stitch width will be limited to zero for all stitches to prevent damage to the needle pres...

Page 31: ... buttons to change the language of all text in your machine The language setting is saved even when the machine is turned off Software Version SET menu sewing mode The currently loaded software version for the sewing machine is displayed 2 Preparations 31 ...

Page 32: ...crease the stitch length by pressing or A see Stitch Length Stitch Density page 37 6 Needle position is shown instead of stitch width when straight stitch is selected Change the needle position by pressing or B see Needle Position page 38 7 The selected stitch illustrated 8 The fabric and sewing technique selected on the Exclusive SEWING ADVISOR feature see Exclusive SEWING ADVISOR page 35 9 Recom...

Page 33: ...d Reduce or increase the stitch density by pressing stitch length and A 21 Recommendation for corded buttonhole When sewing buttonholes in stretch fabric we recommend to cord the buttonhole for better durability see Corded Buttonhole Stretch Fabrics page 54 22 Elongation is shown instead of density if alternate view button is pressed when a satin stitch is selected Reduce or increase the elongatio...

Page 34: ...he stitch illustrated on that button immediately regardless of the selected stitch menu By pressing two digits in quick succession you will be able to select a stitch from 10 and up from the selected stitch menu If the stitch number does not exist in the menu you will hear a beep and the first entered digit will be selected as a stitch The selected stitch menu stitch and stitch number will be visi...

Page 35: ...Woven fabric Stretch knit fabric The difference between woven and knit fabric is the way the threads are put together Woven fabrics are made of two thread systems warp lengthwise and weft crosswise that intersect at right angles A knit fabric is made of one thread system with interlaced stitches A knit fabric usually has stretch As a general rule enter Woven for stable fabrics that have no stretch...

Page 36: ...dhesive Glide Plate page 9 Sewing Techniques 1 Seam sews two pieces of fabric together 2 Overcast finish fabric edges to prevent them from fraying and help them lay flat 3 Seam overcast sews the seam and overcasts the edge all at one time 4 Baste a temporary stitching for fitting garments gathering and marking The Exclusive SEWING ADVISOR feature automatically sets a long stitch length and reduces...

Page 37: ... width density or needle position is set to default the figures will be black If you change the number the numbers will be inverted on a black background When trying to exceed minimum or maximum settings a beep will be heard Stitch length default stitch length stitch length Stitch Length Stitch Density 3 Stitch density Stitch density default stitch density stitch density Increase or decrease the s...

Page 38: ...d to end button A to mirror the selected stitch end to end If the button is pressed in sew out mode for stitch programs the whole stitch program is mirrored The change is visible on the graphic display and an icon is shown indicating that mirror end to end is activated Note If a stitch cannot be mirrored a beep will be heard when pressing the mirror end to end button Mirror Side to Side Press the ...

Page 39: ...when you turn on your machine Press the OK button to close the pop up message Stitch Width Limited for Twin Needle This message is shown when the machine is set for twin needle and you try to adjust the stitch width to wider than possible with the twin needle Close the pop up message by pressing the OK button This Stitch Cannot Be Sewn With Twin Needle This pop up message appears when the machine ...

Page 40: ... machine stops automatically if the top thread runs out or breaks Re thread the top thread and close the pop up message by pressing the OK button Machine Needs to Rest If you are sewing on very heavy fabric or if the machine is blocked when sewing the main motor can get overloaded The pop up message will close when the main motor and power supply is secure Overwrite If there is already a stitch or...

Page 41: ...graphic display is the number of the selected stitch Two numbers are displayed above the stitch program on the center of the graphic display The first number is the position of the selected stitch in the program The second number put in parenthesis is the total number of stitches in the program Add Letters 5 Press the font menu button B Use the arrow buttons to select a font and press OK The machi...

Page 42: ... Delete Stitches or Letters To delete a stitch in the program select the stitch with the cursor by pressing the arrow buttons and press the delete button A To delete the whole program move the cursor to the left of the first position and press the delete button or press and hold on the delete button at any position in the program A pop up will appear asking you to verify the deletion Select yes or...

Page 43: ...owever these adjustments cannot be brought back to programming mode If you have made adjustments in sewing mode and press the program mode button to go back to programming mode these adjustments will be cancelled This will also happen if you load a saved program from the machine memory to programming mode Sew out the Stitch Program Sewing mode When you are done with your program press the save but...

Page 44: ...h program with the new one Select yes or no with the arrow buttons and press the OK button A pop up message will confirm when program or stitch is saved Load a Saved Stitch or Program To load a saved stitch or program from the machine memory press the stitch menu button and select the heart symbol saved stitch or program The stitch program will appear in sewing mode ready to be sewn 44 4 Program ...

Page 45: ... is shown Close the pop up message by pressing the OK button Note If you add a FIX or STOP to the program these will each use one memory space in the program Delete program This pop up message will ask you to confirm when you have chosen to delete an entire program in programming mode Select yes or no with the arrow buttons and press OK Overwrite If there is already a stitch or program saved in th...

Page 46: ...e edge with the 15 mm seam guide Lower the presser foot Sew a seam When finished press the cut function button The machine cuts top and bobbin threads Raise the presser foot and remove your project Tip Straight stitch can also be used for topstitching For a more visible topstitch lengthen the stitch and use heavier thread with a larger size needle Stretch stitch Fabric Stretch light cut in two Sel...

Page 47: ...e Presser foot J and size 80 needle as recommended Set Presser foot pressure to N as recommended Place the edge of a single thickness of fabric under presser foot J with the wire guide along the edge of the fabric The three step zigzag stitch sews over the wire guide to keep the edge of the fabric flat Sew Lower the presser foot Sew to overcast the edge of the fabric When finished press the cut fu...

Page 48: ... machine cuts top and bobbin threads Raise the presser foot and remove your project Repeat the Seam Overcast technique on stretch heavy fabric and on woven heavy fabric Your Exclusive SEWING ADVISOR feature will select the best stitch stitch length stitch width and thread tension for each fabric type Follow other recommendations given on the graphic display Baste Basting is temporary stitching for...

Page 49: ...technique Use Blind Hem Foot D and the needle recommended for your fabric Set Presser foot pressure as recommended for your fabric Sew Fold the fabric as illustrated Make sure the folded edge of the fabric follows the inside of the right toe of Blind Hem Foot D Lower the presser foot The left swing of the needle should just catch the edge of the folded fabric If necessary adjust the stitch width a...

Page 50: ...eedle stop up down to select the needle down position Begin sewing the bottom hem at or near the center back As you near the side seam stop sewing Your machine stops with the needle in the fabric Raise the presser foot Insert the multipurpose tool from behind Both sides of the multipurpose tool are raised Use the side which corresponds closest to the thickness of the seam Lower the presser foot an...

Page 51: ...e Trim away excess fabric Use this technique for belt loops too Sewing Buttonholes The buttonholes in your sewing machine are specially adjusted for different types of fabric and garments Learn about different buttonholes and when to use them by studying the stitch table in the overview chapter The Exclusive SEWING ADVISOR feature will select the best buttonhole and stitch settings for your fabric...

Page 52: ...ced under the foot 4 Position your project under the presser foot so that the marking on the fabric is aligned with the center of the buttonhole foot 5 Lower the buttonhole lever B all the way down Note The machine will not start to sew if the buttonhole lever is not lowered properly or the frame of buttonhole foot is not positioned all the way forward 6 Hold the end of the upper thread and start ...

Page 53: ...e starts sewing the first column forwards 3 When the column stitching has reached your desired length push the buttonhole lever away from you until the machine starts sewing a straight stitch backwards 4 Pull the buttonhole lever towards you until the machine starts sewing the bar tack and second column forwards 5 When the columns are aligned push the buttonhole lever away from you until the machi...

Page 54: ... the ankle with the holes in the button lined up with the swing of the needle Check the swing of the needle by pressing the mirror side to side button to be sure the needle will not hit the button Bring the needle down into the holes of the button with the handwheel to verify Tip When using the multipurpose tool the button is stitched to the fabric leaving a shank If stitching without the multipur...

Page 55: ...ght side so it stays in place A 3 Select straight stitch and move the needle position to the left Snap on the Zipper Foot E so the needle is on the left side of the foot Place fabric under the foot right side up with the zipper foot on the right side of the zipper 4 Begin stitching across the bottom turn the fabric and stitch the right side of the zipper to the top B 5 To avoid fabric shifting sew...

Page 56: ...same size Reposition your fabric then step on the foot control to sew again The stitch will now repeat the same size darning square The machine will stop automatically when the stitch is completed To cancel the repeat function press the STOP button Bartack Manual Woven heavy and stitch 1 22 Secure elastic ends drapery pleats belt loops and pocket corners with the same look as ready to wear Place f...

Page 57: ...e look of handmade quilting with invisible thread and the hand look quilting stitch 2 11 This stitch is pre set with a high thread tension to get the accurate hand stitched look Thread the needle with clear invisible thread and the bobbin with a color of thread that coordinates with your fabric Stitch along one of the seams of your project The hand look effect is created as the bobbin thread is pu...

Page 58: ...hen free motion quilting use the Open Toe Free Motion Spring Foot optional accessory part number 4130376 46 or the included Embroidery Darning Foot U Begin by basting your quilt through all layers starting from the center of your quilt and working out Note When free motion sewing with more than 4mm stitch width replace the short needle clamp screw with the long needle clamp screw found in the incl...

Page 59: ... with your machine We recommend copying the font and designs to your computer as an easily accessible backup if you should lose the USB embroidery stick or if you temporarily want to remove the designs from the stick DESIGNER JADE 35 Sampler Book Page through the DESIGNER JADE 35 sampler book found as a PDF file on the USB embroidery stick for an overview of the available designs and embroidery fo...

Page 60: ... Press OK The machine will calibrate and the embroidery arm will move to the ready position Note DO NOT calibrate the machine with the embroidery hoop attached as this can damage the needle presser foot hoop and or the embroidery unit Be sure to clear all materials from around the machine before calibrating so that the embroidery arm does not bump into anything while calibrating Remove the Embroid...

Page 61: ...r hoop Place the outer hoop on a firm flat surface with the screw on the lower right B There is a small arrow in the center of the lower edge of the hoop which will line up with a small arrow on the inner hoop 2 Place the stabilizer and fabric with the right sides facing up on top of the outer hoop Place the inner hoop on top of the fabric with the small arrow at the bottom edge If you can see the...

Page 62: ... with OK The design is placed in the center of the hoop 3 Attach the embroidery foot and insert a bobbin with lightweight bobbin thread 4 Hoop a piece of fabric and stabilizer and slide the hoop onto the embroidery arm 5 Your machine automatically selects the smallest hoop size that fits the design Make sure that the hoop attached matches the hoop size shown on the graphic display or change hoop s...

Page 63: ... pop up message appears on the graphic display asking you to change color Re thread with the next color and continue embroidering by pressing the start stop button Each color segment is tied off at the end and the needle and bobbin threads are cut Note When you start embroidering again hold the thread end so you can easily remove it when cut 10 When the embroidery is completed your machine stops a...

Page 64: ...ee Design Height page 68 5 Design width Reduce or increase the design width by pressing or C see Design Width page 68 6 Current view 1 Edit 2 Stitch out 7 Horizontal and vertical position of design Shows in millimeters how much the design has been moved from its original position 0 8 Design rotation Indicates how many degrees a design has been rotated from its original position 9 Indicates that th...

Page 65: ... See Complimentary Embroidery Intro Software PC page 24 Load a Font One font is stored on the USB embroidery stick upon delivery To load a font press the stitch menu button A with the USB embroidery stick connected Font files are marked with an icon B in the list You can select between three different files with different sizes of the included font 12 mm 20 mm and 30 mm Select the font file you wa...

Page 66: ... verify the deletion Select yes or no with the arrow buttons and press OK Load Text to Embroidery When you want to stitch out the text press the program mode button B to load the text to embroidery mode The text is now handled as one design and you can make adjustments on the entire text If you wish to go back to the text editor and make further adjustments on the text before stitching it out pres...

Page 67: ...ode press the embroidery info button to view information about the current design 1 Design name 2 Number of color blocks in the design 3 Number of stitches in the design 4 Color block list All colors in the loaded design are shown in the order they will be embroidered The current color block is always placed at the top of the list and is marked with a thread spool Each listed color shows order nam...

Page 68: ...e same Note You can resize the design in the Complimentary Embroidery Intro Software PC Move Designs to Position Place your design anywhere in the embroidery area using the arrow buttons A The numbers to the right of the design position icons on the graphic display show in millimeters how much the design has been moved vertically and horizontally from its original center position Rotate and Mirror...

Page 69: ... by pressing the OK button Note If you start embroidering and the hoop you have selected is not the same as the hoop attached to the embroidery unit a pop up message will appear to inform you Attach the correct hoop or select another hoop in the list Current Stitch If you have selected one of the hoop positions and want to return to the current stitch and start embroidering where the embroidery wa...

Page 70: ...ch Press start stop to resume the embroidery Note The hoop options menu will open to show the actual position Corner Check Corner check can be used to trace the four corners of the design Press the corner check button 4 Each time you press the button the hoop will move to one of the corners in the following order upper left upper right lower right and lower left On the fifth press the hoop will mo...

Page 71: ...t is very important to remove the hoop otherwise the hoop or the embroidery unit may be damaged while calibrating Embroidery Unit Not Supported Please Replace Embroidery Unit You can only use the embroidery unit that is delivered with your machine Attach the correct embroidery unit Calibration Failed The machine was unable to calibrate Clear the machine area for calibrating the embroidery arm and ...

Page 72: ...Embroidery Mode page 30 Change Thread Color When it is time to change the needle thread the machine stops and the threads are cut Change the spool and re thread the machine The next recommended color is shown in the popup message This popup message is also shown when your machine stops automatically for you to trim the fabric on cut work applique etc See explanation for each design in the DESIGNER...

Page 73: ...ge Embroidery Too Large This pop up message appears if the size of the design you are trying to load is too large or if the design contains too many stitches Your machine can load designs containing up to 50 000 stitches Press the OK button to close the pop up and select another design Stop Command in Design Your machine stops automatically for you to trim the fabric on cut work applique etc See e...

Page 74: ...t up the needle plate Clean the feed teeth and bobbin area with the brush included with the accessories Cleaning Under the Bobbin Area Clean the area under the bobbin case after sewing several projects or any time you notice an accumulation of lint in the bobbin case area Remove the bobbin case by lifting it up Clean the area with the brush or a dry cloth Use caution when cleaning around the threa...

Page 75: ...ecurely plugged into the machine and the wall socket Check that the foot control cord is securely plugged into the front socket on the bottom right side of the machine Push bobbin winder spindle to sewing position The sewing and embroidery machine function buttons do not respond to touch The sockets and function buttons on the machine can be sensitive to static electricity If the buttons do not re...

Page 76: ... the needle plate hole damaged Change the needle plate Is the bobbin area full of lint Clean lint from bobbin area and use only the bobbins approved for this model Is the bobbin wound correctly Wind a new bobbin The Seam Has Uneven Stitches Is the thread tension correct Check needle thread tension Remove the thread completely and rethread the machine see Threading the Machine page 16 Is the thread...

Page 77: ... locate the accessory user s guide for information about available stabilizers The Machine Will Not Embroider Is the embroidery unit attached Make sure that the embroidery unit is properly attached into the socket Is the wrong hoop attached Slide on the correct hoop Have Your Sewing Machine Serviced Regularly by Your Local Authorized Retailer If you have followed this troubleshooting information a...

Page 78: ...tion 55W Light LED Sewing speed 800 rpm maximum Machine dimensions Length mm Width mm Height mm Net weight kg 464 193 316 9 0 Foot Control Model C 9002 Rated voltage DC 15V max 3mA The technical specifications and this owner s manual can be changed without prior notice 78 8 Maintenance ...

Page 79: ...plimentary Embroidery Intro Software PC 24 Connect the Embroidery Unit 60 Connect the foot control cord 13 Connect the power cord 13 Connect to and Remove From USB Port 23 Contrast 30 Corded Buttonhole Stretch Fabrics 54 Corner Check 70 Crazy Quilt Stitching 57 Create a Stitch Program 41 Current Stitch 69 CUT Auto Only in Sewing Mode 29 Cut Function 26 Cutting the Thread 17 D Darning and Mending 5...

Page 80: ...roidery 66 Long needle clamp screw 8 Lowering the Feed Teeth 20 M Machine Memory 43 Machine Overview 6 Manual Buttonhole 53 Mirror End to End 38 69 Mirror Side to Side 38 68 Monochrome 70 Mounting Machine in Sewing Cabinet 14 Move Designs to Position 68 N Navigator Arrows and OK 27 Needle Area 7 Needle bar 7 Needle clamp screw 7 Needle plate 6 Needle Position 38 Needle Stop Up Down 25 Needle Threa...

Page 81: ...idth 37 Stitch Width Safety 30 Stitch Out View 64 STOP Function Monochrome 25 Storage Box 7 Stretch knit fabric 35 Stretch Hem 51 T Technical specification 78 The Embroidery Design has Puckered 77 The Embroidery Design is Distorted 77 The Machine Does Not Feed or Feeds Irregularly 76 The Machine Skips Stitches 75 The Machine Will Not Embroider 77 The Seam Has Uneven Stitches 76 Thread cutter 6 Thr...

Page 82: ......

Page 83: ...ent of accessories without prior notice or make modifications to the performance or design Such modifications however will always be to the benefit of the user and the product Please note that on disposal this product must be safely recycled in accordance with relevant National legislation relating to electrical electronic products Do not dispose of electrical appliances as unsorted municipal wast...

Page 84: ...4710088 26B Inhouse 2015 KSIN Luxembourg II S ar l All rights reserved Printed in Taiwan on enviromental friendly paper www husqvarnaviking com ...

Reviews: