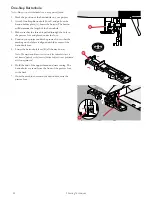
Slide on/off the Hoop
Slide the hoop connector into the hoop attachment (A) from
front to back until it clicks into place.
To remove the hoop from the embroidery arm, press the
grey button (B) on the hoop attachment and slide the hoop
towards you.
Getting Started Embroidering
1.
Make sure the machine is turned off and Attach the
embroidery unit. The machine starts in embroidery
mode. A pop-up message prompts you to clear the
embroidery area for calibration. Press OK to calibrate
and move the embroidery arm to ready position.
2.
The load menu automatically opens. Make sure that the
USB embroidery stick is connected. Select your design
using the arrow buttons and confirm with OK. The
design is placed in the center of the hoop.
3.
Attach the embroidery foot and insert a bobbin with
lightweight bobbin thread.
4.
Hoop a piece of fabric and stabilizer and slide the hoop
onto the embroidery arm.
5.
Your machine automatically selects the smallest hoop
size that fits the design. Make sure that the hoop
attached matches the hoop size shown on the graphic
display or change hoop size by pressing the hoop
options button and select correct size from the list (see
Hoop Size, page 69).
6.
Thread the machine with the first color in the color
block list. To show the complete color block list on the
graphic display press the embroidery info button.
7.
Clear sufficient space to accommodate movement of
the embroidery arm and the hoop. Hold the needle
thread and press the start/stop button. The machine
will start embroidering.
62
6 Embroidery Preparations
Summary of Contents for Designer Jade 35
Page 1: ...User s Guide KEEPING THE WORLD SEWING ...
Page 82: ......

