background image

INSTALLATION

10

If you ordered Hold-Down Brackets...

Hold-down brackets provide stability and prevent swaying by securing  
the bottom rail — for example, in French door applications. Hold-down 
brackets can only be used with outside mount shades.


Lower the shade and place the pins from the hold-down 
brackets into the bottom rail end caps.


On the mounting surface, mark the screw holes.


Drill the screw holes using a 

3

/

32

" drill bit.


Attach the hold-down brackets to the mounting 
surface using the screws provided.

Attach the Universal Cord Tensioner — EasyRise

 Only

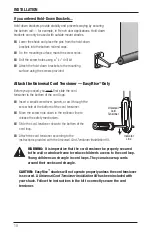
Before you proceed, you must first slide the cord 
tensioner to the bottom of the cord loop.


Insert a small screwdriver, punch, or awl through the 
screw hole at the bottom of the cord tensioner. 


Move the screw hole down to the indicator line to 
release the safety mechanism.


Slide the cord tensioner down to the bottom of the 
cord loop.


Attach the cord tensioner according to the 
instructions provided with the 

Universal Cord Tensioner Installation Kit

WarnIng:  

It is imperative that the cord tensioner be properly secured 

to the wall or window frame to reduce children’s access to the cord loop. 
Young children can strangle in cord loops. They can also wrap cords 
around their necks and strangle. 

CautIon:

  EasyRise

 shades will not operate properly unless the cord tensioner 

is secured. A 

Universal Cord Tensioner Installation Kit

 has been included with 

your shade. Follow the instructions in the kit to correctly secure the cord 
tensioner.

Indicator

Line

Universal

Cord

Tensioner

Summary of Contents for Provenance Woven Wood Shades

Page 1: ...eration Care Provenance Woven Wood Shades EasyRise UltraGlide and LiteRise Lifting Systems Installation Operation Care Horizontal Blinds Standard Hardware System LiteRise Operating System UltraGlide O...

Page 2: ...Installation Overview 4 Mount the Installation Brackets Inside Mount 6 Mount the Installation Brackets Outside Mount 7 Install the Shade 8 Attach the Optional Components 8 Attach the Universal Cord Te...

Page 3: ...de Cord Tensioner and Bracket Cord Loop Installation Brackets Fabric Valance UltraGlide Shade UltraGlide Shade Standard Hold Down Bracket Optional Not Shown Top Down Bottom Up LiteRise and Independent...

Page 4: ...2 GETTING STARTED Product View Crestover Valance Dust Cover Returns Valance...

Page 5: ...Phillips screwdrivers Level laser level is recommended Measuring tape and pencil Power drill 3 32 drill bit and 1 4 hex driver In addition you will need fasteners designed to work with your specific m...

Page 6: ...f installation brackets for your shade width as shown in the table below Crestover Valance Optional Brackets are already attached to your shade and valance Installation Bracket Shade Width Brackets Re...

Page 7: ...ortant first step review the mounting types and basic window terminology illustrated below Refer to the appropriate page below based on your order Inside Mount page 6 Outside Mount page 7 Outside Moun...

Page 8: ...crew holes For fully recessed mounting the fabric will be flush with the front of the window casement when raised A minimum depth of 3 is needed to fully recess your shade Minimum mounting depth for b...

Page 9: ...e Center the brackets on your marks and mark the screw holes A minimum of 13 4 flat vertical surface is required to mount the brackets The top of the installation brackets should be at the desired sha...

Page 10: ...e headrail slightly tilted insert the front lip of the headrail onto the front lip of the installation bracket Push the headrail back and up until its bottom lip snaps into bottom tab on the installat...

Page 11: ...d using a cut off saw to remove material from the back edge Do not cut the miter corners to shorten the returns Mount the Crestover Valance Place the hook on the valance bracket into the top groove on...

Page 12: ...rewdriver punch or awl through the screw hole at the bottom of the cord tensioner Move the screw hole down to the indicator line to release the safety mechanism Slide the cord tensioner down to the bo...

Page 13: ...raise the middle rail before raising the bottom rail EasyRise Shades To Lower the Shade Pull down on the back of the continuous cord loop To Raise the Shade Pull down on the front of the continuous co...

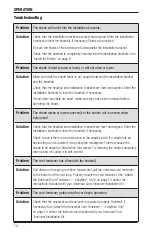
Page 14: ...ay cause the shade to be angled or tilted when fully raised If this occurs do the following Raise the shade slightly Lower the shade completely to the sill In some cases pull gently on the bottom rail...

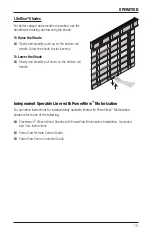
Page 15: ...er the Shade Slowly and steadily pull down on the bottom rail handle Independent Operable Liner with PowerView Motorization For operation instructions for independently operable liners with PowerView...

Page 16: ...when fully raised Solution Check that the headrail and installation brackets are level and aligned Shim the installation brackets to level the headrail if necessary Check to see if there is an obstru...

Page 17: ...use your finger or a flat blade screwdriver to release the bottom tab on the installation brackets Pull the headrail straight out from the installation brackets Removing the Crestover Valance If Neces...

Page 18: ...eld vacuum for more thorough dust removal Spot Cleaning Only the following Provenance fabrics can be spot cleaned Prepare a solution of warm water and a mild detergent Dampen a clean cloth in the solu...

Page 19: ...ing the cord tensioner For the shade to operate properly the cord tensioner must be correctly mounted and secured Fasteners provided in this kit may not be appropriate for all mounting surfaces Use ap...

Reviews: