


43
POINTING THE SATELLITE DISH
16. Repeat at least one iteration of the sequence beginning at
step 12 to be sure that you have acquired the strongest possi-
ble signal. Adjust azimuth, then elevation, then azimuth
again and continue until there is no improvement in signal
strength.
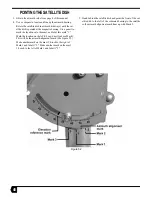
17. The three satellite dish mast clamp bolts must be tightened
to complete the alignment process, but the act of tightening
them can cause loss of signal strength. Monitor the signal
strength while tightening the clamp bolts in the following
sequence:
a. Tighten the top nut until the signal strength begins to
degrade then back off until you have regained the peak
signal.
b. Tighten the bottom nut until the signal strength begins to
degrade then back off until you have regained the peak
signal.
c. If you cannot tighten either the top or bottom nuts without
losing signal strength then go to step f.
d. If the top and bottom nuts are fully tightened then also
tighten the middle nut and go to step 18. You have com-
pleted step 17.
e. Go to step a to repeat the sequence.
f. If the top and bottom nuts cannot be completely tightened
without loss of signal, further elevation adjustment is
necessary. Go back to step 13 and begin the sequence
again.
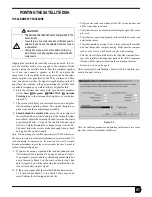
18. While watching the signal strength number to ensure that it
stays at maximum, tighten the elevation nuts in the follow-
ing sequence:
a) Snug the left-hand nut but do not completely tighten it.
b) Snug the right-hand nut but do not completely tighten it.
c) Fully tighten the left-hand nut (torque to 12 ft.-lbs.).
d) Fully tighten the right-hand nut (torque to 12 ft.-lbs.).
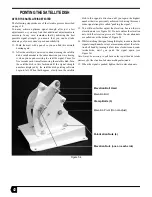
19. Fine-tune the polarization setting by loosening the polariza-
tion nuts just enough to enable you to rotate the satellite dish
a few degrees in each direction. If the signal strength does
not change, set the polarization to the value you obtained
from page 4. Otherwise, set the polarization at the setting
where you peaked the signal.
20. While monitoring the signal strength number to ensure that
it stays at maximum, tighten the polarization nuts.
21. After fine-tuning the satellite dish, erase all marks previ-
ously made on the mast. Mark the present position with a
permanent marker.
CONNECTING THE TRANSMITTER
22. Back in the house, unplug the power transformer that came
with your satellite modems.
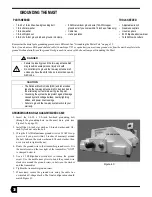
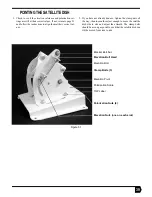
23. Return outside and remove the black protective cap from the
transmitter connection marked “IFL” on the back of the
transmitter.
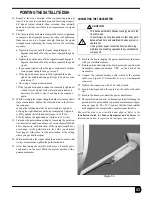
24. Connect the transmit modem cable, which is the marked
cable (see Figure 55). Remember to use a weatherproof
connector.
25. Tighten the connection with a 7/16-inch wrench.
26. Secure drip loops and other points on the cable with cable
ties.
27. Back in the house, reconnect the power transformer.
28. The satellite dish can now be transmit pointed following the
procedures for polarization separation measurement begin-
ning on page 46. The FCC requires that the final satellite
dish alignment be completed by a professional installer.
The satellite dish is now installed and aligned. Refer to the
Installation Guide for Indoor Equipment and Software for
information on how to register and configure your system.
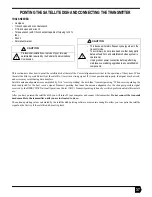
CAUTION
• This device emits radio frequency energy when in the
transmit mode.
• To avoid injury, do not place head or other body parts
between feed horn and satellite dish when system is
operational.
• Unplug indoor power connection before performing
maintenance or adding upgrades to any satellite dish
components.
Figure 55
Summary of Contents for DiRECWAY DW4000
Page 4: ...iv ...


