


16
INSTALLING THE MOUNT ON A WOOD FRAME ROOF
17. Install a 3/8-inch washer on the 3/8-inch x 4-inch lag screw.
18. Use a 9/16-inch socket wrench to screw the lag screw into
the lower center hole. Do not tighten the screw fully.
19. Re-plumb the mast and snug down the lag screw.
20. Use a torque wrench with 1/2-inch socket to torque the mast
adjustment nuts to 18 ft.-lbs. Confirm the mast is plumb
after torquing. Note: the mast must be plumb before you can
proceed. If you cannot plumb the mast, repeat the installation or
find another installation site.
21. Adjusting the drilling depth for the 3/8-inch by 2-inch lag
screws, repeat step 6 and step 7 to drill holes for the four
corner holes. See Figure 15.
Note: the base plate must not move when you drill the holes.
22. Fill the holes with silicone sealant.
23. Install a 3/8-inch washer on each of the 3/8-inch x 2-inch
lag screws.
24. Use a 9/16 socket wrench to screw the lag screws into the
four holes. Note: do not overtighten the screws. You may
strip the screw threads.
25. Re-plumb the mast and snug down the four screws firmly.
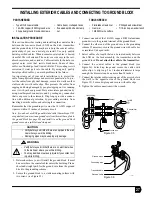
INSTALLING THE BRACE KIT
1. Slip the short 18-inch strut collar onto the mast as shown in
Figure 17.
2. Secure the collar to the mast by using a 7/16-inch socket
wrench to tighten the Nylock nut installed on the bolt.
3. Position the strut mounting plate below the mast and base
plate so the two screw holes are exactly in line vertically
with the mast base plate center holes (see Figure 17).
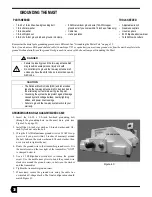
4. Mark the center of the bottom mounting plate screw hole
(see Figure 18).
5. Drill a hole on the center mark in the manner described
below. Note: to avoid drilling too deeply, wrap a piece of
masking tape around the drill bit shank at the appropriate
depth so that you can see when you should stop drilling.
Drill a 5/32-inch hole 4 inches deep.
Going into the 5/32-inch hole, drill a 1/4-inch hole to a
depth equal to the unthreaded portion of the 1/4-inch x 4-
inch lag screw.
6. Fill the holes with silicone sealant, and apply silicone seal-
ant to the bottom of the mounting plate.
7. Install a 1/4-inch washer on the 1/4-inch x 4-inch lag screw.
8. Use a 7/16-inch socket wrench to screw the lag screws into
the mounting plate hole.
Note: do not pound the lag screws into the rafter or truss with a ham-
mer or mallet. Doing so may split the wood and damage it.
Figure 17
Figure 18
Center line
Top center hole
Bottom center hole
Summary of Contents for DiRECWAY DW4000
Page 4: ...iv ...


