


26
INSTALLING AND ROUTING INTERIOR CABLE
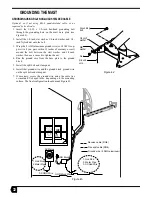
This section consists of routing two coaxial cables from the
outside wall into your house to the receive and transmit
modems connected to your computer. In most installations,
there is more than one way to get the cables to the inside desti-
nation. If the modems are located near an inside wall, you can
use the crawl, basement, or attic spaces. Use cable clips where
necessary. When routing the cables to the modems, take the
shortest possible path and always protect them from physical
damage. You may need to feed a length of string through tight
access hole(s) and then pull the cables through.
Remember that you must use 14 AWG copper grounding wire
if the ground wire will come within 12 inches of the soil or
masonry.
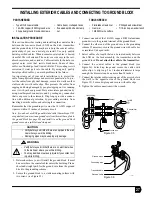
Remember that each cable is actually installed in two sections.
One section runs from your modems to the ground block,
which is installed where the cable exits the house. The other
section runs from the ground block to the LNB.
Cable is usually sold in lengths of 100, 75, 50, and 25 feet. If
the distances between your modems and ground block, or
ground block and LNB, are not approximately those lengths,
you may have to cut and strip the cable and install the weather-
proof connectors.
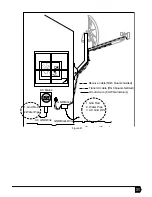
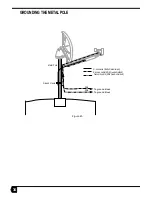
When the grounding scheme requires access to the internal
building ground, feed the 14 AWG copper/8AWG aluminum
wire from the ground block with the RG6 coaxial cables. Con-
nect the 14 AWG copper/8AWG aluminum ground wire to the
grounding scheme you select (see “Overview of Grounding the
Satellite System” on page 29) or as specified by local code
requirements.
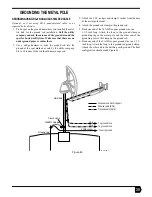
1. Before you start, use paint or fingernail polish to mark the
cable you will later connect to the transmitter. Mark this
transmit cable at both ends and every 3 feet along its length.
Marking the cable ensures that you can tell the cables apart
when you connect them later.
2. Choose a spot on the outside wall where you will drill a
hole. It should be near the satellite dish.
3. After verifying that there are no wires or pipes blocking the
location where you want to feed the coaxial cables into the
building, drill a one-inch hole through the outside wall.
4. Feed the cables into the access hole and route it to the
modems. Depending on the installation site, cables could be
routed through a floor or wall, or directly to the rear of the
computer. If the cables come out of a wall, you can use a
wall plate for a more professional look.
Also, if required by your grounding scheme, feed the
ground wire at this time. Remember to use copper wire if
your ground scheme requires it, or if you will come within
12 inches of masonry or soil.
5. Connect the unmarked cable to the receive modem.
6. Seal the outside access hole with silicone sealant.
7. Estimate the total length of cable used. You will need this to
determine if a line amplifier may be required for the receive
cable.
8. If you plan to install a DIRECTV
®
upgrade kit in the future,
consider installing the additional cable at this time. You may
install that cable through a separate hole to avoid drilling a
large hole in your wall.
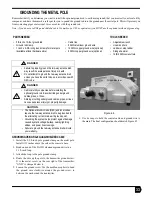
PARTS NEEDED
TOOLS NEEDED
• Coaxial cable
• Cable clips
• Silicone sealant
• 14 AWG copper/8 AWG aluminum
grounding wire (if required by
grounding scheme)
• Electric drill and 1-inch bit
• String
• Screwdriver (if install wall plate)
• Paint or fingernail polish
WARNING
• Verify before you drill that there are no electrical wires
in the wall near where you will be drilling.
• You may be killed or seriously injured if you contact wir-
ing while drilling.
CAUTION
• Verify before you drill that there are no pipes in the wall
near where you will be drilling.
• Damaging pipes may cause property damage.
• Never use a staple gun to attach coaxial cable to a
wall.
Summary of Contents for DiRECWAY DW4000
Page 4: ...iv ...


