


42
Utilisation du menu principal (suite)
Ajustement de la qualité du son
Élément de sous-menu (SON)
Ajustez la qualité du son (aigus/graves).
1
Appuyez sur la touche MENU/ENTER.
• Le menu principal apparaît sur l’écran.
2
Choisissez “SON” avec la touche de
curseur
5
ou
∞
.
• L’élément choisi (affiché en texte) apparaît en magenta sur
l’écran.
3
Appuyez sur la touche MENU/ENTER.
•Les éléments de sous-menu du menu SON apparaissent sur
l’écran.
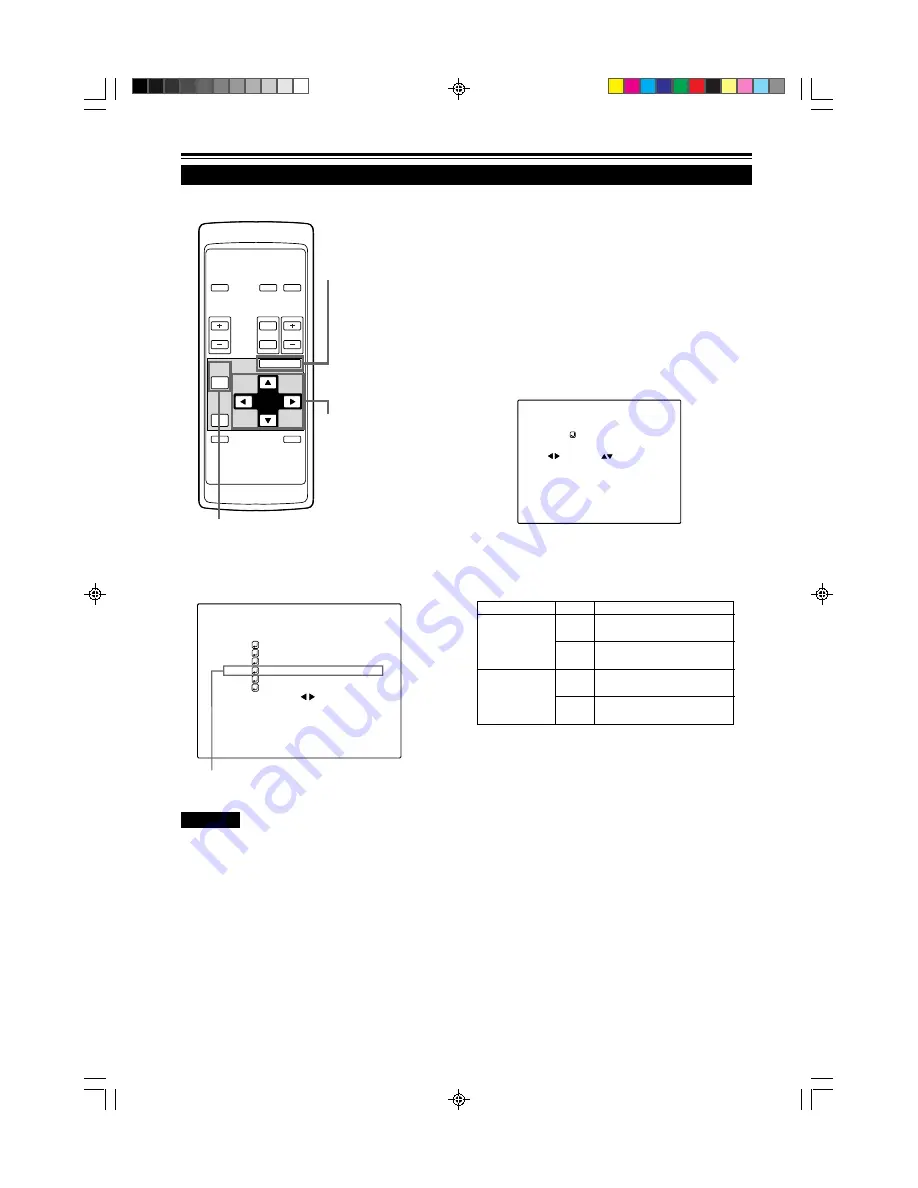
(Menu SON)
4
Ajustez “AIGUË” et “GRAVE” avec les
touches de curseur.
• Ajustez la qualité du son (AIGUË et GRAVE).
* Pour réinitialiser les valeurs préréglées en usine, appuyez sur la
touche PRESET de la télécommande.
Les aigus et les graves sont réinitialisés aux valeurs préréglées
en usine.
Pour retourner au menu principal, appuyez sur
la touche PAGE BACK. Pour quitter le menu
principal, appuyez de nouveau sur PAGE BACK.
• Pour quitter l’affichage du menu à partir de l’affichage du sous-menu
(menu SON), appuyez deux fois sur PAGE BACK.
Devient plus faible.
(–5
←
0
←
+5)
Devient plus fort.
(–5
→
0
→
+5)
Devient plus fort.
(–5
→
0
→
+5)
Devient plus faible.
(–5
←
0
←
+5)
Élément ajusté
Touche
Contenu de l’ajustement
AIGUË
GRAVE
2
3
5
∞
■
Télécommande
■
Menu principal
Remarque
• L’élément choisi apparaît en magenta. Les éléments
apparaissant en gris ne peuvent pas être utilisés ou réglés
dans le mode actuel.
S O N
A I G U Ë G R A V E
0 0
OPERATE
VOL.
PAGE
BACK
PRESET
ZOOM
FOCUS
COMPUTER VIDEO
QUICK
ALIGN.
AV
MUTING
W
T
MENU/ENTER
Touche MENU/
ENTER
Touches de
curseur
Touche PAGE BACK
V I D E O N T S C ( 4 8 0 i )
H O R L O G E P I X E L
P O S I T I O N
I M A G E
S O N
O P T I O N S
S O U R C E
D E C O D E U R
L A N G U A G E
A U T O ( N T S C ( 4 8 0 i ) )
F R A N Ç A I S
G1500M(Fr)34-45
99.8.25, 3:26 PM
42
Summary of Contents for G1500M
Page 2: ...G1500M Cover A4 99 8 25 1 05 PM 1 ...
Page 3: ...1 ENGLISH DIGITAL GRAPHICS PROJECTOR G1500M INSTRUCTIONS G1500M SubcoverEN 99 8 25 1 07 PM 1 ...
Page 60: ...58 G1500M p 46 59 99 8 25 1 13 PM 58 ...
Page 118: ...58 G1500M Fr 46 59 99 8 25 3 35 PM 58 ...
Page 119: ...G1500M Cover A4 99 8 25 1 05 PM 4 ...


