background image

11

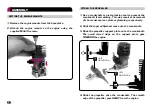
mounting thE BEnch

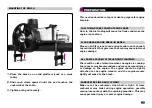
1. Place  the  bench  on  a  solid  platform  (such  as  a  work 

table).

2. Slide  each  clamp  upward  until  the  pad  touches  the 

underside of the table.

3. Tighten each pad securely.

PREPARATION

This section describes steps to take to prepare for engine 

break-in.

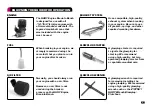
fuEl tuBing fREE fRom cuts And lEAks

Cuts in the fuel tubing will cause fuel leaks and make the 

engine run too lean.

clEAR AREA ARound BREAk-in BEnch

Since an air filter is not used during break-in on the bench, 

any swirling dirt that gets into the carb may cause internal 

engine damage.

All pARts sEcuREly AttAchEd And tightEnEd

There will be a lot of vibration when the engine is running. 

Loose parts may become undone and cause personal injury 

or  damage  to  the  engine.  The  engine  should  be  tightly 

attached  to  the  engine  mounts,  and  the  engine  mounts 

tightly attached to the bench.

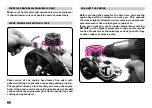
cARBuREtoR cinch Bolt is tight

Make  sure  the  carburetor  cinch  bolt  is  tight.  A  loose 

carburetor  may  twist  during  engine  operation,  possibly 

coming into contact with the spinning propeller.  This may 

cause personal injury or severe engine damage.

Summary of Contents for Ultimate Break-In Bench

Page 1: ...BREAK IN BENCH FOR ALL 1 8 1 10 NITRO ENGINES INSTRUCTION MANUAL ...

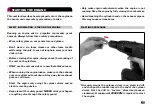
Page 2: ... process that reduces wear tear on engine components ensuring increased performance reliability and longevity Constructed of top quality components of tough aluminium and spring steel the Engine Break In Bench comes partially assembled from the factory to get you running sooner The heavy duty aluminum base plate with integrated clamps provides quick solid mounting on any workbench and a large prot...

Page 3: ...eak in Bench is extremely noisy and poses great hazards Always follow these safety precautions Wear safety glasses ear protectors and gloves DO NOT wear a necktie loose sleeves or other loose clothes while using the unit In case of long hair wear your hair under a hat Before starting the engine always check that the engine is securely mounted Keep clear of the propeller safety cover never stick yo...

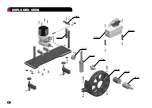
Page 4: ...4 EXPLODED VIEW 104162 104160 358602 104166 104169 104164 356200 104168 358680 104142 ...

Page 5: ...er However an air filter is not used during the break in process on the HUDY Engine Break In Bench Exhaust System Use a compatible high quality exhaust system when breaking in your engine Be sure to use all gaskets springs and other required mounting hardware Glowplug Starter A glowplug starter is required to ignite the glowplug for starting We recommend using a high quality battery operated glowp...

Page 6: ...iston locking tool is strongly recommended for preventing the crankshaft from turning while installing and tightening the propeller and spinner We recommend using a locking tool from a reputable manufacturer 17mm Wrench A 17mm wrench is required for tightening the spinner on the crankshaft We recommend using tools from reputable manufacturers Electric Drill An electric drill is required to spin th...

Page 7: ...eak in Bench is pre assembled at the factory with the exception of the fuel tank and stands which must be installed before use Attach the two plastic support stands to the base plate using the included flat head screws then attach the fuel tank to the stands using the two button head screws and rubber grommets PLIERS A pair of pliers is required to connect the throttle control rod ball joint to th...

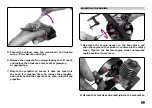
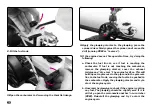
Page 8: ...one onto the crankshaft 3 Slide the propeller support plate onto the crankshaft The small raised ridge on the support plate goes TOWARD the engine NOTE ORIENTATION NOTE ORIENTATION 4 Slide the propeller onto the crankshaft The smooth edge of the propeller goes AWAY from the engine Setting the Engine Mounts 1 Remove the engine mounts from the base plate 2 Attach the engine mounts to the engine usin...

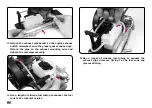
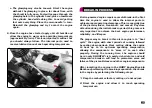
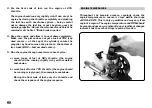
Page 9: ...peller to ensure it does not touch hit the carb If it touches the carb remove the propeller add a shim behind the tapered cone then re install the propeller Mounting the Engine 1 Re attach the engine mounts to the base plate and align the engine so the spinner is centered in the safety cover Tighten the bottom engine mount screws the engine position if necessary 2 Attach the throttle control ball ...

Page 10: ...and springs Attach the pipe to the exhaust mounting wire and tighten the setscrew securely 4 Use a length of silicone fuel tubing to connect the fuel tank to the carburetor inlet 5 Use a length of silicone fuel tubing to connect the exhaust pipe pressure fitting to the fuel tank cap pressure fitting ...

Page 11: ...used during break in on the bench any swirling dirt that gets into the carb may cause internal engine damage All parts securely attached and tightened There will be a lot of vibration when the engine is running Loose parts may become undone and cause personal injury or damage to the engine The engine should be tightly attached to the engine mounts and the engine mounts tightly attached to the benc...

Page 12: ...ead remains too cold during break in this will cause premature engine wear just like an overly rich carb setting during break in Pre heat the engine Before starting the engine for the first time pre heat the engine head with a hairdryer or heat gun This expands the sleeve slightly allows for easier starting and prevents excessive wear that a cold engine is subject to If you use a heat gun use the ...

Page 13: ...ventilated room When running the engine indoor make sure the exhaust gases are directed to outdoors Stay away from exhaust gases at all times Start the engine only using the spinner driver and an electric starting device Keep clear of the safety guard NEVER stick your fingers or anything else through the safety guard Only make engine adjustments when the engine is not running Stop the engine by fu...

Page 14: ...etor If fuel is not reaching the carburetor remove the glowplug starter cover the exhaust tailpipe and dry start the engine for 2sec This will build up extra pressure in the pipe and in the pressure line to the fuel tank causing the fuel to be pushed to the carburetor Apply the glowplug starter and try to start the engine again b Unscrew the glowplug to check if the engine is getting any fuel The ...

Page 15: ...ng clearances This is especially true of the piston cylinder crankshaft and conrod Pay close attention during the initial break in period this process is very important to achieve the best engine performance reliability and lifespan The proper way to break in this nitro engine is to heat cycle the engine with short periods of running followed by cooling down periods Heat cycling allows the engine ...

Page 16: ...move the piston to the bottom of its stroke BDC bottom dead center 5 Run the engine through several more heat cycles a more tanks of fuel at 50 throttle the engine should still be running slightly rich with complete cool downs b more tank of fuel at 70 throttle the engine should be running crisply now then complete cool down During the final tank of fuel vary the throttle and check the crispness o...

Page 17: ... TDC or there could be internal engine damage Note During engine break in it is normal for the engine to be extremely tight and hard to turn when the piston reaches the top of the cylinder Engine is very sluggish hard to start and will not idle during initial break in Thefactorydefaultbreak insettings onthecarburetor may be too rich for your location weather conditions or fuel brand Extremes in te...

Page 18: ...r known as pinch since the cylinder has a tapered fit The fit should not be so tight that then engine cannot be started If the piston gets stuck at TDC use a pair of pliers to grasp the flywheel from the bottom of the engine Rotate the flywheel CCW viewed from the front of the engine until the flywheel turns you should feel the piston become unstuck from the top of the cylinder WARRANTY This produ...

Page 19: ...19 NOTES ...

Page 20: ...HUDY Pred Polom 762 91101 Trencin Slovakia Europe HUDY Pred Polom 762 91101 Trencin Slovakia Europe team hudy net ...

Reviews: