background image

41 

Emergency Call 

You can use your device for emergency calls in the service area. 
The connection, however, cannot be guaranteed in all conditions. 
You should not rely solely on the device for essential 
communications. 
Certification Information (SAR) 

This mobile device meets guidelines for exposure to radio waves. 
Your device is a low-power radio transmitter and receiver. As 
recommended by international guidelines, the device is designed 
not to exceed the limits for exposure to radio waves. These 
guidelines were developed by the independent scientific 
organization International Commission on Non-Ionizing 
Radiation Protection (ICNIRP) and include safety measures 
designed to ensure safety for all users, regardless of age and 
health. 
The Specific Absorption Rate (SAR) is the unit of measurement 
for the amount of radio frequency energy absorbed by the body 
when using a device. The SAR value is determined at the highest 
certified power level in laboratory conditions, but the actual SAR 
level of the device when being operated can be well below the 
value. This is because the device is designed to use the minimum 
power required to reach the network. 
The SAR limit adopted by USA and Canada is 1.6 watts/kilogram 
(W/kg) averaged over one gram of tissue. The highest SAR value 
reported to the FCC and IC for this device type when tested for 
use at the ear is 0.691 W/kg, and when properly worn on the 
body is 0.617 W/kg. 
FCC Statement 

This equipment has been tested and found to comply with the 
limits for a Class B digital device, pursuant to Part 15 of the FCC 
Rules. These limits are designed to provide reasonable protection 
against harmful interference in a residential installation. This 
equipment generates, uses and can radiate radio frequency 

Summary of Contents for U5300

Page 1: ...ering English 10 Smart English Input Method 10 Traditional English Input Method 10 Entering a Digit 11 4 Contacts 12 Adding a Contact 12 Searching for a Contact 12 5 Voice Services 13 Making a Call 13 Dialing via Keypad 13 Dialing via Contacts 13 Dialing via Call Log 13 Answering a Call 13 6 Direct Connect DC and DC Group 15 Making a DC Call 15 Dialing a DC Number 15 Last call notification 16 Maki...

Page 2: ...ting a DC Call to a Voice Call 19 Concurrency 19 Other Operations 21 7 Messaging 23 SMS MMS 23 Writing and Sending a Text Message 23 Reading a Message 23 Email 23 Creating an Email Account 23 Creating and Sending an Email 24 Receiving an Email 24 8 Media Applications 25 Camera 25 Taking a Photo 25 Recording a Video 25 Music Player 25 Starting the Music Player 25 Adding a Playlist 25 Playing music ...

Page 3: ...rowser Options 29 10 Connectivity 30 Connecting via USB 30 Installing PC Suite 30 USB based Internet Access 31 Bluetooth 32 Bluetooth based Data Transfer 32 Using a Bluetooth Headset 32 11 Security 34 Enabling Disabling the Phone Lock 34 PIN and PUK 34 Locking the Keypad 34 Unlocking the Keypad 35 12 Warnings and Precautions 36 ...

Page 4: ......

Page 5: ...tions are approved by respective copyright holders under licenses Trademarks and Permissions HUAWEI and are trademarks or registered trademarks of Huawei Technologies Co Ltd Other trademarks product service and company names mentioned are the property of their respective owners Notice Some features of the product and its accessories described herein rely on the software installed capacities and se...

Page 6: ...mply with all applicable export or import laws and regulations and will obtain all necessary governmental permits and licenses in order to export re export or import the product mentioned in this manual including the software and technical data therein ...

Page 7: ...dio performance please use the headset that was included with your phone 8 9 9 11 12 17 1 2 3 4 6 5 13 14 15 16 7 10 1 Earpiece 2 Screen 3 Confirm key 4 Right soft key 5 Clear back key 6 End Power key 7 Microphone 8 Number key 9 Talk Send key 10 Camera button 11 Left soft key 12 Navigation keys ...

Page 8: ...he phone backlight when user has activated the setting Left soft key Select the option displayed in the lower left corner of the screen Right soft key Select the option displayed in the lower right corner of the screen Clear back key Delete a character in editing mode or delete a selected item in an application Return to the upper level menu key Switch between the general volume mode and the Vibra...

Page 9: ...ired key 2 9 after a phone number is assigned to the number key Confirm key Confirm a selection Navigation key Switch between shortcuts when the standby screen is set to widgets mode Access the corresponding widgets in standby mode when the standby screen is set to Concise mode DC button Make or answer a DC call Camera button Launch the camera Take a photo after the camera is launched ...

Page 10: ...6 Inserting the USIM Card and the Battery 1 2 4 3 1 2 ...

Page 11: ... the charger connector of the phone The phone begins charging When the battery icon changes to fully charged it indicates that your phone is fully charged 3 When the phone is fully charged disconnect the charger from the phone and then from the power outlet Status Icons Signal strength Roaming 2G network available 3G network available Receiving and sending data on a 2G network Receiving and sendin...

Page 12: ...uetooth on Bluetooth searching Data receiving via Bluetooth Low battery Data sending via Bluetooth Charging Battery level Ringing and vibration mode activated Ringing mode activated MicroSD card inserted Silence mode activated Speaker on Headset connected GPS turned on Speaker off DC Group call in progress DC service not available DC call roaming DC call in progress Number type PTT 1 Number type P...

Page 13: ...rt Missed Invitation Missed Alert Incoming Invitation in the call log list Incoming Invitation on the PTT call screen Missed DC Group call Incoming DC Group call Outgoing DC Group call Alert received Originator in a DC Group call To add a member to an ongoing call ...

Page 14: ...to the numeric sequence of key presses 2 Select the desired word and press Confirm key or 0 key to enter the word 3 Press 1 key to enter a full stop or another commonly used punctuation Press key to display the symbol list Then you can select and enter a symbol The indicator of the current input method is displayed in the upper right corner of the screen You can press key to change the input metho...

Page 15: ...ering a Digit In 123 input mode press the key labeled with your desired digit In Abc input mode press a number key consecutively until the digit appears In En input mode press a number key and then press Navigation keys to scroll to the digit and press Confirm key to enter it In any text input mode except the 123 input mode press and hold a number key to enter the digit ...

Page 16: ...e Edit screen enter the information about the contact For each contact at least one number needs to be entered 3 Select Save to save the contact Searching for a Contact 1 Select Menu Contacts 2 Enter the name of the contact in the text box The contacts that comply with the search information you entered will be displayed ...

Page 17: ...ly to insert W and then enter the extension number 2 Press Send key to dial the number 3 Press End key or select End to end the call Dialing via Contacts Select Menu Contacts select a contact and press Send key to make a call Dialing via Call Log Select Menu Call log or press Send key to select the desired number from the call log Then press Send key to dial the number Answering a Call When there ...

Page 18: ...14 If the Headset auto answer function is enabled when the headset is connected to the phone the incoming call is answered automatically ...

Page 19: ...eparate all the three parts with an asterisk A DC number contains a maximum of 15 characters including asterisks and the number of digits in each part of a DC number may vary for example 000 00000 00000 and 99 99999 999999 You must have all 3 parts when calling iDEN or 3G users 1 In standby mode enter a DC number directly by using the number pad 2 Push and hold the DC button on the left side of yo...

Page 20: ...of time Pushing the DC button from the last call screen will attempt a restart of the last call indicated Making a DC call from Contacts Select Menu Contacts Select a contact with a DC number and push the DC button to start a DC call Making a DC call from the Call Log Select Menu Call log or press the Send key to select the desired number from the DC calls log Then push the DC button to start the ...

Page 21: ...o create a DC Group Select Menu Contacts Select Create New Create DC Group or press the left soft key to select Options Create DC Group to create a DC Group In standby mode press Send key or select Menu Call log to access the call log Press the left soft key to select Options Create DC Group to create a DC Group If you want to delete a member from a DC Group select Contacts Open Then highlight a m...

Page 22: ...lowing to add members to the call Select Option Add Member to select members from Contacts or Call log or directly enter DC numbers on the Enter number screen Then press the left soft key to select Done An invitation will be sent to the desired members Joining a DC Call After it has Started If a DC Group call has ended when you receive the invitation after you select Join by pressing the left soft...

Page 23: ...is moment press the right soft key to select Reject press the confirm key to select Accept press the left soft key to select Option and then Accept or Reject Receiving a DC Call During a Voice Call When you receive a DC call during a voice call the phone displays Missed DC call From xxxxxxxx At this moment press the right soft key to select Ignore and continue with the voice call press the left so...

Page 24: ...isplays Incoming Alert From xxxxxxxx At this moment press the right soft key to select Ignore and continue with the voice call press the left soft key to select Hold and the phone will display Push DC button to call xxxxxxxx Then you can do the following Press the right soft key to select Cancel Then press the Send key to return to the voice call screen Press the left soft key to select Alert An a...

Page 25: ... the list of DC Contacts stored on your phone Exiting a DC Group Call I initiated Select one of the following settings to allow the call to continue when you exit a DC Group call you initiated Allow call to continue End call for everyone Add Member to ongoing call Select one of the following to allow a member to add a contact to a Direct Connect or DC Group Call you initiated Allow call to continu...

Page 26: ...t Connect call to you Alert timeout Set the length of time you want the Alert ringtone to repeat Invitation timeout Set the length of time you want the Invitation ringtone to repeat DC button backlight Select whether you want to turn on the Direct Connect button light on incoming DC events ...

Page 27: ...Send to send the message Your phone supports a multimedia message of a maximum size of 600 KB Reading a Message To read a text message stored in the inbox do the following 1 Select Menu Messages Inbox 2 Press Navigation keys to scroll to a message Press Confirm key to read the message Email Creating an Email Account Before sending or receiving emails you need to create an email account When you op...

Page 28: ...nly Creating and Sending an Email 1 Select Email and then select an account 2 Select Create to create an email 3 Enter the recipient s email address subject and contents in the corresponding text box 4 In the email editing screen select Options Send to send the email Receiving an Email 1 Select Menu Email Get new emails 2 In the email inbox select Options and then select Download Only the email he...

Page 29: ...ing a Video 1 Select Menu Camera Options Shooting mode to switch to the video camera 2 In the viewfinder screen select Options for the camera settings 3 Press Confirm key or camera button to start recording Select Pause Continue to pause or continue Select Stop to stop recording The video is automatically saved to the Videos folder of the storage that you select Music Player Starting the Music Pla...

Page 30: ...ind the song Press Up navigation key to access the current playlist Press Down navigation key to access the media library Press Volume key to increase or decrease the volume Select Options Exit or the End key to exit the media player When a song is played you can select Minimize to minimize the media player screen In this case the media player is running in the background Playing a Video 1 In stan...

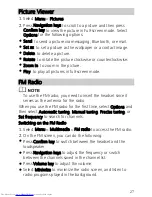
Page 31: ...use the FM radio you need to insert the headset since it serves as the antenna for the radio When you use the FM radio for the first time select Options and then select Automatic tuning Manual tuning Precise tuning or Set frequency to search for channels Switching on the FM Radio 1 Select Menu Multimedia FM radio to access the FM radio 2 On the FM screen you can do the following Press Confirm key ...

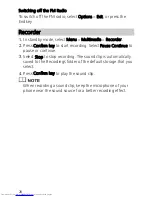
Page 32: ... Confirm key to start recording Select Pause Continue to pause or continue 3 Select Stop to stop recording The sound clip is automatically saved to the Recordings folder of the default storage that you select 4 Press Confirm key to play the sound clip When recording a sound clip keep the microphone of your phone near the sound source for a better recording effect ...

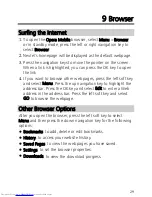
Page 33: ...es press the left soft key and select Menu Press the up navigation key to highlight the address bar Press the OK key and select Edit to enter a Web address in the address bar Press the left soft key and select GO to browse the webpage Other Browser Options After you open the browser press the left soft key to select Menu and then press the down navigation key for the following options Bookmarks to...

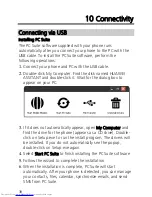
Page 34: ...g box to appear on your PC 3 If it does not automatically appear open My Computer and find the drive for the phone appears as a CD drive Double click on Setup exe to run the install program The drivers will be installed If you do not automatically see the popup double click on Setup exe again 4 Select Start PC Suite to finish installing the PC Suite software 5 Follow the wizard to complete the ins...

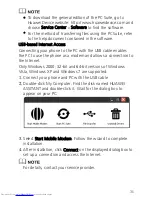
Page 35: ...o use the phone as a modem and allows a connection to the Internet Only Windows 2000 32 bit and 64 bit versions of Windows Vista Windows XP and Windows 7 are supported 1 Connect your phone and PC with the USB cable 2 Double click My Computer Find the disk named HUAWEI ASSITANT and double click it Wait for the dialog box to appear on your PC 3 Select Start Mobile Modem Follow the wizard to complete...

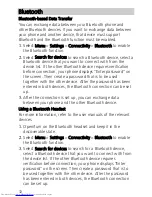
Page 36: ...ce After the password has been entered in both devices the Bluetooth connection can be set up 3 After the connection is set up you can exchange data between your phone and the other Bluetooth device Using a Bluetooth Headset For more information refer to the user manuals of the relevant devices 1 Open turn on the Bluetooth headset and keep it in the discoverable state 2 Select Menu Settings Connec...

Page 37: ...33 4 After the connection is set up you can use the Bluetooth headset ...

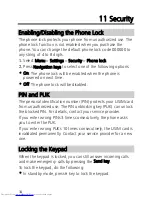
Page 38: ...one lock will be disabled PIN and PUK The personal identification number PIN protects your USIM card from unauthorized use The PIN unblocking key PUK can unlock the blocked PIN For details contact your service provider If you enter wrong PINs 3 times consecutively the phone asks you to enter the PUK If you enter wrong PUKs 10 times consecutively the USIM card is invalidated permanently Contact you...

Page 39: ...t Menu Settings Phone Auto keypad lock On the keypad is automatically locked after the phone is idle for 30 seconds Unlocking the Keypad In standby mode Press the left soft keyand then right soft key to unlock the keypad ...

Page 40: ... a device and a pacemaker to prevent potential interference with the pacemaker If you are using a pacemaker use the device on the opposite side of the pacemaker and do not carry the device in your front pocket Potentially Explosive Atmosphere Power off your device in any area with a potentially explosive atmosphere and comply with all signs and instructions Areas that may have potentially explosiv...

Page 41: ... is to drive safely Do not talk on the device while driving Use hands free accessories When you have to make or answer a call park the vehicle at the roadside before using your device RF signals may affect electronic systems of motor vehicles For more information consult the vehicle manufacturer In a motor vehicle do not place the device over the air bag or in the air bag deployment area Otherwise...

Page 42: ...mbient temperature between 0 C to 40 C for using the device powered by a battery Prevention of Hearing Damage Using a headset at high volume can damage your hearing To reduce the risk of damage to hearing lower the headset volume to a safe and comfortable level Safety of Children Comply with all precautions with regard to children s safety Letting the child play with your device or its accessories...

Page 43: ...der the battery poles Otherwise it may lead to electrolyte leakage overheating fire or explosion If battery electrolyte leaks out ensure that the electrolyte does not touch your skin and eyes If the electrolyte touches your skin or splashes into your eyes wash your eyes with clean water immediately and consult a doctor If there is a case of battery deformation color change or abnormal heating whil...

Page 44: ...arger in a place with an extreme high or low temperature Otherwise they may not function properly and may lead to a fire or an explosion When the temperature is lower than 0 C performance of the battery is affected Do not place sharp metal objects such as pins near the earpiece The earpiece may attract these objects and hurt you when you are using the device Before you clean or maintain the device...

Page 45: ...e unit of measurement for the amount of radio frequency energy absorbed by the body when using a device The SAR value is determined at the highest certified power level in laboratory conditions but the actual SAR level of the device when being operated can be well below the value This is because the device is designed to use the minimum power required to reach the network The SAR limit adopted by ...

Page 46: ...relocate the receiving antenna Increase the separation between the equipment and receiver Connect the equipment into an outlet on a circuit different from that to which the receiver is connected Consult the dealer or an experienced radio TV technician for help This device complies with Part 15 of the FCC Rules Operation is subject to the following two conditions 1 this device may not cause harmful...

Reviews: