8
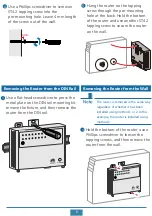
Removing the Router from the Wall
Hold the bottom of the router, use a
Phillips screwdriver to loosen the
tapping screws, and then remove the
router from the wall.
1
The router is removed in the same way
regardless of whether it has been
installed using method 1 or 2. In this
example, the router is installed using
method 1.
Use a Phillips screwdriver to screw an
ST4.2 tapping screw into the
pre-mounting hole. Leave 4 mm length
of the screw out of the wall.
4
Hang the router on the tapping
screw through the pre-mounting
hole at the back. Hold the bottom
of the router and use another ST4.2
tapping screw to secure the router
on the wall.
5
Removing the Router from the DIN Rail
Use a flat-head screwdriver to press the
metal plate on the DIN rail mounting kit,
remove the fixture, and then remove the
router from the DIN rail.
1
Note
Schindler
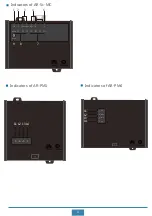
PWR
FXS
RS232-0 RS232-1
CAN-0
CAN-1
SIGNAL
DI
Eth0/WAN
BLE/RST
Eth1
Eth2
Eth3
CIL1
CIL2
CIL3
CIL4
Schindler
PWR
FXS
RS232-0
RS232-1
CAN-0
CAN-1
SIGNAL
DI
Eth0/WAN
BLE/RST
Eth1
Eth2
Eth3
CIL1
CIL2
CIL3
CIL4
4mm


