background image

420010970304 - LP-700 Rev. 000 Rel. 002 Date 4.21.21

75

D. System Water Fill, Purge, and Test

WARNING

!

Ensure the boiler is full of water before firing the burner. Failure to do 

so will damage the boiler. Such damage IS NOT covered by warranty, 

and could result in property damage, severe personal injury, or death.

The boiler and heating system must 

be thoroughly purged of air during 

the initial installation or system 

maintenance. Proceed as follows to 

purge the boiler and heating system:

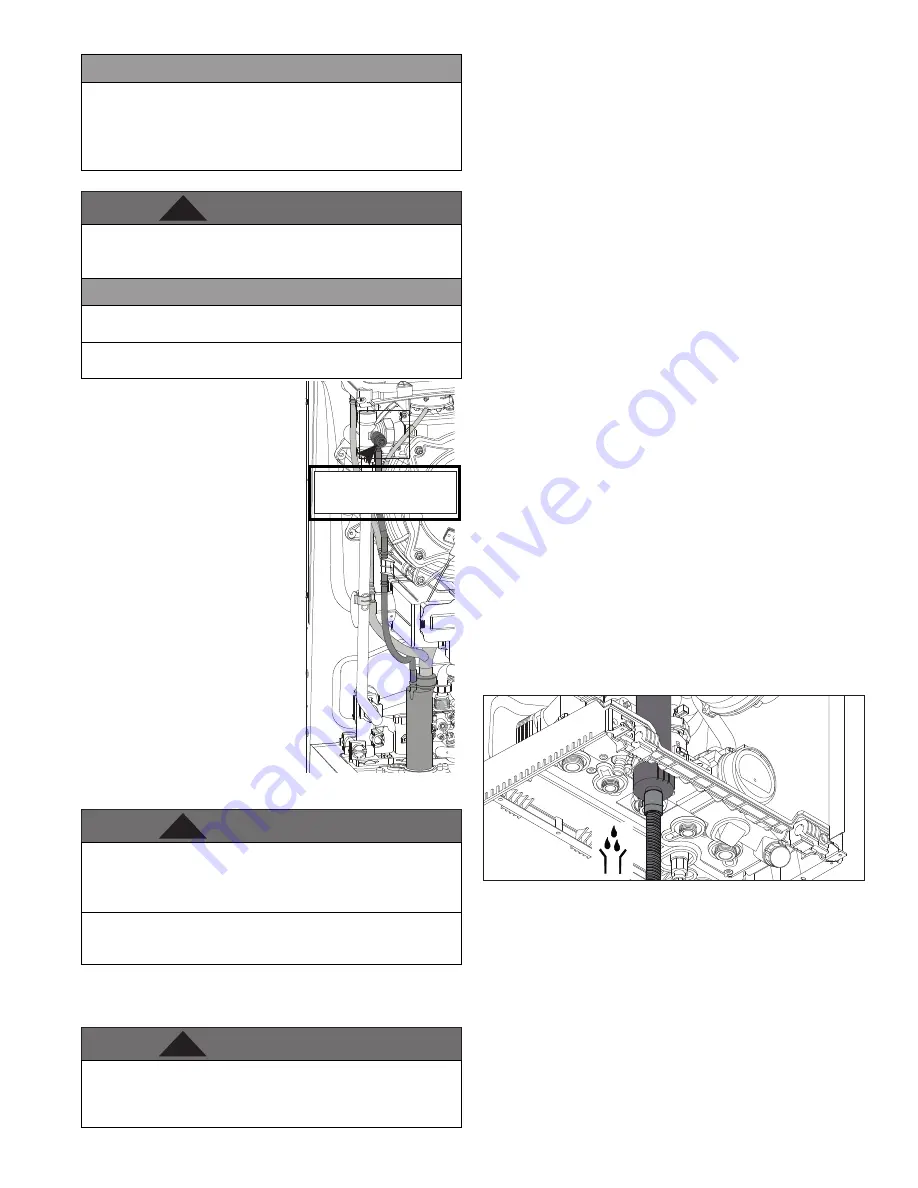
1. Open the manual air vent 


positioned on the side of the primary 

exchanger. The valve is already 

connected to a discharge hose routed 

to the condensate trap.

2. Lift the cap on the automatic air 

release valve on the pump. Leave 

open permanently.

3. Gradually open the main water 

valve until water flows. Do not open 

fully.

4. Thoroughly purge each zone 

starting with the lowest point and 

close them only when clear water free 

of air is visible.

5. Close the manual air vent when 

clear water free of air is visible.

6. Continue filling the system until at 

least 12 psi registers on the pressure 

gauge.

WARNING

!

Eliminate all system leaks. Continual fresh make-up water will 

reduce boiler life. Minerals can build up in the heat exchanger, 

reducing heat transfer, overheating the heat exchanger and 

causing heat exchanger failure.

It is important to purge the system of air to avoid damage to the 

boiler.

CAUTION

Connect the condensate discharge pipe before filling and purging 

the heating circuit.

Figure 86 - Manual Air Vent 

Position

Check if the condensate trap contains water. If not, it must be refilled. 

Open the manual air vent on the main exchanger until completely 

filled. Check the system pressure on the pressure gauge again.

F. Check Thermostat Circuit(s)

1. Disconnect the two external wires connected to the boiler 

thermostat terminals TT1/TT2 (low voltage terminal strip).

2. Connect a voltmeter across these two incoming wires with power 

supplied to the thermostat circuits. Close each thermostat, zone 

valve and relay in the external circuit one at a time and check the 

voltmeter reading across the incoming wires.

3. There should NEVER be a voltage reading.

4. If a voltage reading does occur under any condition, check and 

correct the external wiring. (This is a common problem when using 

3-wire zone valves.)

5. Once the external thermostat circuit wiring is checked and 

corrected if necessary, reconnect the external thermostat circuit 

wires to the boiler low voltage terminal strip. Allow the boiler to 

cycle.

E. Purge Air from DHW System

WARNING

!

Ensure the boiler is full of water before firing the burner. Failure 

to do so will damage the boiler. Such damage IS NOT covered by 

warranty, and could result in property damage, severe personal 

injury, or death.

1. Make sure the CH and DHW lines are open and full of water. Turn 

on all electric power to boiler.

2. Open hot water faucets in the DHW system. Start with the faucets 

nearest the boiler.

3. Keep faucets open until water runs freely and all air is purged. Then 

move on to faucets further away from the boiler in the system.

4. When water flows freely from all hot water faucets, DHW purging 

is complete.

G. Condensate Removal

1. The boiler is a high efficiency condensing appliance. Therefore, 

the unit has a condensate drain. Condensate fluid is nothing more 

than water vapor, derived from combustion products, similar to that 

produced by an automobile when it is initially started.

Condensation is slightly acidic (typically with a pH of 3 to 5) and 

must be piped with the correct materials. Never pipe the condensate 

using steel, copper, brass or other materials that will be subject to 

corrosion. Plastic PVC or CPVC pipe are the only approved materials.

A condensate neutralizer, if required by local authorities, can be made 

up of lime crystals, marble or phosphate chips that will neutralize the 

condensate. This may be done by the installer or you may purchase a 

condensate neutralizer from HTP (7450P-212). 

2. The boiler is equipped with a barbed outlet fitting, to which the 

supplied hose must be installed and routed to a local drain. It is very 

important that the condensate line is sloped downward away from 

the boiler to a suitable indoor drain.

Figure 87 - Condensate Discharge

If the condensate outlet on the boiler is lower than the drain, you 

must use a condensate removal pump, available from HTP (554200). 

This pump is equipped with two leads that can be connected to 

an alarm or another type of warning device to alert the user of a 

condensate overflow, which, if not corrected, could cause property 

damage.

3. If a long horizontal run is used, it may be necessary to create a vent 

in the horizontal run to prevent a vacuum lock in the condensate 

line.

4. Do not expose the condensate to freezing temperatures.

5. It is very important you support the condensation line to assure 

proper drainage.

It is highly recommended to carefully follow the glycol manufacturer’s 

recommended concentrations, expansion requirements, and 

maintenance recommendations (pH additive breakdown, inhibitor 

reduction, etc.) You must carefully calculate the additional friction 

loss in the system as well as the reduction in heat transfer coefficients.

CAUTION

Boiler Manual Air 

Vent

Summary of Contents for ELU Series

Page 1: ... FUTURE REFERENCE 272 Duchaine Blvd New Bedford MA 02745 www htproducts com LP 700 Rev 000 Rel 002 Date 4 21 21 WARNING Improper installation adjustment alteration service or maintenance could void product warranty and cause property damage severe personal injury or death California Proposition 65 Warning This product contains chemicals known to the State of California to cause cancer birth defect...

Page 2: ...ny appliance Do not touch any electrical switch do not use any phone in your building Immediately call your gas supplier from a neighbor s phone Follow the gas supplier s instructions If you cannot reach your gas supplier call the fire department Installation and service must be provided by a qualified installer service agency or the gas supplier Improper installation adjustment alteration service...

Page 3: ...utility company requirements In the absence of local codes preference should be given to the National Fuel Gas Code ANSI Z223 1 in the United States and the Natural Gas and Propane Installation Code B149 1 in Canada latest versions Installations Must Comply With Local state provincial and national codes laws regulations and ordinances In the United States The latest version of the National Fuel Ga...

Page 4: ...on Act HTP has provided this boiler with multiple features designed to save energy by reducing the boiler water temperature as heating load decreases These features include A modulating combustion system that adjusts firing rate based on heat demand Adjustment of boiler set point based on inferred heat load as determined by an outdoor sensor The outdoor sensor is supplied with this boiler This boi...

Page 5: ...ents CO levels must be monitored using a calibrated combustion analyzer such that a CO level of no more than 150 ppm is exceeded at any time during operation Part 6 Installing the Condensate Drain 48 Part 7 Connecting Electrical Service 50 A Wiring 50 1 Removing the Power Cord To Hard Wire the Boiler 50 2 Connecting Power 120V for DHW and CH Circulators 51 3 Low Voltage Wiring Connections 51 4 Roo...

Page 6: ... shut off until the problem is repaired by a qualified technician After installation all appliance safety devices should be tested Theboileriscertifiedforindoorinstallationsonly Theboilerconsists of gas ignition system components which must be protected from water dripping spraying etc during operation and service Carefully consider installation location and the placement of critical components ci...

Page 7: ...Hardness Specifications Contaminant Maximum Allowable Level Total Hardness Below 140o F water temperature 200 mg l 12 grains gallon Total Hardness Above 140o F water temperature 120 mg l 7 grains gallon CH and DHW Loop Water Quality Specifications Contaminant Maximum Allowable Level Aluminum 0 05 to 0 2 mg l or PPM Chloride 100 mg l or PPM Copper 1 mg l or PPM Iron 0 3 mg l or PPM Manganese 0 05 m...

Page 8: ...ition Events Time The water temperature detected by probes NTC1 or NTC2 ranges between 39oF 4oC and 46oF 8oC The internal pump operates at high speed The 3 Way Valve alternately switches positions 1 minute on heating mode to 1 minute on DHW mode The display shows the icon Until the NTC1 and NTC2 temperature is greater than or equal to 46 F 8 C If after 20 minutes the conditions described in Stage ...

Page 9: ...Installation Start Up Maintenance Parts Warranty DANGER steps in the given order Failure to do so could result in substantial property damage severe personal injury or death NOTICE The manufacturer reserves the right to make product changes or updates without notice and will not be held liable for typographical errors in literature NOTE TO CONSUMER PLEASE KEEP ALL INSTRUCTIONS FOR FUTURE REFERENCE...

Page 10: ...l of the multiple boilers in an installation to minimize downtime and maximize efficiency The cascade system works by establishing one boiler as the master and the other connected boilers as followers The master boiler requires a sensor to provide feedback on set point temperature in order to adjust heating input from the connected boilers Each cascaded boiler will have its own pump to provide max...

Page 11: ...warranty Failure to install the boiler indoors could result in property damage severe personal injury or death A Locating the Boiler Incorrect ambient conditions can lead to damage to the heating system and put safe operation at risk Ensure that the installation location adheres to the information included in this manual Failure to do so could result in property damage serious personal injury or d...

Page 12: ...er If the boiler is located in an installation location with limited clearances it may be necessary to remove the boiler from the space to perform maintenance Failure to consider maintenance when determining installation location could result in property damage CAUTION WARNING Do not introduce toxic chemicals such as antifreeze or appliance treatments into any piping meant for potable water purpos...

Page 13: ...rop the boiler which could damage the boiler and cause property damage and or severe personal injury Verify that the boiler is properly and securely mounted before leaving unsupervised Failure to comply with the above and properly mount the boiler could result in substantial property damage severe personal injury or death E Wall Mounting Instructions 1 Mounting to a concrete wall STU D STU D Ply w...

Page 14: ...ick Us e at least fourteen 14 1 2 x 3 3 16 x 3 roun d he ad tapp ing screws to secu re the plyw oo d bo ard to the stud de d wall Po sit ionthepa pe rtemplateon theco nc rete wallto locate thepo sit ions of theha ng ingbracke tan dpiping bracke t Dr ill an d plug the wall an d secu re the ha ng ing bracke t us ing the screws prov ided fish er S 10 x5 0 En su re the ha ng ing bracke t is leve l Se ...

Page 15: ...ilating air NOTE To prevent combustion air contamination see Table 7 Combustion air from the indoor space can be used if the space has adequate area or when air is provided through a duct or louver to supply sufficient combustion air based on the boiler input Never obstruct the supply of combustion air to the boiler If the boiler is installed in areas where indoor air is contaminated see Table 7 i...

Page 16: ...etermine if there is blockage leakage corrosion or other deficiencies that could cause an unsafe condition 3 If practical close all building doors windows and doors between the space in which the boiler remains connected to the common venting system and other spaces in the building Turn on clothes dryers and any appliances not connected to the common venting system Turn on any exhaust fans such as...

Page 17: ...terials3 PVC CPVC PP Stainless Steel Shipping Weight lbs 78 84 83 84 Gas Supply Pressure NG 3 5 to 10 5 WC LP 8 to 13 WC Power Supply 120V 60 Hz less than 12A General Operating Conditions Ambient Temperature Range 33 104o F 0 6 40o C Product Approvals and Requirements ANSI Z21 13 CSA 4 9 Ignition System Direct Electronic Spark Ignition Flame Rectification Burner System Premixed Fuel Modulation Sta...

Page 18: ...6 2 5 8 67mm 2 5 8 13 1 mm 1 2 9 7 16 239 75 mm 8 15 16 226 65 mm 1108 15 mm 43 5 8 745 mm 29 5 16 A B C D E F Model ELU85WBN ELU120WBN Model ELU120WCN ELU150WCN A Central Heating Supply 1 A Central Heating Supply 1 B Return from Indirect Water Heater 3 4 B Domestic Hot Water Outlet 3 4 C Gas Inlet 3 4 C Gas Inlet 3 4 D Domestic Hot Water Inlet Not Used D Domestic Hot Water Inlet 3 4 E Central Hea...

Page 19: ...ame detection electrode 8 Silencer 9 Junction box 11 Condensate trap 12 Gas valve 13 Control panel 14 CH circuit filter 26 ELU85WBN ELU120WBN Figure 11 Boiler Component Locations and Descriptions 15 Circulation Pump with auto air vent 17 Water pressure switch 18 Modulating Fan 19 Boiler inlet temperature sensor 20 Frame 21 Ignition electrode 22 Spark generator 23 Combustion Analysis Test Point 24 ...

Page 20: ...me detection electrode 8 Silencer 9 Junction box 10 DHW heat exchanger 11 Condensate trap 12 Gas valve 13 Control panel 14 CH circuit filter 15 Circulation Pump with auto air vent 16 DHW Flow switch 17 Water pressure switch 18 Modulating Fan 19 Boiler inlet temperature sensor 20 Frame 21 Ignition electrode 22 Spark generator 23 Combustion Analysis Test Point 24 Air intake connection 25 Exhaust ven...

Page 21: ...detection electrode 8 Silencer 9 Junction box 10 DHW heat exchanger 11 Condensate trap 12 Gas valve 13 Control panel 14 CH circuit filter 15 Circulation Pump with auto air vent 16 DHW Flow switch 17 Water pressure switch 18 Modulating Fan 19 Boiler inlet temperature sensor 20 Frame 21 Ignition electrode 22 Spark generator 23 Combustion Analysis Test Point 24 Air intake connection 25 Exhaust vent c...

Page 22: ...de low water protection by sensing the water level in the heat exchanger Some codes jurisdictions may require additional external controls Do not apply a torch within 12 of the boiler If sweat connections are used sweat tubing to the adapter before fitting adapter to the water connections on the boiler Damages due to improper installation practices ARE NOT covered by warranty B Backflow Preventer ...

Page 23: ...upply 1 B DHW Outlet 3 4 C Gas Inlet 3 4 D DHW Inlet 3 4 E CH Return 1 I Condensate Discharge L Drain Valve A CH Supply 1 B Return from Indirect Water Heater 3 4 C Gas Inlet 3 4 D Not Used E CH Return 1 I Condensate Discharge L Drain Valve ELU120WCN ELU150WCN ELU85WBN ELU120WBN Figure 14 Water Gas Connections I L A B E C 20 0 250 100 150 50 200 20 0 80 60 40 psi I L A B D E C 20 0 250 100 150 50 2...

Page 24: ...es This boiler has a high temperature shut off switch built in as a standard safety feature Therefore a pressure only relief valve is required DO NOT operate this appliance before the supplied pressure relief valve is installed with sufficient relieving capacity in accordance with the ASME rating plate on the appliance The pressure relief valve must be installed with the provided adaptor pipe in t...

Page 25: ...te correctly replace it with a new relief valve The relief valve capacity must exceed the BTU H input capacity of the boiler Radiant heating For appliances with underfloor heating it is possible but not necessary to fit a safety thermostat onto the radiant heating outlet If the thermostat cannot be installed the radiant heating equipment must be protected by a thermostatic valve or by a by pass to...

Page 26: ...lone are not an acceptable substitute for a micro bubble air elimination device Here are a few examples of acceptable devices Spirovent TACO 4900 Series Caleffi Discal ThisboilerisprovidedwithafactoryinstalledWaterPressureSwitch Inthe event water pressure drops below 7 PSI the control will go to a blocking error FILL 108 inhibiting burner operation However a low water cut off may be required by lo...

Page 27: ...ter and CH piping should be 1 in diameter 5 Circulators are shown with isolation flanges The alternative is standard flanges with full port ball valves Purge valves can be used with circulator flanges as an alternative 6 Piping shown is Primary Secondary 7 Install a minimum of 12 diameters of straight pipe upstream of all circulators 8 VERY IMPORTANT Minimum flow rates outlined in this manual 2 gp...

Page 28: ...Contacts in the zone valves provide a signal to the boiler to operate when there is a call for heat 7 Unit is equipped with built in primary pump for the heating loop This pump is sized to ensure proper flow rate through the boiler heat exchanger and related piping 8 IWH Applications a mixing valve is recommended if the DHW temperature is set above the factory setting of 119o F 9 In direct not pri...

Page 29: ...and CH piping should be 1 in diameter 5 Circulators are shown with isolation flanges The alternative is standard flanges with full port ball valves Purge valves can be used with circulator flanges as an alternative 6 Piping shown is Primary Secondary and is mandatory 7 Install a minimum of 12 diameters of straight pipe upstream of all circulators 8 VERY IMPORTANT Minimum flow rates outlined in thi...

Page 30: ...for all equipment and detailing required by local codes 2 All closely spaced tees shall be within 4 pipe diameters center to center spacing 3 A minimum of 6 pipe diameters of straight pipe shall be installed upstream and downstream of all closely spaced tees 4 The minimum pipe size of DHW piping should be diameter and CH piping should be 1 in diameter 5 Circulators are shown with isolation flanges...

Page 31: ...PORTANT Minimum flow rates outlined in this manual 2 gpm must be maintained through the heat exchanger to minimize short cycling 6 In a valve based system each heating zone has a zone valve which opens when that zone calls for heat Each zone thermostat is wired to its corresponding zone valve Contacts in the zone valves provide a signal to the boiler to operate when there is a call for heat 7 Unit...

Page 32: ...show system piping concept only Installer is responsible for all equipment and detailing required by local codes 2 All closely spaced tees shall be within 4 pipe diameters center to center spacing 3 A minimum of 6 pipe diameters of straight pipe shall be installed upstream and downstream of all closely spaced tees 4 The minimum pipe size of DHW piping should be diameter and CH piping should be 1 i...

Page 33: ...s to 18 Example 1 Parameter 2 7 5 131 F increasing phase from 77 F to 131 F 6 days stays at 131 F for 6 days decreasing phase from 131 F to 77 F 6 days Example 2 Parameter 2 7 5 140 F increasing phase from 77 F to 140 F 7 days stays at 140 F for 4 days decreasing phase from 140 F to 77 F 7 days 3 0 10 20 30 40 50 60 0 1 2 3 4 5 6 7 8 9 10 11 12 13 14 Jours Fonction chauffage 7 jours Durcissement c...

Page 34: ...personal injury or death DANGER Due to the extreme flammability of most glues cements solvents and primers used to join plastic exhaust vent and intake pipes explosive solvent vapors must be cleared from all vent piping before start up Avoid using excess cement or primer as this may pool in the vent pipes Vent assemblies should be allowed to cure for a period of at least 8 hours before powering a ...

Page 35: ...haust venting systems is prohibited Covering non metallic vent pipe and fittings with thermal insulation is prohibited The boiler s vent and air intake connections are designed to accept 2 PVC CPVC and Polypropylene directly DO NOT insert PVC piping into the boiler s exhaust connection When venting with PVC insert the factory supplied 5 5 length of CPVC before transitioning to PVC When installing ...

Page 36: ...oor that may be opened Direct Vent 1 foot 3 feet 91 cm Power Vent 4 ft below or to side of opening 1 ft above opening C Clearance to permanently closed window D Vertical clearance to ventilated soffit located above the terminal within a horizontal distance 2 feet 61 cm from the center line of the terminal E Clearance to unventilated soffit F Clearance to outside corner G Clearance to inside corner...

Page 37: ...aust vent pipe run must not exceed one hundred 100 feet in 2 pipe or one hundred fifty 150 feet in 3 pipe Figure 30 Correct Installation into the Appliance Collar When venting with PVC first install the included 5 5 length of 2 CPVC into the boiler s exhaust connection then adapt to PVC using approved CPVC to PVC transition cement Installing PVC pipe into the boiler s exhaust connection is strictl...

Page 38: ...the boiler not less than per foot to allow condensate to drain from the vent pipe 11 The exhaust vent must terminate where vapors cannot make accidental contact with people or pets or damage shrubs or plants 12 In vacant chimney applications install and seal a rain cap over existing chimney openings 13 All piping must be fully supported Use pipe hangers at a minimum of 4 foot intervals to prevent ...

Page 39: ...er However for piping with a diameter exceeding two inches said lettering does not need to be larger than two inches The following table lists optional exhaust intake terminations available from HTP Description Stock Code 3 PVC Concentric Termination Kit KGAVT0601CVT 3 Stainless Steel Termination Kit V1000 3 Polypro Vent Kit 8400P 001 Table 16 Optional Vent Kits Description Vent Size Supplier Part...

Page 40: ... Exhaust and Intake If installing a direct vent option combustion air must be drawn from the outdoors directly into the boiler intake and exhaust must terminate outside There are three basic direct vent options detailed in this manual 1 Side Wall Venting 2 Roof Venting and 3 Unbalanced Venting Be sure to locate the boiler such that the exhaust vent and intake pipe can be routed through the buildin...

Page 41: ...mination Low Profile Termination Exhaust must terminate a minimum of 18 above the air intake termination See Figure 39 for more details WARNING 3 IPEX Low Profile Termination illustrated See Figure 40 for more details WARNING Concentric Termination 3 IPEX Low Profile Termination illustrated See Figure 41 for more details WARNING 3 Duravent Innoflue Concentric Termination illustrated See Figure 42 ...

Page 42: ... with termination kit for complete installation instructions WARNING Concentric Termination Refer to documentation included with termination kit for complete installation instructions WARNING Refer to documentation included with termination kit for complete installation instructions WARNING Figure 41 Sidewall Concentric Termination with Optional IPEX kit Figure 42 Sidewall Concentric Termination w...

Page 43: ...m 12 30 5 mm plus snow allowance above grade Air Inlet Figure 44 Venting Below Grade For installations that exit the wall below grade 1 Excavate the site to a point where the pipes are to exit as shown in Figure 44 2 Ensure the wall is fully sealed where the pipes penetrate 3 The exhaust vent air intake piping MUST be secured to the side of the building above grade as shown to provide rigidity 4 E...

Page 44: ...ermination Roof Exhaust Sidewall Intake Exhaust must terminate a minimum of 18 above the air intake termination See Figure 50 for more details WARNING Exhaust must terminate a minimum of 12 above snow level See Figure 51 for more details WARNING Concentric Termination 3 Polypro Innoflue Concentric Termination illustrated See Figure 52 for more details WARNING 3 IPEX Concentric Termination illustra...

Page 45: ...mination Figure illustrates two options for exhaust termination only Neither vent pipe illustrated is intended for combustion air intake WARNING Concentric Termination Refer to documentation included with termination kit for complete installation instructions WARNING Refer to documentation included with termination kit for complete installation instructions WARNING Figure 52 Sidewall Concentric Te...

Page 46: ...ocal codes before installing through an existing opening could result in property damage and add significantly to installation costs CAUTION If an existing venting system is converted for use with this boiler the installer must ensure that the existing venting system is clean and free from particulate contamination that could damage the boiler Failure to do so could result in property damage and b...

Page 47: ...ectly from the outdoors into the boiler intake connection Unconfined space is space with volume greater than 50 cubic feet per 1 000 Btu hour 4 8 cubic meters per kW of the total input rating of all fuel burning appliances installed in that space Rooms connected directly to this space through openings not furnished with doors are considered part of the space Confined space is space with volume les...

Page 48: ...imestone or neutralizing agent will be required The rate of depletion of the limestone varies with usage of the boiler During the first year of boiler operation check the neutralizer every few months for depletion 9 Route the drain line to a nearby floor drain laundry tub or condensate pump If the boiler condensate outlet is lower than the drain you must use a condensate removal pump kit p n 55420...

Page 49: ...east per foot to properly drain If this cannot be done or a very long length of condensate hose is used increase the condensate line to a minimum of 1 ID and place a tee in the line after the condensate neutralizer to properly reduce vacuum lock in the drain line 2 PVC or CPVC pipe should be the only material used for condensate line Steel brass copper and other metals will be subject to corrosion...

Page 50: ... can cause improper and dangerous operation Failure to follow these instructions may result in property damage or personal injury Figure 59 Proper Grounding 1 This boiler must be properly grounded Ensure the electrical receptacle is properly grounded Do not remove the grounding prong from the boiler plug 2 Do not attach the ground wire to either the gas or water piping 3 The wiring diagrams in thi...

Page 51: ...junction box 1 Shut off the power supply at the boiler and at the circuit breaker 2 Shut off the gas at the manual shutoff 3 Remove the boiler front cover 4 Disconnect the three clips and open the junction box 5 Insert the circulator power cable through the hole in the side panel use an appropriate strain relief conduit hub to secure the cable to the side panel 6 Connect the cable on the connector...

Page 52: ...re that the wires are well connected and not subject to stress when the control panel or cabinet cover are closed 5 Outdoor Sensor Connections Connector OD on PCB Outdoor Sensor Figure 67 Outdoor Sensor Connection NOTE WHEN CONNECTING THE BOILER TO EXTERNAL CONTROLS DO NOT RUN 120V CABLES AND CABLES FOR CONTROL CIRCUITS WHICH ARE LOWVOLTAGE TOGETHER USE SEPARATE CABLESTO PREVENT INDUCEDVOLTAGE ONT...

Page 53: ... OFF MODE OK ESC RESET Bk Bl Bl Rd Wh Bl Bl Rd Rd Br Br Gry Gry Bl Bk Bl Bk Bk Bk Rd Rd Wh Br Br Br Br Br Wh Br Bl Br Detection electrode C H Pump EBUS 2 TT2 TT1 System sensor Tank sensor Outdoor sensor Boiler Pump Igniter Gas valve Fan Diverter valve Water pressure switch D H W Flow switch Air pressure switch Flue temp probe Return temp probe Outlet temp probe N N FUSE 5AT FUSE 5AT L N DHW PUMP P...

Page 54: ...4 Vdc H FAN CIRCUIT Ebus G G HOT SMPS C A COMMUNICATION A NEUTRAL filtered 3 WAY VALVE HOT filterd N Safety Ground H HMI G G D C B A 3 WAY VALVE CIRCUIT uP C Nf HMI B FLUE RETURN SENSORS CIRCUIT OUT1 TANK DHW SYSTEM OUT2 OUTDOOR C A Nf A D A G G Hf Hf C 5 Vdc for SAFETY MCU B 5 Vdc C GAS VALVE OVERHEAT INPUT AIR PRESSURE SWITCH INPUT A FAN G C Nf GAS VALVE CIRCUIT Hf G D G FLAME ELECTRODE Nf B FLA...

Page 55: ... NEUTRAL GAS VALVE 5 120 VRAC NO 6 120 VRAC NO CN8 POWER SUPPLY OUT 1 120 VAC LINE HT 120V AC 2 120 VAC NEUTRAL CN4 PROTECTIVE EARTH 1 CN7 PROTECTIVE EARTH 1 CN9 PROTECTIVE EARTH 1 CN26 NTC HEAT RETURN 1 5V SELV 5V 2 CH RETURN NTC SENSOR SIGNAL NTC HEAT FLOW 1 3 5V 4 CH FLOW 1 NTC SENSOR SIGNAL 5 NOT USED 6 NTC FLUE 7 5V 8 FLUE NTC SENSOR SIGNAL AIR PRESSURE SWITCH 9 24V SELV 24V 10 APS DETECTION ...

Page 56: ...US2 11 EBUS2 SIGNAL SELV 24V 12 GROUND CN16 FAN MANAGEMENT 1 GROUND SELV 24V 2 PWM FAN DRIVER 3 HALL_EFFECT SENSOR 4 24V CN19 EXTERNAL CLIP IN 1 24V SELV 24V 5V 2 GROUND 3 CLIP IN SERIAL TX SIGNAL 4 CLIP IN SERIAL RX SIGNAL CN12 HMI 1 5V SELV 24V 5V 2 GROUND 3 HMI SERIAL TX SIGNAL 4 HMI SERIAL RX SIGNAL 5 24V CN22 PWM PUMP 1 PWM PUMP SIGNAL SELV 24V 2 NOT USED 3 GROUND CN23 FLAME 1 FLAME SENSOR SI...

Page 57: ...ier to size pipes tanks and 100 lockup gas pressure regulator Adjust propane supply regulator provided by the gas supplier for 14 inches w c maximum pressure B Gas Connection Requirements 1 Install the factory supplied 3 4 NPT gas adapter and gasket onto the gas connection of the boiler NOTE The boiler gas connection is a straight thread and seals via the factory supplied gasket to the factory sup...

Page 58: ...leted and the heat exchanger is filled with water Doing so will damage the boiler and void the warranty Figure 74 Gas Valve Detail Figure 75 Remove Yellow Cap 7 Use a manometer to test the gas pressure to make sure it meets the minimum standards and does not exceed the maximum standards of the boiler 8 Leak test the gas line pipe before placing the boiler in operation Only use approved leak detect...

Page 59: ...error After pressing the Reset button to clear an error condition the button will flash for five 5 seconds Display Icon Description Digits Indicating Boiler Status Temperature oF with bar level Error Codes ERROR Press Reset Button Request RESET boiler lockout Menu Settings Technical assistance request Flame detected with indication of power used CH Heating Operation Set CH Heating Operation Active...

Page 60: ...ome screen by pressing the DHW buttons See Figure 79 The DHW temperature range is 97 140oF The previously set value will flash on the display Figure 79 Domestic Hot Water DHW Temperature Adjustment DANGER Hotter water increases the risk of scald injury Scalding may occur within five 5 seconds at a setting of 140o F Water temperature over 125o F can instantly cause severe burns or death from scalds...

Page 61: ...ature Control AUTO OFF 1 Basic Temp Control without Optional Room Sensor or Outdoor Sensor 2 Indoor Temp Reset With Optional Room Sensor 3 Outdoor Temp Reset With Included Outdoor Sensor or weather from the internet if the boiler is connected to WiFi 4 Indoor and Outdoor Temp Reset With Optional Room Sensor and Included Outdoor Sensor or weather from the internet if the boiler is connected to WiFi...

Page 62: ...eset The boiler target temperature automatically adjusts between the Min and Max Temperature Settings 4 2 6 and 4 2 5 based on the input temperature provided by the included Outdoor Sensor or Internet Weather via WiFi connection in accordance with the following formula Boiler Target Temp Min Temp 4 2 6 Slope of Outdoor Reset Curve 4 2 2 X Room Setpoint 4 0 0 Outdoor Temp Parallel Shift of Reset Cu...

Page 63: ...match the needs of the heating system The function boosts the boiler target temperature by increasing the Slope 10 every 10 minutes a call for heat is continuously active to a maximum of 2X the nominal Slope setting 4 2 2 While the heat call is satisfied the Slope decreases by 1 every minute to a minimum of the nominal Slope setting 4 2 2 Auto Boost is only applicable when 4 2 1 3 or 4 NOTE The bo...

Page 64: ...AFTER ENTERING THE ACCESS CODE To access the Menus proceed as follows in this example Parameter 2 3 1 1 Simultaneously press the and buttons for 5 seconds The display shows 222 2 Press the button to select 234 the service code 3 Press the OK button The display shows the first quick setting PCB 4 Press the button until the display shows MENU 5 Press the OK button The display shows menu 0 6 Press th...

Page 65: ...eating 2 5 Domestic Hot Water 6 Boiler Manual Settings 7 Test Utilities 8 Reset Factory Settings 10 Others parameters 4 Zone1 Parameters 0 Setpoint 1 S W Changeover 2 Z1 Settings 3 Z1 Diagnostics 7 Z1 Regulation parameters 5 Zone2 Parameters 0 Setpoint 1 S W Changeover 2 Z2 Settings 3 Z2 Diagnostics 7 Z2 Regulation parameters 6 Zone3 Parameters 0 Setpoint 1 S W Changeover 2 Z3 Settings 3 Z3 Diagno...

Page 66: ...F 1 2 BOILER PARAMETERS 2 0 GENERAL 2 0 0 DHW Setpoint Temperature WCN Models 97 140 F 125 Also settable via the home screen see item 2 Figure 76 not applicable when 2 2 8 2 DHW Setpoint Temperature WBN Models 104 149 F 125 2 0 1 DHW Preheating 0 Disabled 1 Enabled 1 Enables disables comfort on off setting via COMFORT button and parameter 2 5 0 2 1 FREE PARAMETERS DO NOT USE 2 1 1 DO NOT USE 2 1 2...

Page 67: ... WBN models set to 2 Always On This is not changeable NOTE On WBN models the COMFORT button on the display is disabled and this function cannot be changed ELU WCN models set to 0 Deactivated COMFORT function is not active ELU WCN models set to 1 or 2 On activates conditionally once per Comfort Anti cycling Time Activating the COMFORT function keeps the DHW heat exchanger temperature warm when a DH...

Page 68: ...T FACTORY SETTINGS 2 8 0 Automatically resets all parameters to the factory defaults WARNING Always check PCB settings if restoring factory default settings on a replacement controller Replacement controllers have generic settings that may not be specific to the boiler model Reset OK yes ESC no To Reset all parameter settings press the OK button 2 10 OTHERS PARAMETERS 2 10 0 CH On Differential Tem...

Page 69: ...NTER CHANGEOVER 4 1 0 S W function activation 0 OFF 1 ON 0 4 1 1 S W temperature threshold 50 86 F 68 4 1 2 S W delay time 0 300 minutes 60 4 2 ZONE 1 SETTINGS 4 2 0 Temperature Range 0 1 1 This parameter determines the starting boiler target temperature when using Basic Temp Control 4 2 1 1 4 2 1 Type of Temperature Control 0 Fixed Outlet Temperature 1 Basic Temp Control 2 Indoor Temp Reset 3 Out...

Page 70: ...hen using an optional HTP Room Sensor and when 4 2 1 2 or 4 4 2 5 MAXIMUM Temperature Setting 68 179 F 179 if Parameter 4 2 0 1 68 179 F 179 if Parameter 4 2 0 0 4 2 5 sets the allowable boiler operating temperature range for Zone 1 heating limiting Automatic Temperature Control and manual adjustments from the User Menu 4 2 6 MINIMUM Temperature Setting 68 179 F 95 if Parameter 4 2 0 1 68 179 F 95...

Page 71: ...rature setting 68 179 F 95 if parameter 5 2 0 1 68 179 F 95 if parameter 5 2 0 0 5 2 6 sets the allowable boiler operating temperature range for Zone 2 heating limiting Automatic Temperature Control and manual adjustments from the User Menu 5 3 ZONE 2 DIAGNOSTICS 5 3 0 Room Temperature Read only Only applicable when using an HTP room sensor 5 3 1 Room Temperature Setpoint Read only 5 3 4 Heat Call...

Page 72: ...re range for Zone 3 heating limiting Automatic Temperature Control and manual adjustments from the User Menu 6 3 DIAGNOSTICS 6 3 0 S W function activation 0 OFF 1 ON 0 Only applicable when using an HTP room sensor 6 3 1 S W temperature threshold 50 86 F 68 6 3 4 S W delay time 0 300 minutes 60 6 7 ZONE 3 REGULATION PARAMETERS 6 7 5 Auto Boost 0 OFF 1 ON 0 See description of Parameter 475 8 SERVICE...

Page 73: ...icable warning that it is time for maintenance 8 5 1 Enable Maintenance Warning 0 OFF 1 ON 0 8 5 2 Maintenance Warning Reset Reset OK Yes Esc No Resets Maintenance Advice and clears the Warning 8 5 4 SW Version Display Interface 8 5 5 SW Version Main Controller 8 6 ERROR HISTORY 8 6 0 10 last errors ERROR 0 ERROR 9 This parameter displays the last 10 boiler errors indicating the error code day mon...

Page 74: ...ler for gas odorant or any unusual odor Remove boiler front door and smell interior of boiler enclosure Do not proceed with startup if there is any indication of a gas leak Repair any leaks at once PROPANE BOILERS ONLY The propane supplier mixes an odorant with the propane to make its presence detectable In some instances the odorant can fade and the gas may no longer have an odor Before startup a...

Page 75: ...ler to cycle E Purge Air from DHW System WARNING Ensure the boiler is full of water before firing the burner Failure to do so will damage the boiler Such damage IS NOT covered by warranty and could result in property damage severe personal injury or death 1 Make sure the CH and DHW lines are open and full of water Turn on all electric power to boiler 2 Open hot water faucets in the DHW system Star...

Page 76: ...e Press the Auto button for 5 seconds NOTE It is VERY IMPORTANT to complete this purging process 8 Purge air from the CH and DHW systems After CH system purging is complete verify that system pressure is at least 12 psi on the pressure gauge NOTE The water pressure switch safety is set at 8 psi to protect A First Ignition 1 Make sure that the gas valve is closed and the electrical connections have...

Page 77: ...stion Settings ATTENTION Obtain all values with the front cover installed If the CO2 reading differs from the values given in the table adjust the gas valve following the instructions below Otherwise move directly to Operation 4 Adjusting the Gas Valve at Maximum Gas Flow Adjust the gas valve by turning setting screw 4 clockwise to increase the CO2 level counterclockwise to reduce the CO2 level 1 ...

Page 78: ... valve following the instructions below Otherwise move directly to Operation 5 AdjustingtheGasValveatMinimum Gas Flow Remove cap and adjust screw 2 by turning counter clockwise to reduce the CO2 level clockwise to increase the CO2 level Wait 1 minute after each adjustment for the CO2 value to stabilize WARNING Minimum Gas Flow Adjustment is very sensitive If the value measured corresponds to the v...

Page 79: ...150 Max CH 85 120 106 120 Min 9 400 13 200 11 200 13 200 Table 30 Table Summarizing Powers D Converting the Appliance from Natural Gas to Propane Operation ELU NATURAL TO PROPANE CONVERSION INSTRUCTIONS For Qualified Technician Installation Instructions This conversion kit shall be installed by a qualified service agency in accordance with the manufacturer s instructions and all applicable codes a...

Page 80: ...umulation level Is vent piping properly supported Has vent piping been checked for leaks Has the exhaust vent line been pitched back to the boiler at a rate of 1 4 per foot Have the exhaust vent and intake pipes been properly installed to the boiler Is the condensate drain supported so as to not place strain on the boiler s condensate outlet fitting Install Condensate Piping Tubing and Components ...

Page 81: ...NOTE Contact a qualified service technician if the error continues to occur In the event of Error 108 Shut off due to insufficient water pressure inside the heating circuit Pressure can be increased by filling the heating circuit See filling and purging procedures this manual If Error 108 occurs frequently and system needs repeated refilling turn the boiler off Turn the Figure 93 Blocking Error Ex...

Page 82: ...appens again 1 Check the water pressure on the pressure gauge 2 Purge the air from the central heating circuit 3 Check for the correct functioning and positioning of the supply and return temperature probes 4 Check for the correct functioning and positioning of the circulation pump 1 08 Fill system No water in the primary circuit P Pmin This Error Code will go away when the condition is remedied I...

Page 83: ...any 5 resets in 15 minutes Switch the boiler OFF and ON at the main electrical power supply Blocking Auto Reset 1 1 Turn Off the Power to the Boiler 3 05 PCB internal error Switch the boiler OFF and ON at the main electrical power supply If the problem happens again replace the main PCB Blocking Manual Reset 3 06 PCB internal error Switch the boiler OFF and ON at the main electrical power supply I...

Page 84: ...ion Ensure pressure is between 3 5 and 10 5 WC Natural Gas or between 8 and 13 WC for boilers converted to Propane LP operation 2 Check gas valve wire Ensure connection is secure 3 Check flame detection sensor Ensure connections are secure Normal operating settings are more than 2 5DC before ignition less than 2 5DC after ignition 4 Check igniter transformer for proper connection 5 Clean the spark...

Page 85: ... not zero replace the switch 3 Check APS hose Ensure it is connected and in good condition 4 Check condensate line and termination for blockages 5 Check exhaust vent for blockages 6 If the problem persists replace the main control 6 05 Exhaust NTC circuit open or short circuit This Error Code will go away when the condition is remedied 1 Check exhaust temperature sensor Ensure connections are dry ...

Page 86: ...e Pipe Terminations Verify that the boiler exhaust vent and intake pipe terminations are clean and free of obstructions Remove any debris from the exhaust B Maintenance That May be Performed by the User vent or intake pipe openings If removing the debris does not allow the boiler to operate correctly contact your qualified service technician to inspect the boiler and the vent system Check Exhaust ...

Page 87: ...der to avoid the need for repeated draining Ensure the antifreeze used is compatible with the stainless steel boiler heat exchanger WARNING NEVER use any toxic chemical including automotive standard glycol antifreeze or ethylene glycol made for hydronic non potable systems These chemicals can attack gaskets and seals in water systems are poisonous if consumed and can cause personal injury or death...

Page 88: ...N95 This type of respirator is based on the OSHA requirements for cristobalite at the time this document was written Other types of respirators may be needed depending on job site conditions Current NIOSH recommendations can be found on the NIOSH website http www cdc gov niosh homepage html NIOSH approved respirators manufacturers and phone numbers are also listed on this website Wear long sleeved...

Page 89: ...ion chamber by spraying water or solution into the combustion assembly and monitor the flow through the combustion system Liquid should flow freely through each tube If there is an obstruction increase the flow on the tube to force blockage out Figure 102 Remove the Combustion Assembly 2 Figure 104 Disassembled Burner Assembly 13 After all maintenance is complete reinstall the combustion assembly ...

Page 90: ...pported with pipe supports and pitched per foot to allow for proper drainage The condensate line must remain unobstructed allowing free flow of condensate If condensate freezes in the line or if line is obstructed in any other manner condensate can exit from the tee resulting in potential water damage to property 3 Refill the condensate trap with fresh water prior to operating the boiler 4 If a co...

Page 91: ... Proceed in the reverse order to reinstall the components Figure 108 Removing the Fan Replacing the Fan 1 Remove the silencer and gas line as described in Cleaning the Heat Exchanger Combustion Chamber 2 Loosen the three 3 screws to release the Mixer 1 from the fan 5 Ensure the O Ring 4 is not damaged or deteriorating DANGER Failure to replace damaged or deteriorating gaskets or O Rings will resul...

Page 92: ...om the valve 3 Pull the by pass valve assembly upwards Removing the By Pass Valve ELU 120WCN and ELU 150WCN The by pass valve is located in the right hydraulic block To remove it 1 Ensure the boiler is drained of water 2 Rotate clockvise to unhook the locking ring of the diverter valve 3 Remove the securing clip from the valve 4 Pull the by pass valve assembly upwards Figure 110 Remove the Clip Fi...

Page 93: ...described in Cleaning the Heat Exchanger Combustion Chamber 2 Loosen and remove the CH relief valve 3 Loosen and remove the CH relief valve pipe and gasket 4 Remove the securing clips from positions a and b Figure 116 Remove the CH Pressure Relief Valve 5 Disconnect the plastic pipes from the manual breather a b Figure 117 Remove the CH Outlet Pipe 6 Disconnect the heating supply pipe 7 Disconnect...

Page 94: ...TY WARNING Allowing the boiler to operate with a dirty combustion chamber will hurt operation Failure to clean the heat exchanger as needed by the installation location could result in boiler failure property damage personal injury or death Such product failures ARE NOT covered under warranty The combustion chamber insulation in this product contains ceramic fiber material Ceramic fibers can be co...

Page 95: ...e Clean Set gap at 1 8 CONDENSATE Condensate Trap Clean debris from the condensate trap Fill with clean water Neutralizer Check condensate neutralizer Replace if necessary Condensate hose Disconnect condensate hose Clean out dirt and re install NOTE Verify the flow of condensate making sure that the hose is properly connected during final inspection GAS Pressure Measure incoming gas pressure 3 5 t...

Page 96: ...cumstances a qualified service technician should be contacted immediately to properly service the boiler and correct the problem If a technician is not available press a button on the display to wake it Then press the RESET button to remove the lockout state so additional trials for ignition can be performed If the RESET key is not pressed error code 501 or 503 the boiler will reset automatically ...

Page 97: ...420010970304 LP 700 Rev 000 Rel 002 Date 4 21 21 97 Maintenance Notes ...

Page 98: ...420010970304 LP 700 Rev 000 Rel 002 Date 4 21 21 98 ...

Page 99: ...420010970304 LP 700 Rev 000 Rel 002 Date 4 21 21 99 ...

Page 100: ... of Installation Installation Address Product Name Serial Number s Comments Installer s Code Name Installers Phone Number Signed by Installer Signed by Customer Installation Notes IMPORTANT Customer Please only sign after the qualified installer service technician has fully reviewed the installation safety proper operation and maintenance of the system If the system has any problems please call th...

Reviews: