background image

31 


7. Product data 

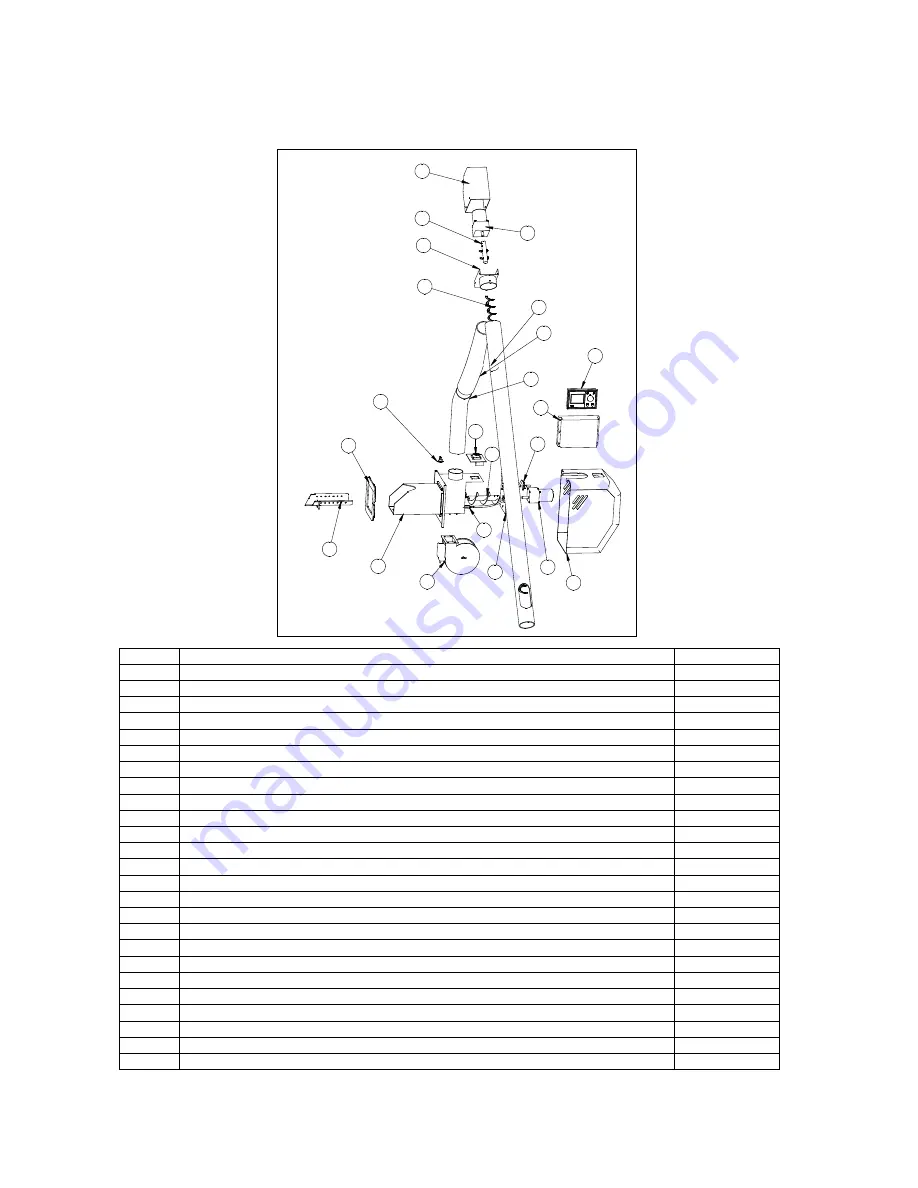
7.1 Spare parts Scandpell 


Item 

Description 

Part no. 

Burner housing 

016024 

Burner cartridge 

016002 

Fan (black model) 

016003 

Fan (blank model) 

016030 

Back plate for burner  

016004 

Ignition element 

016005 

Electrical connection plate 

016006 

Fibre gasket 

016007 

Burner auger motor 

016008 

Burner auger 

016009 

10 

Flame sensor 

016010 

11 

Feeder motor 

016017 

12 

Feeder auger 

016016 

13 

Auger pipe 

016015 

14 

Feeder motor cover 

016021 

15 

Anchor 

016019 

16 

Anchor plate 

016018 

17 

Burner cabinet 

016011 

18 

Control unit 

016040 

19 

Downpipe, metal 

016013 

20 

Flexible downpipe 

016012 

21 

Bi-metal sensor 

016022 

22 

Control box 

016025 

Boiler temperature sensor 

016026 

Extra temperature sensor (5 meter) 

016027 

4

3

2

5

6

7

8

9

11

12

13

10

016000

14

15

16

19

20

21

17

Pos

Vare nr.

Tekst

1

016024

Brænderhoved

2

016002

Brænderzone

3

016003

Ventilator

4

016004

Bagplade for brænder

5

016005

Tændelement

6

016006

Elforbindelse

7

016007

Fiberpakning

8

016008

Sneglemotor brænder

9

016009

Snegl brænder

10

016010

Flammesensor

11

016017

Sneglemotor

12

016016

Snegl

13

016015

Snegle rør

14

016021

Kappe for snegl

15

016019

Aksel for snegl

16

016018

Holder for snegl

17

016011

Kappe for brænder

18

016014

Styring

19

016013

Rør for brænder

20

016012

Flexrørfor brænder

21

016022

Bimetalsensor

22

016025

Styringsboks

1

18

22

Summary of Contents for TPK

Page 1: ...1 with or without Scandpell ...

Page 2: ...tion with solar hot water storage tank 15 3 5 Installing the TPK 16 3 5 1 Clearance requirements 16 3 5 2 Base 16 3 5 3 Flue chimney 17 4 Initial operation TPK with Scandpell 18 4 1 Filling the feeder tube 18 4 2 Test of fuel quantity 19 4 3 Starting the Scandpell burner 19 4 4 Setting of output and combustion air 19 5 Daily use 20 5 1 TPK with Scandpell 20 5 1 1 Operating the control unit 20 5 1 ...

Page 3: ... ready for connection to the burner itself The boiler is configured for connecting a Scandpell pellet burner on its left or right side the opposite side being sealed with an insulated blank The boiler is fitted as standard with a manually operated cleaning mechanism for the heat exchanger The cleaning mechanism is configured for upgrading to fully automatic function This function is provided by th...

Page 4: ...is configured for connecting a pellet burner on its left or right side or if neither of these positions can be used it can be connected via the cleaning access door The boiler is fitted as standard with a manually operated cleaning mechanism for the exchanger Cleaning shovel ash pan and steel brush ...

Page 5: ...er version 2 Control unit for Scandpell 3 Overheat thermostat 4 Scandpell burner can be connected to the left or right side Shown here on the left side 5 Mechanical cleaning system for heat exchanger 6 Cleaning access door with inspection window 7 Filling air vent 8 Connector for attaching pressure gauge 1 2 3 5 6 4 5 7 8 ...

Page 6: ...either left or right side 11 Mechanical cleaning system for heat exchanger 12 Cleaning access door with inspection window can be used to connect burners that cannot be connected to left or right side 13 Sensor housing 14 Manual air vent 15 Connector for attaching optional pressure gauge 9 11 11 12 13 14 15 10 ...

Page 7: ...head with pre fitted fan distribution circuit board stoker motor igniter light sensor and max temperature thermostat 2 Burner plate 3 Rigid downpipe 4 Flexible downpipe 5 Burner cover 6 Feed pipe 1 7 metre with feeder motor 7 Control unit The control unit is pre fitted to the boiler at delivery and all plug in connectors are ready for connecting to the burner The boiler sensor is placed in the boi...

Page 8: ...pell can be installed using either of the holes in the side of the boiler It may instead be necessary to install the burner via the front cleaning access door This cleaning access door is not pre prepared for installation of this kind and it may require specific adaptation for the burner in question The distance from the front of the boiler to its back wall is 515 mm This distance must be sufficie...

Page 9: ...dpell 2 Loading Unit 55 C you could also use a thermostatic 3 way valve and pump use a balancing valve on the shunt loop 3 Safety valve 4 Storage tank type O 800 1000 or 1500 liter 5 Heating circuit pump 6 Hot water tank VBF 85 VBF 100 or VBF 150 7 Thermostat with external sensor bulb 8 Expansion tank the size should be adapted to the total volume of the system 9 Automatic air vent Please note tha...

Page 10: ...n tank the size should be adapted to the total volume of the system Please note that on this installation the summer winter function cannot be used To be set to winter standard set up Control unit set up Function of extra sensor is set to the storage tank Service menu Pump function Boiler pump Service menu Set the desired storage tank temperature storage tank menu in User s menu Storage tank minim...

Page 11: ... hot water priority pump 5 Expansion tank the size should be adapted to the total volume of the system 6 Safety valve 7 Non return valve If it is decided that the control unit s hot water facility is to be used it is important that the non return valve is installed as shown in the diagram The summer winter function could easily be used with this kind of installation Boiler parameters in User s man...

Page 12: ... Thermostat with external sensor bulb 5 Expansion tank the size should be adapted to the total volume of the system 6 Safety valve Please note that on this installation the summer winter function cannot be used To be set to winter standard set up Control unit set up Function of extra sensor is set to OFF Service menu Pump function Boiler pump Service menu The boiler temperature is set by turning t...

Page 13: ... tank type OS and separate domestic hot water tank 1 TPK Scandpell 2 Loading unit 55 C you could also use a thermostatic 3 way valve and pump use a balancing valve on the shunt loop 3 Storage tank type OS 800 1000 or 1500 liter 4 Heating circuit pump 5 Hot water tank VBF 85 VBF 100 or VBF 150 6 Thermostat with external sensor bulb 7 Expansion tank the size should be adapted to the total volume of ...

Page 14: ...r collector system jointly heat the storage tank The system side runs independently of the boiler and solar collector system In cases of over production of energy from solar collector system the 3 way zone valve shifts from the normal flow from the storage tank to the top of the storage tank In cases where the solar collector system generates so much energy that the storage tank is at risk of over...

Page 15: ...strainer spring loaded prevents gravity circulation 8 Hydraulic separator The solar collector system is the primary domestic hot water production system The boiler supplies auxiliary heating if need be Excess heat is removed from the domestic hot water storage tank when the energy production from the solar collector system is so much that the temperature in the storage tank exceeds the set maximum...

Page 16: ...als is decisive This means that according to Danish regulations there must be a minimum distance of 0 3 metres from the surfaces of not insulated flues to flammable materials If manufactured insulated pipes with approved clearances are to be used there must be compliance with these clearances 3 5 2 Base The boiler must be placed on a dry level and non flammable base The base must be non flammable ...

Page 17: ... fitted into an existing chimney In both cases a condensate drain must be fitted in the bottom of the vertical section of the flue and the part of the flue between the boiler and the vertical section should be insulated Necessary minimum chimney draft 0 1 mbar 3 5 3 2 TPK with a burner from another supplier When installing a burner other than a Scandpell the same precautions should usually be take...

Page 18: ...ol to confirm the selected value The default factory setting is 3 minutes which in most cases is less than the required value It is important however not to select a run time that is considerably longer than is necessary When the feeder motor is started up for the first time it can only be stopped by disconnecting the control unit from the mains power supply If the feeder tube is filled with so mu...

Page 19: ...e feeder tube must be filled with wood pellets before the burner is started It might be necessary to adjust the correct quantity for firing 4 4 Setting of output and combustion air Outputs and correct quantity of combustion air depend on the fuel used Therefore always measure CO and O2 emissions from the flue gases Correct set quantity of air at both output levels should give between 10 12 O2 in t...

Page 20: ...on To change a value press this button to select the parameter Turn this button to select parameters in menus Turn the button to change a value clockwise to increase the value and counter clockwise to reduce the value When the display is shown rotate the button and you can either set the boiler temperature or if the storage tank function is chosen you can set the storage tank tempera ture STOP Pre...

Page 21: ...as boiler pump Display when neither hot water nor storage tank function is activated and the pump is activated as heating pump Display when storage tank function is activated Display when hot water tank function is activated Menu functions Pressing the MENU button provides access to the USER and SERVICE MENUS ...

Page 22: ...peed at ignition Pellet volume 15 sec 1 sec 60 sec Operating time for feeder motor at ignition Light sensor Current light strength 0 1023 Current light value cannot be set Minimum light strength 5 10 0 1023 Min light value for fire in the fuel Feeder auger filling Do you want to start filling the feeder auger Yes No Used for force filling the feeder auger e g at start up following a dry run Time s...

Page 23: ...f ignition attempts Max number of attempts 2 1 10 Max number of extra ignition attempts Cleaning time 30 sec 1 sec 200 sec Pre ventilation of burner before start of ignition Burn out Burn out time 15 sec 1 sec 900 sec Fan run time after shut down Burner auger Burner auger ON ON OFF Run time at stop 20 sec 1 sec 200 sec Required time for removing fuel out of the internal auger Pause 3 sec 2 sec 200...

Page 24: ...utput hysteresis respectively The shift between high and low outputs can be adjusted by using the hysteresis for each of the output levels The default hysteresis is 5 C for low output and 10 C for high output under Low output and High output respectively in the Service menu When the boiler temperature is increasing the burner will change over from high to low output when the boiler temperature is ...

Page 25: ...the entire storage tank will be heated through and therefore the same temperature as the boiler This requires sufficient flow in the system so that all the energy produced in the boiler is transferred to the storage tank otherwise the burner stops when max boiler temperature is reached The pump must be set to be boiler pump and operate as long as the burner will not be in standby or manually stopp...

Page 26: ...ry to clean them out more than once a month 5 2 3 Scandpell The frequency of necessary cleaning will vary depending on the quality of the wood pellets and the type of burner and settings used However an interval of less than 14 days is recommended Cleaning the burner cartridge and inside the burner head is usually sufficient This is done by lifting out the burner cartridge and removing ash from th...

Page 27: ...nt is reached hot water function or until the boiler max temperature is reached storage tank function perhaps change over to a kind of operation without use of extra sensor until a new sensor can be installed Connection to extra sensor is cut off extra sensor selected for hot water ERROR in storage tank Extra sensor is defective extra sensor selected for storage tank Connection to extra sensor is ...

Page 28: ...tly check whether there is any voltage The feeder auger is full of sawdust Test the quantity of fuel that the feeder auger can give see 4 2 The light sensor is defective Remove the light sensor go into the menu Light sensor in User s menu select Current light strength at daylight the light sensor must show a value 200 The light sensor is dirty Remove the light sensor and check its surface clean th...

Page 29: ...tput Chose Ignition You can manually inspect if the ignition element gets warm or not take care of your hands do not touch the metal parts directly around the ignition element o The fan speed is too high during the ignition Test Go into the Service Menu press shortly on the menu button Chose Ignition and hereafter Fan level The value shall be within 2 4 approximately 30 13 17 for burners with blan...

Page 30: ...ference in the span 5 8 o The hysteresis of the light sensor is too low Test Go into Service Menu Select Light sensor and sub menu Hysteresis The value shall be at least 15 raise it to level 5 If this does not help that is after a maximum adjustment of 10 15 the failure is not here do not adjust any higher as this can shorten the lifetime of the ignition element The ignition time time between mini...

Page 31: ...013 20 Flexible downpipe 016012 21 Bi metal sensor 016022 22 Control box 016025 Boiler temperature sensor 016026 Extra temperature sensor 5 meter 016027 4 3 2 5 6 7 8 9 1 1 1 2 1 3 1 0 016000 1 4 1 5 1 6 1 9 20 21 1 7 Pos Vare nr Tekst 1 016024 Brænderhoved 2 016002 Brænderzone 3 016003 Ventilator 4 016004 Bagplade for brænder 5 016005 Tændelement 6 016006 Elforbindelse 7 016007 Fiberpakning 8 016...

Page 32: ...35 Adjustable plate 2 015915 Side panel 8 015934 Supports 3 015916 Back panel 9 015947 Internal control unit holder 4 015917 Front panel 10 015985 Blank panel 5 015918 Top 11 015948 Cover plate at fitting 6 015919 Cover 12 090004 Overheat thermostat GODKENDT 1 2 3 4 5 6 8 7 9 1 1 1 0 1 2 Pos 1 2 3 4 5 6 7 8 9 10 11 12 ...

Page 33: ...13139 Inspection window 21 015940 Handle man cleaning 9 013367 1 surround 22 015941 Disc for cleaning motor 10 013155 Fastener 23 015942 Axel cleaning motor 11 015924 Connecting rod 24 013055 Spherical handle 12 020003 Gear motor 25 013103 Cylindrical handle 13 015930 Attachment for gear motor 26 012210 Sensor pocket extra equipment GODKENDT INIT BV 7 26 1 1 0 6 3 2 24 4 25 8 5 9 1 5 27 1 1 1 3 1 ...

Page 34: ... Ignition element 17 Light sensor 8 Fan N 18 Bi metal sensor overheating sensor 9 Fan PH 19 Bi metal sensor overheating sensor 10 7 3 1 2 Connection between the grey control box and the black operating panel The connection between the grey part of the control unit mounted inside the cabinet and the black operating panel consists of a 4 conductor cable between the terminal blocks identified as term...

Page 35: ...ater sensor storage tank sensor 3 Hot water pump 13 Boiler sensor 4 Cleaning motor not fitted as standard A Frame 5 Feeder motor B Data 6 Fan C 12 V 7 Stoker motor D Data 2 8 Heating element ignition 9 Light sensor 10 Overheating fuse sensor in the burner the temperature sensor is either used as hot water sensor or storage tank sensor 1 2 3 4 5 6 7 8 9 1 0 1 1 1 2 1 3 N L N L N L N L N L L L L N L...

Page 36: ...candpell unit the TPK is equipped with an overheat thermostat that is connected on delivery to the power supply 7 3 4 Function check of the safety system NB Any work involving high voltage electrical connections should only be carried out by a qualified installer Testing fan function With the burner working undo the wire in terminal 9 phase supply to the fan on the connection circuit board in the ...

Page 37: ...t 20 C room temp Nominal output C 135 Minimum output C 80 Electrical supply Voltage VAC 230 Frequency Hz 50 Required output max at ignition W 300 Required output operation W 80 7 5 2 TPK Output kW 6 5 24 Efficiency together with Scandpell 90 91 Weight kg 230 Combustion chamber depth mm 520 Height incl cabinet mm 1270 Width flange to flange mm 600 Depth total mm 745 Depth base plate mm 590 Height t...

Page 38: ...38 8 EEC declaration of conformity ...

Page 39: ...39 9 Test certificate ...

Page 40: ...40 Rev 11 100913 ...

Reviews: