


TP585L User Manual
22
6 TROUBLESHOOTING
Your printer is very reliable, but occasionally problems may occur. This chapter provides
information on some common problems you may encounter and how to solve them. If you
encounter problems that you can not resolve, contact your dealer for assistance.
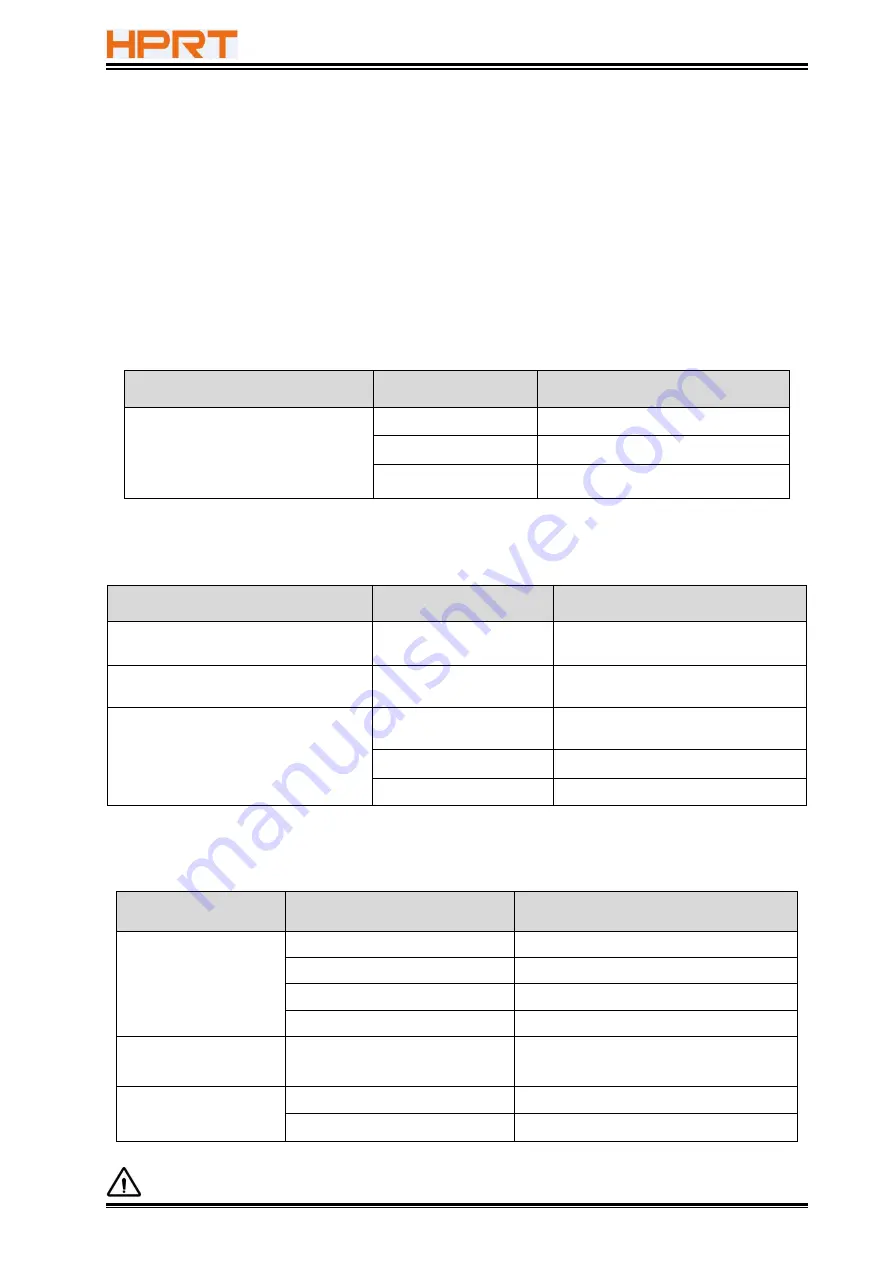
6.1 Printer Not Working
Problem Description
Probable Reason
Solution
LED indicator is off, printer is not
working
Printer has no power
Connect printer to power supply
Printer is not on
Turn on the printer
Circuit board is broken Contact with the dealer
6.2 LED Indicator and Beeper Alarm
Problem Description
Probable Reason
Solution
LED indicator is red and flashing,
buzzer alarms
Printer cover open
Close the printer cover
LED indicator is always on with red
colour and beeper alarms
Paper end
Reload the paper roll
Printer does not work and beeper
alarms
Thermal print head is
over-heated
Turn the printer off and resume
when it cools
Over-voltage
Print with specified voltage
Low-voltage
Print with specified voltage
6.3 Troubles Occur During Printing
Problem Description
Probable Reason
Solution
Blurred printing or spot
Incorrect paper roll loading
Check if the paper roll is loaded
Unqualified paper roll
Use recommended thermal paper roll
Dirty thermal head or print roller Clean the thermal head or print roller
Low print density
Increase the print density level
Paper is not feeding
normally
Paper jam
Open the printer cover, check the paper
path and remove jammed paper
Vertical print words are
missing
Dirty thermal head or print roller Clean the thermal head or print roller
Thermal head is damaged
Contact with your dealer for assistance
Note: about the density setting, please refer to Chapter 8.
Summary of Contents for TP585L
Page 26: ...TP585L User Manual 26 4 Click Next 5 Select start menu folder Click Next ...
Page 27: ...TP585L User Manual 27 6 Click Install 7 Click Finish Utility is installed successfully ...
Page 32: ...TP585L User Manual 32 8 2 1 4 Connection Test 1 Choose the printer Click Connection Test ...
Page 49: ...TP585L User Manual 49 Auto Line Feed DPI Mode Default 203DPI USB Port Mode ...
Page 51: ...TP585L User Manual 51 Return to the printer utility and click Modify Printer ...
Page 52: ...TP585L User Manual 52 Change the port to COM2 COM2 ...
Page 57: ...TP585L User Manual 57 8 3 Firmware Update 1 Click FW Update ...
Page 61: ...TP585L User Manual 61 4 Click Next ...
Page 68: ...TP585L User Manual 68 Feed Paper Feed Distance 0 5 10 15 20mm End Document ...
Page 69: ...TP585L User Manual 69 Cash Drawer Custom Command ...
Page 71: ...TP585L User Manual 71 Click Download Click Add to add a logo BMP format is recommended ...
Page 73: ...TP585L User Manual 73 Select Printer properties in Devices and Printers then click Preference ...
Page 74: ...TP585L User Manual 74 Click the Advanced then click Logo ...
Page 76: ...TP585L User Manual 76 Then click OK ...
Page 77: ...TP585L User Manual 77 Click Print Test Page to view the printing effect ...
Page 79: ...TP585L User Manual 79 Code Page ...
Page 80: ...TP585L User Manual 80 3 Click Watermark Set watermark to print ...
Page 81: ...TP585L User Manual 81 4 Click Halftone to set the halftone ...
Page 84: ...TP585L User Manual 84 Add Barcode firstly ...
Page 85: ...TP585L User Manual 85 Set the Font Name and the Barcode Option ...
Page 86: ...TP585L User Manual 86 Click the Printer Setting Choose the Display Language for Properties ...
Page 88: ...TP585L User Manual 88 ...
Page 89: ...TP585L User Manual 89 ...
Page 90: ...TP585L User Manual 90 ...
Page 93: ...TP585L User Manual 93 Select the System Font for example Arial ...
Page 94: ...TP585L User Manual 94 Select the font to that you want to replace Click Set ...
Page 95: ...TP585L User Manual 95 ...
Page 97: ...TP585L User Manual 97 3 Set the Ports 4 Click Advanced to set the printing time ...


