background image

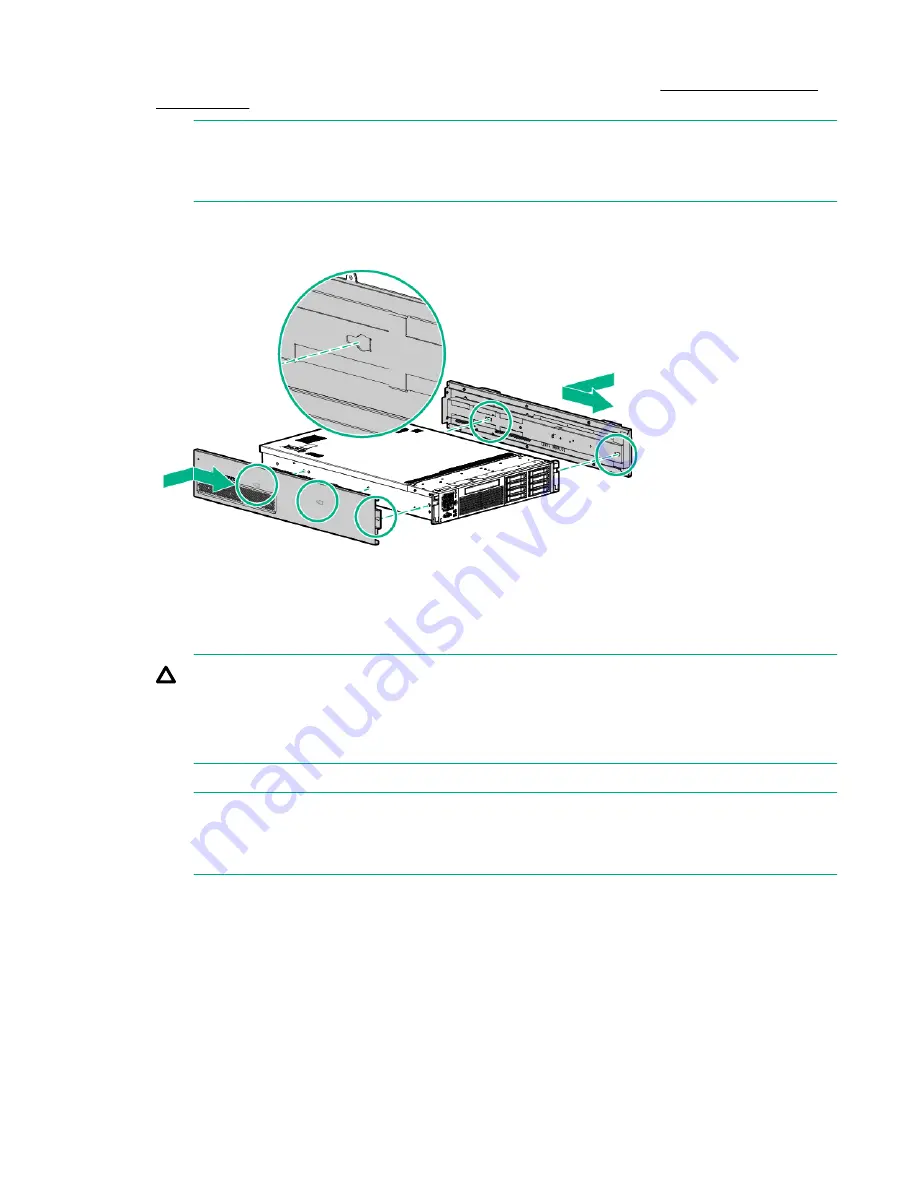
To attach the components.

1.

Align the holes in the pedestal component with the posts on the server. See 

Installing the pedestal

bottom piece

.

NOTE:

One of the holes in the pedestal component contains the locking mechanism. This makes the
hole appear partially blocked.

2.

Hold the pedestal component flush against the server.

3.

Slide the pedestal component forward until it locks into place.

Figure 3: Installing the pedestal bottom piece

4.

Stand the server up on the bottom piece of the pedestal kit that was just installed so the server is in
the vertical position.

CAUTION:

The server is heavy. Be careful when lifting it to the vertical position.

Without the feet installed, the server might tip over easily. Be careful when working near the
server to avoid tipping it over.

5.

Align the holes in the pedestal top piece with the posts on the server

NOTE:

One of the holes in the pedestal component contains the locking mechanism. This makes the
hole appear partially blocked.

6.

Hold the pedestal top piece flush against the server.

7.

Slide the pedestal top piece forward until it locks into place.

8.

The top and bottom pedestal kit pieces are now in place.

Attaching the bezel cover

To attach the bezel cover:

8

 Attaching the bezel cover

Summary of Contents for Integrity rx2800 i6

Page 1: ...rity rx2800 i6 rx2900 i6 Installation Guide Part Number 881360 001a Published August 2017 Edition 2 Abstract This document provides installation procedures for the HPE Integrity rx2800 i6 and rx2900 i...

Page 2: ...sed to the U S Government under vendor s standard commercial license Links to third party websites take you outside the Hewlett Packard Enterprise website Hewlett Packard Enterprise has no control ove...

Page 3: ...I Front Page 15 Booting and installing the operating system 18 Operating system is loaded onto the server 18 Operating system is not loaded onto the server 18 OS login prompt 19 Powering on and poweri...

Page 4: ...he main power switch is off Failure to observe this warning might result in personal injury or equipment damage Do not wear loose clothing that might snag or catch on the server or on other components...

Page 5: ...w the steps in this installation guide to determine where and how to install the server into the rack For more information on rack deployment stabilization and transportation see the 10000 Series G2 R...

Page 6: ...the server Figure 1 Removing the rails from the server Attaching the pedestal kit top and bottom IMPORTANT In this document the server top bottom right and left refer to the server as faced from the f...

Page 7: ...edestal bottom can be distinguished from the pedestal top by the pedestal feet slots Procedure NOTE The bottom piece of the pedestal is taller than the server so try to position the server so the righ...

Page 8: ...talled so the server is in the vertical position CAUTION The server is heavy Be careful when lifting it to the vertical position Without the feet installed the server might tip over easily Be careful...

Page 9: ...enable proper air flow and cooling The right side piece of the pedestal kit also has ventilation holes in it to enable the proper cooling and air flow Follow these steps to attach the pedestal kit rig...

Page 10: ...Figure 5 Attaching the pedestal kit side piece 3 Secure the pedestal side by hand tightening the captive thumb screws on the rear of the server 10 Installing the server...

Page 11: ...ll the left side piece Attaching the pedestal feet The pedestal feet slide into the slots on the pedestal bottom two on each side The feet are all the same and can be mounted in any slot on the bottom...

Page 12: ...e is still enough power supplied to the server to operate You must promptly replace the failed power supply to restore 1 1 functionality All high line 220 V configurations are capable of 1 1 redundanc...

Page 13: ...ED is green when the server is powered on to full power If the power restore feature is set to Always On through the iLO 3 MP PR command the server automatically powers on to the full power state when...

Page 14: ...counts if you are using the local accounts feature 6 Set up security access Set up the security access settings Accessing UEFI or the OS from iLO MP The Unified Extensible Firmware Interface is an arc...

Page 15: ...For typical boots Hewlett Packard Enterprise recommends that you let the prompt time out After selecting an option the boot proceeds NOTE If no option is selected the boot proceeds after a few seconds...

Page 16: ...Figure 8 Shell map page Figure 9 UEFI front page To view boot options or launch a specific boot option press B to launch the Boot Manager 16 Installing the server...

Page 17: ...he Device Manager This is an advanced feature and must only be performed when directed Figure 11 Device Manager screen To perform maintenance on the system such as adding deleting or reordering boot o...

Page 18: ...s loaded onto your server see Operating System Is loaded onto the server If the OS is not installed onto your server see Operating system is not loaded onto the server Operating system is loaded onto...

Page 19: ...to Always On through the iLO 3 MP PR command the server automatically powers on to the full power state when the power cord is plugged in to the server Ports and power supplies are located on the rear...

Page 20: ...cally powers on to the full power state when the power cord is plugged in to the server Procedure 1 Plug all power cables into the receptacles on the rear panel of the server 2 Press the power button...

Page 21: ...required components to the target SUM also has logic to install updates in the correct order and ensure all dependencies are met before deployment of a firmware update It also contains logic to preve...

Page 22: ...through the product interface Review your product documentation to identify the recommended software update method To download product updates Hewlett Packard Enterprise Support Center www hpe com su...

Page 23: ...mote support details use search to locate that information Remote support and Proactive Care information HPE Get Connected www hpe com services getconnected HPE Proactive Care services www hpe com ser...

Page 24: ...oduct can be found at www hpe com info reach For Hewlett Packard Enterprise product environmental and safety information and compliance data including RoHS and REACH see www hpe com info ecodata For H...

Reviews: